Here’s how to create a complete web app in under an hour. We will (naturally!) create a todo app. The features:
- Create, update, delete a todo
- Sort (and show sort order)
- Search
- Pagination
We’ll try to make it somewhat user friendly, e.g.
- Date-picker widget for todo due date
- Enable/disable buttons as appropriate for context
Our infrastructure will be:
- Backend Language: C#
- Backend Framework: WebApi
- Database: SQL Server (including SQL Express LocalDB during development)
- ORM: Entity Framework Code First + Migrations
- Frontend Framework: AngularJS
- CSS styles: Bootstrap
- IDE: Visual Studio + Resharper
- Hosting: Appharbor
As you’ll see, this particular choice of tools is well suited to rapid application development, and is also very flexible.
The goal is not just to throw together the minimal necessary to have something working, but to create a really flexible infrastructure that we can use as a foundation for many future applications. OK, let’s get started.
The Backend
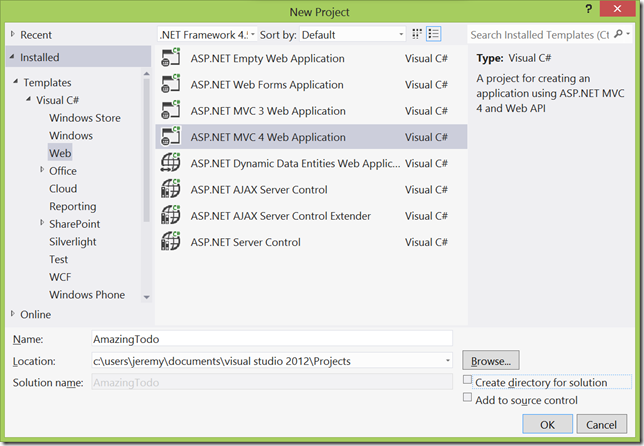
In Visual Studio, create a new document and choose to create an MVC web application project.
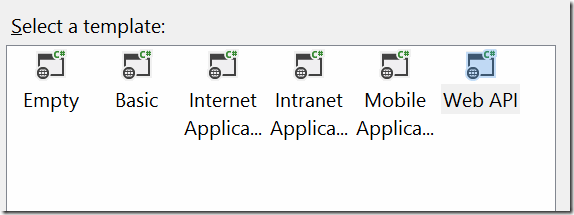
Use the web API template.
Web API is a framework which makes it easier to create REST APIs. It is very similar to ASP.net MVC.
Delete HomeController.cs, everything in the Content folder, and everything except Web.config in the Views folder. (These are all for using ASP.Net MVC views and default styles, none of which we’ll need).
By default the API will use XML, but we would prefer JSON (this makes it a little easier to debug), therefore add this to the end of WebApiConfig.Register():
config.Formatters.XmlFormatter.SupportedMediaTypes.Remove(
                config.Formatters.XmlFormatter.SupportedMediaTypes.FirstOrDefault(t => t.MediaType == "application/xml"));
Now, create a new class for your Todo Items:
public class TodoItem {
        public int TodoItemId { get; set; }
        public String Todo { get; set; }
        public byte Priority { get; set; }
        public DateTime? DueDate { get; set; }
    }
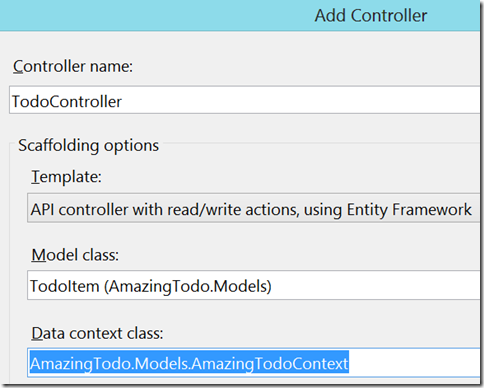
And now we’re ready to create our REST API! After compiling, right-click the Solution Explorer, and choose Add->Controller, and create a controller called TodoController.
You’ll need to choose the option to create a new data context.
You should now have a working REST API! Press F5 to run your solution, and it should open in a browser. You will get a “not found” error since we don’t have any pages set up yet, so you’ll need to modify the URL path to ‘/api/todo’.
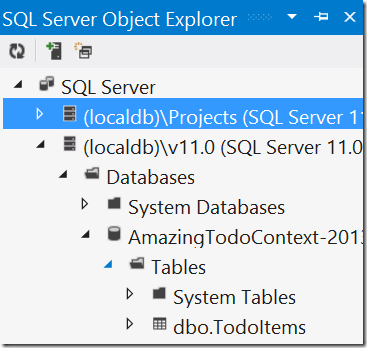
Of course, at this stage all we get is an empty array. We need to put some items into our database! First, check out SQL Server Object Browser to see that Visual Studio has already created a DB for us:
To add items, we are going to use Entity Framework Migrations. We will go to Tools->Library Package Manager in order to open the Package Manager Console, which is where we can enter commands to work with Entity Framework. In the console, type “Enable-Migrations”.
This has created a file for me called Configuration.cs, which allows me to specify data to seed my DB with. Let’s edit that now to seed some data.
protected override void Seed(AmazingTodoContext context) {
    var r = new Random();
    var items = Enumerable.Range(1, 50).Select(o => new TodoItem {
        DueDate = new DateTime(2012, r.Next(1, 12), r.Next(1, 28)),
        Priority = (byte)r.Next(10),
        Todo = o.ToString()
    }).ToArray();
    context.TodoItems.AddOrUpdate(item => new { item.Todo }, items);
}
Any time I change my model or edit Seed(), I’ll need to run Update-Database in Package Manager Console to have the DB show my changes to the code.
Now I’ll refresh my browser to see the data via the REST API:
The Basic AngularJS setup
Now that the API is working, we can create a simple page to show a list of todos. We will use AngularJS as our Javascript MVC framework, so let’s install that: simply type “Install-Package angularjs” at the package manager console. We’ll be using Bootstrap to style things up, so install that too: “Install-Package Twitter.Bootstrap”. In the root of your project, create index.html, with references to the css and js files we’ll be using.
<!DOCTYPE html>
<html ng-app="TodoApp" xmlns="http://www.w3.org/1999/xhtml">
    <head>
        <script src="Scripts/jquery-1.7.1.js"></script>
        <script src="Scripts/angular.js"></script>
        <script src="Scripts/angular-resource.js"></script>
        <link rel="stylesheet" type="text/css" href="Content/bootstrap.css" />
        <title>Amazing Todo</title>
    </head>
    <body>
        <div class="container">
            <div ng-view></div>
        </div>
    </body>
</html>
You will need to change the ng-app attribute in the html element, and the title, for each of your projects. Other than that, your index.html will be the same for most of your projects (other that having some different js and css links, of course). All the actual work will occur in AngularJS templates. In order for AngularJS To know what template and controller to use we need to set up some routes. To do this, we use the config method of the AngularJS module class. Let’s create a new JavaScript file for our AngularJS code; the convention is to call this app.js.
var TodoApp = angular.module("TodoApp", ["ngResource"]).
    config(function($routeProvider) {
        $routeProvider.
            when('/', { controller: ListCtrl, templateUrl: 'list.html' }).
            otherwise({ redirectTo: '/' });
    });
This creates a route for ‘/’ that uses a controller called ListCtrl and a template called list.html.
Let’s create an empty controller in app.js.
var ListCtrl = function($scope, $location) {
    $scope.test = "testing";
};
Let’s create a basic list.html as well.
<h1>Test {{test}}</h1>
Any properties and methods of $scope are made available automatically in the template. In the template, use ‘handlebars’ (double braces) to indicate where AngularJS expressions should be placed. Don’t forget to add a script element to index.html pointing at your app.js. Now try going to http://localhost:5127/index.htmlin your browser (you’ll need to change the port of course). If it’s working, you’ll see “Test testing”.
The List Page
Let’s edit our list.html to do something more useful!
<table class="table table-striped table-condensed table-hover">
    <thead>
        <th>Todo</th>
        <th>Priority</th>
        <th>Due</th>
    </thead>
    <tbody>
        <tr ng-repeat="item in items">
            <td>{{item.Todo}}</td>
            <td>{{item.Priority}}</td>
            <td>{{item.DueDate}}</td>
        </tr>
    </tbody>
</table>
For this to do anything, we will need $scope.items to contain our todos. We can define in app.js an AngularJS $resource that we can use to query our REST API.
TodoApp.factory('Todo', function($resource) {
    return $resource('/api/todo/:id', { id: '@id' }, { update: { method: 'PUT' } });
});

var ListCtrl = function ($scope, $location, Todo) {
    $scope.items = Todo.query();
};
$resource is a function provided by AngularJS that creates an object for accessing a REST API. We use a factory method so that we can reuse the object without it getting recreated every time. Note that we also had to add a parameter to ListCtrl in order to have access to this object.
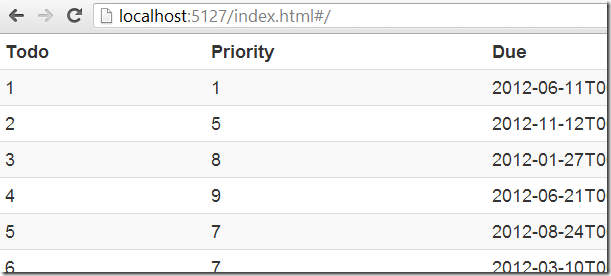
At this point, you should be able to view the list in your browser.
It’s interesting to note that all the html files are entirely static – the only thing that’s dynamic is the JSON sent by the web API.
That’s the end of Part 1 of this walkthrough. In the next part, we’ll add sorting, searching, and pagination to the list.
