Showing posts with label New Features. Show all posts

Friday, 20 July 2018

Angular 5: Upgrading & Summary of New Features

Angular 5, code named pentagonal-donut, was just announced, and with it comes a few new features as well as a number of internal changes to make Angular apps smaller and faster to execute. In this post we’ll briefly go over some of the most important changes as well as pointers on upgrading. For more details, refer to the announcement blog post, and for in-depth details about all the changes, refer to the official changelog.

Performance

Here are some of the changes that Angular 5 includes to make your apps smaller and faster:
  • The Angular CLI v1.5 was also released today, and with it comes a build optimizer that’s enabled by default. The build optimizer performs a series of additional optimizations on builds, including better tree shaking.
  • The Angular compiler was also improved to enable faster builds and rebuilds. It now uses TypeScript transforms under the hood. Ahead of time and incremental builds are now possible when developing, using the --aot flag with the ng serve command. This should become the default in a future version of the CLI.
  • The intl and Reflect polyfills are no longer needed, which contributes to smaller bundles. Note that the Reflect polyfill is still needed in JIT mode.
  • There’s a new option, preserveWhitespaces, to remove non-significant white space characters from template code, which can further reduce your app’s final bundle size. The option is turned off by default, be it can easily be turned on for your entire app by adding a rule to your global tsconfig.json file and setting the option to a value of false:
tsconfig.json
{
  "compileOnSave": false,
  "compilerOptions": {
    "outDir": "./dist/out-tsc",
    "sourceMap": true,
    "declaration": false,
    "moduleResolution": "node",
    "emitDecoratorMetadata": true,
    "experimentalDecorators": true,
    "target": "es5",
    "typeRoots": ["node_modules/@types"],
    "lib": ["es2017", "dom"]
  },
  "angularCompilerOptions": {
    "preserveWhitespaces": false
  }
}
You can also set the option granularly on a per-component basis, or override the project’s default only in specific components:
app.component.ts
import { Component } from '@angular/core';

@Component({
  selector: 'app-root',
  templateUrl: './app.component.html',
  styleUrls: ['./app.component.css'],
  preserveWhitespaces: false
})
export class AppComponent {
  // ...
}

New Features

updateOn blur or submit

A new option for form fields or entire forms, updateOn, can help with performance by telling Angular to check for validity only on blur or submit events, instead of the default change event.
For example, given a template-driven form that looks like this:
<form #newUserForm="ngForm" (ngSubmit)="onSubmit(newUserForm)">

  <label for="user-name">User Name:</label>
  <input type="text" placeholder="User name"
         required maxlength="25" id="user-name"
         [(ngModel)]="userName" name="userName">

  <button type="submit" [disabled]="!newUserForm.form.valid">
    Register
  </button>
</form>
You can now add the following to the input to have Angular check for its validity only when the input is blurred-out:
<input type="text" placeholder="User name"
      required maxlength="25" id="user-name"
      [(ngModel)]="userName" name="userName"
      [ngModelOptions]="{updateOn: 'blur'}">
You can also apply the rule for the whole form at once:
<form #newUserForm="ngForm"
      (ngSubmit)="onSubmit(newUserForm)"
      [ngFormOptions]="{updateOn: 'blur'}">
  ...
</form>

In the case of reactive forms, you’d add the option like this:
ngOnInit() {
  this.newUserForm = this.fb.group({
    userName: ['Bob', { updateOn: 'blur', validators: [Validators.required] }]
  });
}

Router Events

The Angular router now exposes a few new lifecycle events to make it easy to react to events at a more granular level. The new events are the following: ActivationStartActivationEndChildActivationStartChildActivationEndGuardsCheckEndGuardsCheckStartResolveStart and ResolveEnd.

@angular/service-worker

A new package to facilitate adding a service worker to your apps, @angular/service-worker, is now available with Angular 5. We’ll dig deeper into using it in a future post.

Upgrading

Upgrading should be a no brainer since there are very few breaking changes. The Angular team has also put together a handy tool to make upgrading as easy as possible.
Here are a few pointers that can be helpful for upgrading. This assumes that you’re upgrading from an Angular 4 app:
  • You can upgrade all your Angular packages with one command:
$ npm install @angular/{animations,common,compiler,compiler-cli,core,forms,http,platform-browser,platform-browser-dynamic,platform-server,router}@5.0.0

# or, using Yarn:
$ yarn add @angular/{animations,common,compiler,compiler-cli,core,forms,http,platform-browser,platform-browser-dynamic,platform-server,router}@5.0.0
  • Angular 5 now also depends on TypeScript 2.4.2 and RxJS 5.5.2, so you’ll want to upgrade those packages as well.
  • If you haven’t done so already, change your project’s <template> tags to <ng-template>.
  • If you’re using Flex Layout for Angular, you’ll want to make sure that you’re upgrading to the latest release (beta 10 at the time of this writing), as previous versions make use of OpaqueToken, which was removed in Angular 5.
  • If you haven’t done so already, you can start migrating your http calls over to the new HttpClient, which was introduced with Angular 4.3. The legacy Http module has now been deprecated.
  • If you’re using the datecurrency or percent pipes, there may be syntax changes needed, because Angular is now using its own implementation for those pipes instead of relying on the browser’s i18n APIs. Refer to the i18n portion of the changelog for all the details.
  • RxJS version 5.5 was also released recently, and RxJS v5.5.2 is the default for Angular 5 apps. Your code can stay exactly the same, but RxJS is moving to lettable operators to improve tree shaking and make it easier to create custom operators. Because of this, it can be a good idea to start transitioning your observable pipeline code over to the new syntax.
Here’s a quick example with the old syntax:
import { Component, OnInit } from '@angular/core';

import { Observable } from 'rxjs/Observable';
import 'rxjs/add/observable/of';
import 'rxjs/add/operator/map';
import 'rxjs/add/operator/filter';
import 'rxjs/add/operator/do';

@Component({ ... })
export class AppComponent implements OnInit {
  myObs = Observable.of('Hello', 'Alligator', 'World!');

  ngOnInit() {
    this.myObs
      .do(x => console.log('The do operator is the do operator!'))
      .filter(x => x.length > 8)
      .map(x => x.toUpperCase())
      .subscribe(x => console.log(x));
  }
}
…and the same example with the new lettable operator syntax becomes:
import { Component, OnInit } from '@angular/core';

import { of } from 'rxjs/observable/of';
import { map, filter, tap } from 'rxjs/operators';

@Component({ ... })
export class AppComponent implements OnInit {
  myObs = of('Hello', 'Alligator', 'World!');

  ngOnInit() {
    this.myObs
      .pipe(
        tap(x => console.log('The do operator is now tap!')),
        filter(x => x.length > 8),
        map(x => x.toUpperCase())
      )
      .subscribe(x => console.log(x));
  }
}
Notice how the operators can all be imported from a single import statement, and how they are now combined using the pipe method. When using lettable operators, a few operators change name. For example, the do operator becomes tap.
🎢 With this, you should now be ready to leap into Angular 5 and benefit from the resulting faster and smaller apps.
Tuesday, 1 May 2018

Entity Framework Core Tutorial

Entity Framework is a powerful Object-Relational Mapping (ORM) framework for data access in .NET. This framework can be used to build Data Access Layers in any enterprise/non-enterprise application.

Entity Framework Core - Getting Started

Entity Framework Core (or EF Core) is the latest version of Entity Framework and is a complete rewrite. It was released along with .NET Core and is an extensible, lightweight and cross-platform version of Entity Framework.
EF Core does not support all the features offered by Entity Framework 6. However here are some reasons to use EF Core:
  • Simple to get started
  • Supports NoSQL Databases along with other relational databases
  • Fits nicely in an ASP.NET MVC Core setup
  • Integrates well with LINQ
  • Possible to use in Linux and Mac since it is based on .NET Core

Entity Framework Core vs EF 6.x

EF 6.x is a stable and fully tested ORM technology which is used across many applications. EF Core provides a developer experience similar to EF 6.x. However it is built upon a new set of components. The application targets to .NET Core e.g. ASP.NET Core applications. Universal Windows Platform (UWP) Applications cannot use EF 6.x as this requires the complete .NET Framework. EF Core is more suitable for such applications.
Although both of these releases provides similar features, EF Core does not have following features:
  • Spatial Type
  • Complex/value types
  • EDMX Model format
  • Lazy loading
  • Stored Procedures
The complete list of features not available in EF Core and a side-by-side comparison with EF 6.x can be found at Feature Comparison.

EF Core Database Providers

EntityFramework Core uses a provider model that allows EF to map with and access many databases. This includes concepts like, performing queries using LINQ, transactions, change tracking to objects etc. EFCore also supports database specific concepts e.g. memory-optimized tables provided by SQL Server. The library Microsoft.EntityFrameworkCore.Relational is used to create and build class providers for relational databases. This library provides APIs for managing table and column mapping.

APIs used in EF Core

  • DBContext - The instance of the DbContext represents a database session that is used for performing CRUD operations.
  • DbSet
    • This is used to define mapping with “T”. All the LINQ queries against DbSet will be translated into database queries. The important point here to understand is that all LINQ queries executed against DbSetwill contain result returned from database, this may not include change made on database over the DbContext.
    • These queries may be evaluated in-memory rather than converting into database queries. This is depending on the database provider.
This article will cover the following topics:
  • Creating Model in EF Core
  • Querying Data in EF Core
  • Saving Data in EF Core

Creating Database

The application uses SQL Server database. To create a database, open SQL Server Database and create a new database of name DBEfCore. The following command can be used
Create database DBEfCore
In the database, add the following tables:
Department Table
CREATE TABLE [dbo].[Departments](
    [DeptUniqueId] [int] IDENTITY(1,1) NOT NULL,
    [Capacity] [int] NOT NULL,
    [DeptName] [nvarchar](20) NOT NULL,
    [DeptNo] [int] NOT NULL,
    [Location] [nvarchar](20) NOT NULL
)
Employee Table
CREATE TABLE [dbo].[Employees](
    [EmpUniqueId] [int] IDENTITY(1,1) NOT NULL,
    [DeptUniqueId] [int] NOT NULL,
    [Designation] [nvarchar](20) NOT NULL,
    [EmpFirstName] [nvarchar](80) NOT NULL,
    [EmpLastName] [nvarchar](80) NULL,
    [EmpNo] [int] NOT NULL,
    [Salary] [int] NOT NULL,
       [DeptUniqueId] int references master(Departments)
)
The Departments table is parent of Employees Table.
This article uses Console Application to demonstrate all the above features. The following tools must be installed on the machine.
  • Visual Studio 2015 with Update 3
  • The most recent version of NuGet Package Manager.

Installing EF Core NuGet Packages

This article uses two approaches to use Entity Framework Core in the application. To use EF Core in the application and since the application will be using Microsoft SQL Server database it need SQL Server provider. To use EF Core the application needs to install the following packages from the Package Manager Console.
Install-Package Microsoft.EntityFrameworkCore.SqlServer
Install-Package Microsoft.EntityFrameworkCore.Tools –Pre
Install-Package Microsoft.EntityFrameworkCore.SqlServer.Design
Note: The Microsoft.EntityFramework.SqlServer package can also be used for SQL Azure.

Approach 1 Using a Database-First approach

While developing an application, if the database is already available, then Model classes can be created using the Database. The advantage of this approach is that the application knows that the database is production ready and no changes (or modifications) are required in the database design (Table design). This scenario is more useful when the application is developed from scratch except the database. E.g. Application is redesigned by migrating from Desktop to Web application or ASP.NET to MVC, etc.
This approach explains how to generate Model classes based on Tables in database. The application uses DBEfCore database created as per the instruction given in the Creating Database section.
Step 1: Create a Console application of the name EFCore_Scaffolding. As explained in the Install NuGet Packages section, open the Package manager console using Tools > NuGet Package Manager > Package Manager Console and installed required packages.
Step 2: To generate Models from the database, run the following command from the NuGet Package Manager Console.
Scaffold-DbContext "Data Source=.;Initial Catalog=DBEfCore;Integrated Security=SSPI;" Microsoft.EntityFrameworkCore.SqlServer -OutputDir Models
The Scaffold-Context command scaffolds DbContext from the database based on the database connection string and the Sql Server NuGet package for EntityFramework Core. This package is a Sql Server provider which is used to connect to Sql Server instance based on the connection string and scaffolded DbContext. The OutputDir switch is used to specify the folder in the project where the Entity classes will be created.
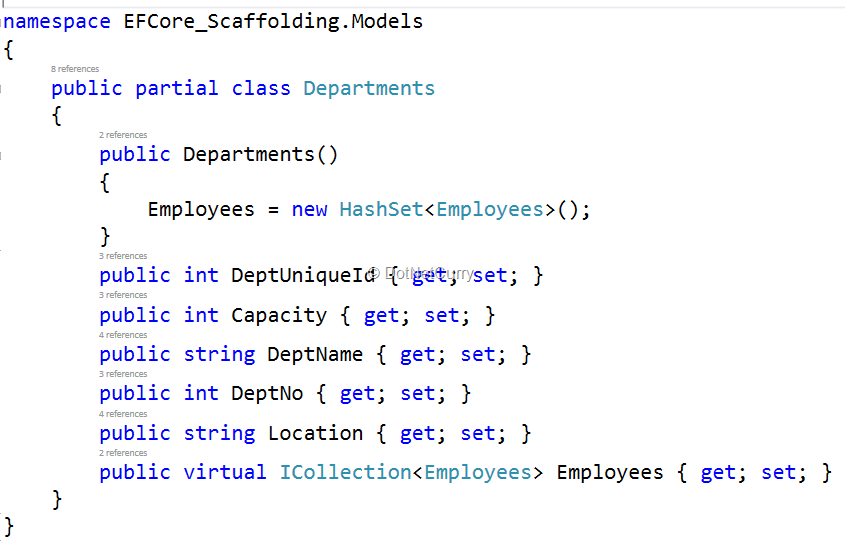
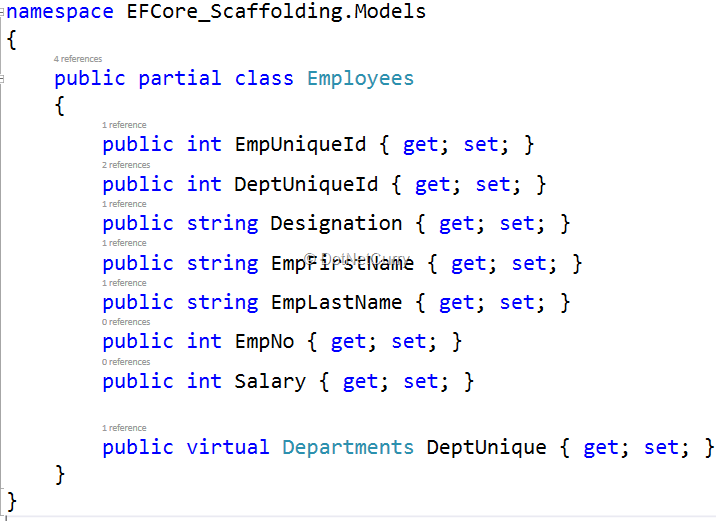
Step 3: In the project, a Model folder is created. This folder contains the classes files, one for each table name in the database and one for the DbContext class. Since Departments table is a parent of Employees table, the mapping generated using the Scaffold command maintains the relationship across them. The following images shows code for Departments and Employees class
departments-classs
employees-class
Step 4: To perform Database Read/Write operations, open Program.cs and write the following code. Note that the code is relatively similar to the code for Entity Framework 6.x.
static void Main(string[] args)
{
    DBEfCoreContext ctx = new Models.DBEfCoreContext();
    Console.WriteLine("The Added Data is");
    foreach (var item in ctx.Departments.ToList())
    {
        Console.WriteLine(item.DeptUniqueId + "\t\t" + item.DeptNo + "\t\t" + item.DeptName + "\t\t" + item.Location + "\t\t" + item.Capacity);
    }
    Departments d = new Models.Departments();
    Departments dept = new Departments()
    {
        DeptNo = 50,
        DeptName = "Sales",
        Location = "Pune",
        Capacity = 500
    };
     
    ctx.Departments.Add(dept);
    ctx.SaveChanges();
    Console.WriteLine("Data Added Successfully");
    Console.WriteLine();
    Console.WriteLine("The Added Data is");
    foreach (var item in ctx.Departments.ToList())
    {
        Console.WriteLine(item.DeptUniqueId + "\t\t" + item.DeptNo + "\t\t" + item.DeptName + "\t\t" + item.Location + "\t\t" + item.Capacity);
    }
    Console.ReadLine();
}
The above code creates an instance of the DbEfCoreContext class generated after the scaffolding is over. An instance of the Departments class is created to create a new Department. The Departments instance is added in the Departments DbSet using its Add() method. The SaveChanges() method is used to commit the save operations on the database.
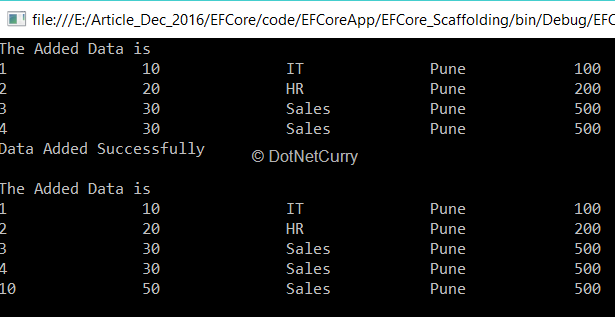
After running the application, the result will be displayed as shown in the following image:
ef-core-db-first
The Scaffold-DbContext provides an easy mechanism to scaffold the DbContext and Entity classes so that they can be used in database CRUD operations.
Note: To try out the steps for Approach 2, delete Departments and Employees table from the database.

Approach 2: Using the approach of creating Model

In an enterprise application, it is important to design the application model. An accurate application model makes the application development easy. The maintainability of the application is primarily dependent on the model design. In EF, the model is based on the design of the Entity Classes. These classes contain necessary properties based on which the application can decide what data is accepted through the application and saved in database.

Step 1: Create a new Console application of the name EFCoreApp targeted to .NET Framework 4.6.1.
Step 2: In the project, add a class file of name Entities.cs. This will contain Models classes (POCO) as shown in the following code.
using System.ComponentModel.DataAnnotations;
using System.ComponentModel.DataAnnotations.Schema;
namespace EFCoreApp
{
    public class Department
    {
        [Key]
        public int DeptUniqueId { get; set; }
        [Required]
        public int DeptNo { get; set; }
        [Required]
        [MaxLength(20)]
        public string DeptName { get; set; }
        [Required]
        [MaxLength(20)]
        public string Location { get; set; }
        [Required]
        public int Capacity { get; set; }
    }
    public class Employee
    {
        [Key]
        public int EmpUniqueId { get; set; }
        [Required]
        public int EmpNo { get; set; }
        [Required]
        [MaxLength(80)]
        public string EmpFirstName { get; set; }
        [MaxLength(80)]
        public string EmpLastName { get; set; }
        [Required]
        public int Salary { get; set; }
        [Required]
        [MaxLength(20)]
        public string Designation { get; set; }
        public int DeptUniqueId { get; set; }
        [ForeignKey("DeptUniqueId")]
        public Department Department { get; set; }
    }
}
Have a look at the code of the model design. There are attributes applied on the properties for Required, MaxLength, Key and ForeignKey. The rules of behavior and validations of each property is specified using these attributes.
Step 3: In the app.config file, add a connection string for the database
<connectionstrings>   
 <add connectionstring="Data Source=.;Initial Catalog=DBEfCore;Integrated Security=SSPI;" name="connstr"      providername="System.Data.SqlClient">
 </add>
</connectionstrings>
Step 4: In the Project add a reference for System.Configuration. This will be used to read the connection string from the app.config file.
Step 5: In the project, add a new class file of the name DbContextClass.cs. Add the following code in it.
using Microsoft.EntityFrameworkCore;
using System.Configuration;
namespace EFCoreApp
{
    public class CompanyEntities : DbContext
    {
        public DbSet<Department> Departments { get; set; }
        public DbSet<Employee> Employees { get; set; }
        protected override void OnConfiguring(DbContextOptionsBuilder optionsBuilder)
        {
            string connstr = ConfigurationManager.ConnectionStrings["connstr"].ToString();
            optionsBuilder.UseSqlServer(connstr);
        }
         
    }
}
The above code contains the following specification:
  • The class CompanyEntities is derived from DbContext. This class manages the database connection by overriding OnConfiguring() method. This method accepts the DbContextOptionBuilder class. This class is used to configure database connection.
  • The DbSet properties are used to map with the database tables.
Step 6: To generate database tables, run migration commands from the package manager console. In Visual Studio select Tools > NuGet Package Manager > Package Manager Console. Run the following commands:
Add-Migration EFCoreApp.CompanyEntities
Update-Database
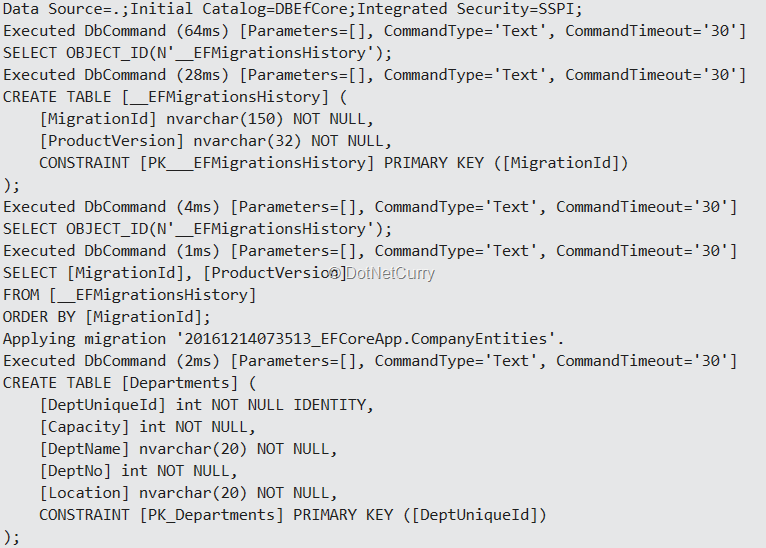
This will update the database by creating tables as shown in the following image:
ef-command-run
ef-command-run-1
This command will create tables in the database. The project will be added in Migrations folder with the migration classes.
Step 7: In Program.cs, add the following code:
using System;
using System.Linq;
namespace EFCoreApp
{
    class Program
    {
        static void Main(string[] args)
        {
            CompanyEntities ctx = new CompanyEntities();
            try
            {
                Department dept = new Department()
                {
                     DeptNo=30,
                     DeptName= "Sales",
                     Location="Pune",
                     Capacity=500
                };
                Employee emp = new Employee()
                {
                     EmpNo = 102,
                     EmpFirstName = "Mahesh",
                     EmpLastName = "Sabnis",
                     Designation = "Manager",
                     Salary = 330000
                };
                ctx.Departments.Add(dept);
                emp.DeptUniqueId = dept.DeptUniqueId;
                ctx.Employees.Add(emp);
                ctx.SaveChanges();
                Console.WriteLine("Record Added");
                Console.WriteLine();
                Console.WriteLine("DeptUniqueId\tDeptNo\tDeptName\tLocation\tCatacity");
                foreach (var item in ctx.Departments.ToList())
                {
                    Console.WriteLine(item.DeptUniqueId + "\t\t" + item.DeptNo + "\t\t" + item.DeptName + "\t\t" + item.Location + "\t\t" + item.Capacity);
                }
                Console.WriteLine();
                Console.WriteLine("EmpUniqueId\tEmpNo\tEmpFirstName\tEmpLastName\tDesignation\tSalary\tDeptUniqueId");
                foreach (var item in ctx.Employees.ToList())
                {
                    Console.WriteLine(item.EmpUniqueId+ "\t\t" + item.EmpNo+ "\t\t" + item.EmpFirstName+ "\t\t" + item.EmpLastName+ "\t\t" + item.Designation+ "\t" + item.Salary+ "\t\t" + item.DeptUniqueId);
                }
            }
            catch (Exception ex)
            {
                Console.WriteLine("Error " + ex.Message + ex.InnerException.Message);
            }
            Console.ReadLine();
        }
    }
}
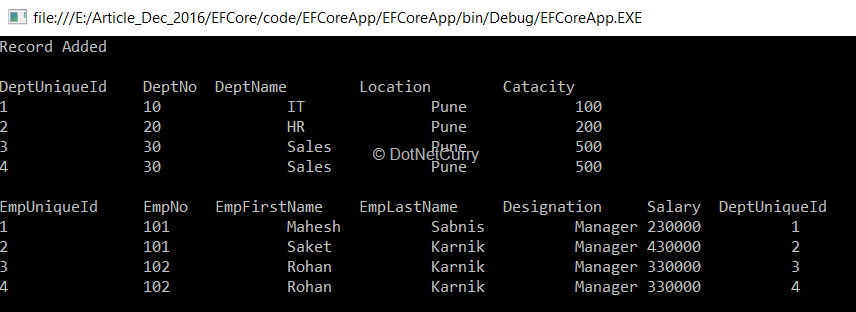
The above code creates an instance of the CompanyEntities class to connect to database and map with the tables. Using Departments and Employees properties and its Add() method, an instance of the Department and Employee instance is added in the DbSet respectively. Using SaveChanges() method, the record is added in the respective table. After executing the application, the result will be displayed as in following image:
ef-core-result
Since the Required attribute are applied on the model properties of Department and Employee class, values must be passed for these properties else the transaction will fail. To test it, remove DeptName property value from the dept instance of the Department in the Main method and run the application, the following exception will be displayed.
An error occurred while updating the entries. See the inner exception for details. Cannot insert the value NULL into column…column does not allow nulls. INSERT fails.
exception-deptname
The reason behind the exception is that the Department table is mapped with the Department class and since DeptName property is set with the Required attribute, the Department table will be generated with Allow Nulls as false.
Since the DeptName property of the Department class is applied with the MaxLength attribute with value as 20, it can access value up-to 20 characters. If the value of the DeptName in dept instance of the Department class is changed as shown in the following code:
DeptName= "Sales_For_The_IT_Goods_In_Pune_Area",
Then after running the application, the result will be as shown in the following image:
An error occurred while updating the entries. See the inner exception for details. String or binary data would be truncated.
exception-deptname-length
Conclusion: Entity Framework Core (EF Core) provides a similar experience of application development as seen in EF 6.x. The Scaffold-DbContext and Migration commands allows creating Models from a ready database and generating database table respectively.
Download the entire source code of this article (Github)

Angular Tutorial (Update to Angular 7)

As Angular 7 has just been released a few days ago. This tutorial is updated to show you how to create an Angular 7 project and the new fe...