About the architecture
You will build an Angular 5 client that consumes a RESTful Web API Core 2 service.
The client side:
- Angular 5
- Angular CLI
- Angular Material
The server side:
- .NET C# Web API Core 2
- Injection dependencies
- JWT authentication
- Entity framework code first
- SQL Server
Note
| In this blog post we are assuming the reader already has basic knowledge of TypeScript, Angular modules, components, and importing/exporting. The goal of this post is to create a good architecture that will allow for the code to grow over time. |
What Do You Need?
Let’s start by choosing the IDE. Of course, this is just my preference, and you can use the one you feel more comfortable with. In my case, I will use Visual Studio Code and Visual Studio 2017.
Why two different IDEs? Since Microsoft created Visual Studio Code for the front end, I cannot stop using this IDE. Anyway, we will also see how to integrate Angular 5 inside the solution project, that will help you if you are the kind of developer who prefers to debug both back end and front with just one F5.
About the back end, you can install the latest Visual Studio 2017 version which has a free edition for developers but is very complete: Community.
So, here the list of things we need to install for this tutorial:
Note
Verify that you are running at least Node 6.9.x and npm 3.x.x by running node -v and npm -v in a terminal or console window. Older versions produce errors, but newer versions are fine. |
The Front End
Quick Start
Let the fun begin! The first thing we need to do is install Angular CLI globally, so open the node.js command prompt and run this command:
npm install -g @angular/cli
Okay, now we have our module bundler. This usually installs the module under your user folder. An alias should not be necessary by default, but if you need it you can execute the next line:
alias ng="<UserFolder>/.npm/lib/node_modules/angular-cli/bin/ng"
The next step is to create the new project. I will call it
angular5-app. First, we navigate to the folder under which we want to create the site, and then:
ng new angular5-app
First Build
While you can test your new website just running
ng serve --open, I do recommend testing the site from your favorite web service. Why? Well, some issues can happen only in production, and building the site with ng build is the closest way to approach this environment. Then we can open the folder angular5-app with Visual Studio Code and run ng build on the terminal bash: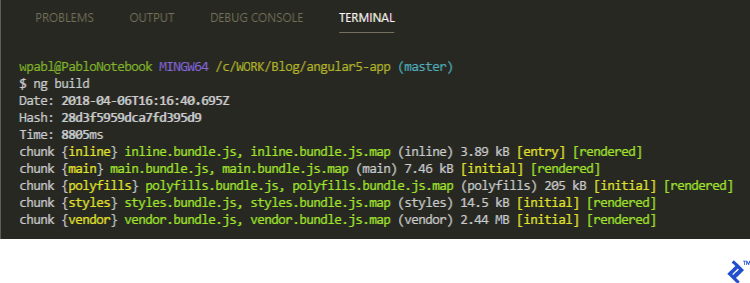
A new folder called
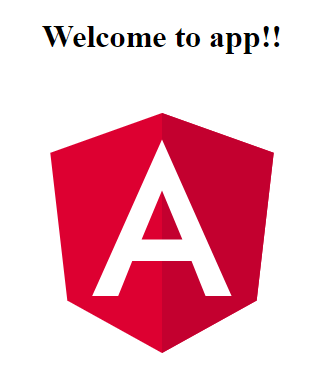
dist will be created and we can serve it using IIS or whichever web server you prefer. Then you can type the URL in the browser, and…done!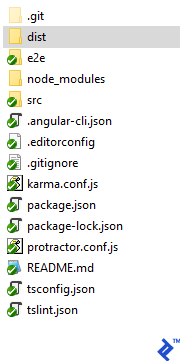
Note
| It is not the purpose of this tutorial to show how to set up a web server, so I assume you already have that knowledge. |
The src Folder
My
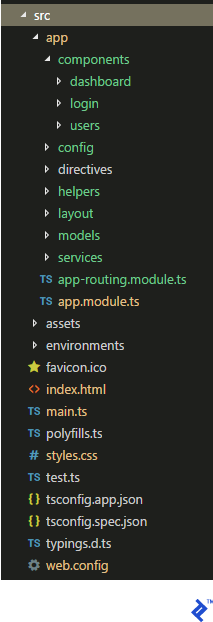
src folder is structured as follows: Inside the app folder we have components where we will create for each Angular component the css, ts, spec, and html files. We will also create a config folder to keep the site configuration, directives will have all our custom directives, helpers will house common code like the authentication manager, layout will contain the main components like body, head, and side panels, modelskeeps what will match with the back-end view models, and finally services will have the code for all the calls to the back end.
Outside the
app folder we will keep the folders created by default, like assets and environments, and also the root files.Creating the Configuration File
Let’s create a
config.ts file inside our config folder and call the class AppConfig. This is where we can set all the values we will use in different places in our code; for instance, the URL of the API. Note that the class implements a get property which receives, as a parameter, a key/value structure and a simple method to get access to the same value. This way, it will be easy to get the values just calling this.config.setting['PathAPI'] from the classes that inherit from it.
import { Injectable } from '@angular/core';

@Injectable()

export class AppConfig {


    private _config: { [key: string]: string };

    constructor() {

        this._config = {

            PathAPI: 'http://localhost:50498/api/'

        };

    }

    get setting():{ [key: string]: string } {

        return this._config;

    }

    get(key: any) {

        return this._config[key];

    }

};
Angular Material
Before starting the layout, let’s set up the UI component framework. Of course, you can use others like Bootstrap, but if you like the styling of Material, I do recommend it because it’s also supported by Google.
To install it, we just need to run the next three commands, which we can execute on the Visual Studio Code terminal:
npm install --save @angular/material @angular/cdk

npm install --save @angular/animations

npm install --save hammerjs
The second command is because some Material components depend on Angular Animations. I also recommend reading the official page to understand which browsers are supported and what a polyfill is.
The third command is because some Material components rely on HammerJS for gestures.
Now we can proceed to import the component modules we want to use in our
app.module.ts file:
import {MatButtonModule, MatCheckboxModule} from '@angular/material';
import {MatInputModule} from '@angular/material/input';
import {MatFormFieldModule} from '@angular/material/form-field';
import {MatSidenavModule} from '@angular/material/sidenav';

// ...

@NgModule({

  imports: [

    BrowserModule,

    BrowserAnimationsModule,

    MatButtonModule,

    MatCheckboxModule,

    MatInputModule,

    MatFormFieldModule,

    MatSidenavModule,

    AppRoutingModule,

    HttpClientModule

  ],
Next step is to change the
style.css file, adding the kind of theme you want to use:
@import "~@angular/material/prebuilt-themes/deeppurple-amber.css";
Now import HammerJS by adding this line in the
main.ts file:
import 'hammerjs';
And finally all we’re missing is to add the Material icons to
index.html, inside the head section:
<link href="https://fonts.googleapis.com/icon?family=Material+Icons" rel="stylesheet">
The Layout
In this example, we will create a simple layout like this:
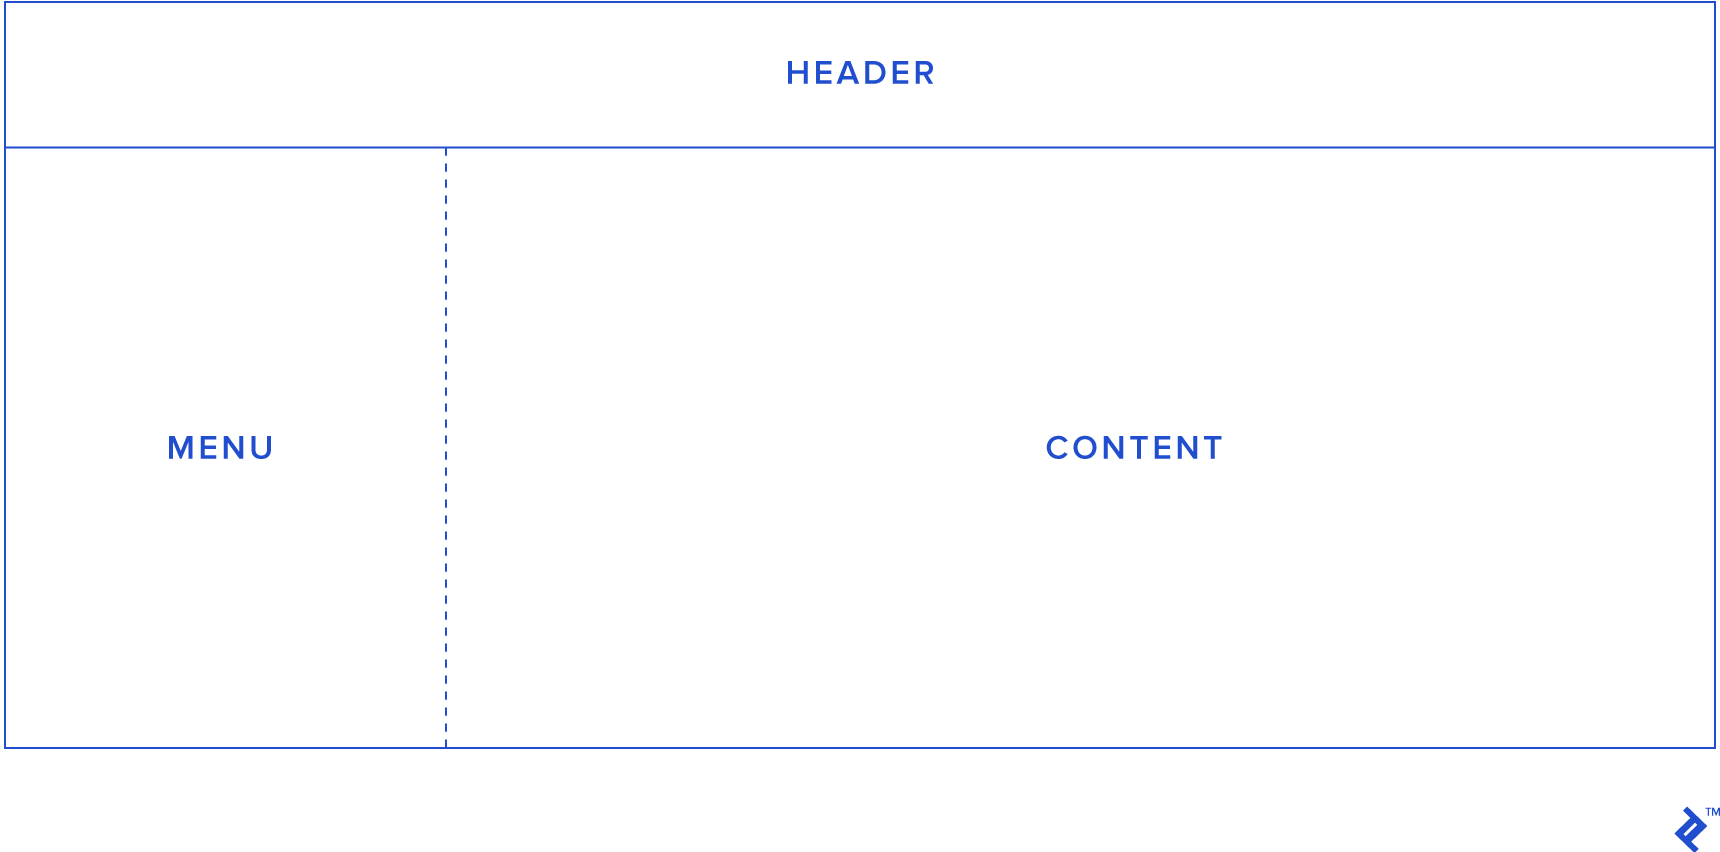
The idea is to open/hide the menu by clicking on some button on the header. Angular Responsive will do the rest of the work for us. To do this we will create a
layout folder and put inside it the app.component files created by default. But we will also create the same files for each section of the layout like you can see in the next image. Then, app.component will be the body, head.component the header, and left-panel.component the menu.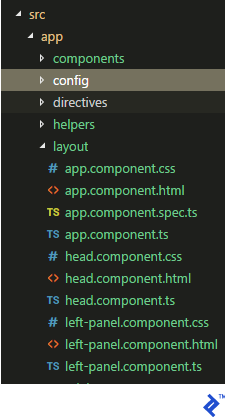
Now let’s change
app.component.html as follows:
<div *ngIf="authentication">

  <app-head></app-head>

  <button type="button" mat-button (click)="drawer.toggle()">

    Menu

  </button>

  <mat-drawer-container class="example-container" autosize>

    <mat-drawer #drawer class="example-sidenav" mode="side">

      <app-left-panel></app-left-panel>

    </mat-drawer>

    <div>

      <router-outlet></router-outlet>

    </div>

  </mat-drawer-container>

</div>

<div *ngIf="!authentication"><app-login></app-login></div>
Basically we will have an
authentication property in the component which will allow us to remove the header and the menu if the user is not logged in, and instead, show a simple login page.
The
head.component.html looks like this:
<h1>{{title}}</h1>

<button mat-button [routerLink]=" ['./logout'] ">Logout!</button>
Just a button to log the user out—we will come back to this again later. As for
left-panel.component.html, for now just change the HTML to:
<nav>

    <a routerLink="/dashboard">Dashboard</a>

    <a routerLink="/users">Users</a>

  </nav>
We’ve kept it simple: So far it’s just two links to navigate through two different pages. (We will also return to this later.)
Now, this is what the head and the left-side component TypeScript files look like:
import { Component } from '@angular/core';

@Component({

  selector: 'app-head',

  templateUrl: './head.component.html',

  styleUrls: ['./head.component.css']

})

export class HeadComponent {

  title = 'Angular 5 Seed';

}
import { Component } from '@angular/core';

@Component({

  selector: 'app-left-panel',

  templateUrl: './left-panel.component.html',

  styleUrls: ['./left-panel.component.css']

})

export class LeftPanelComponent {

  title = 'Angular 5 Seed';

}
But what about the TypeScript code for
app.component? We will leave a little mystery here and pause it for a while, and come back to this after implementing authentication.Routing
Okay, now we have Angular Material helping us with the UI and a simple layout to start building our pages. But how can we navigate between pages?
In order to create a simple example, let’s create two pages: “User,” where we can get a list of the existing users in the database, and “Dashboard,” a page where we can show some statistics.
Inside the
app folder we will create a file called app-routing.modules.ts looking like this:
import { NgModule }             from '@angular/core';

import { RouterModule, Routes } from '@angular/router';

import { AuthGuard }                from './helpers/canActivateAuthGuard';

import { LoginComponent }   from './components/login/login.component';

import { LogoutComponent }   from './components/login/logout.component';

import { DashboardComponent }   from './components/dashboard/dashboard.component';

import { UsersComponent }      from './components/users/users.component';

const routes: Routes = [

  { path: '', redirectTo: '/dashboard', pathMatch: 'full', canActivate: [AuthGuard] },

  { path: 'login', component: LoginComponent},

  { path: 'logout', component: LogoutComponent},

  { path: 'dashboard', component: DashboardComponent, canActivate: [AuthGuard] },

  { path: 'users', component: UsersComponent,canActivate: [AuthGuard] }

];

@NgModule({

  imports: [ RouterModule.forRoot(routes) ],

  exports: [ RouterModule ]

})

export class AppRoutingModule {}
It’s that simple: Just importing
RouterModule and Routes from @angular/router, we can map the paths we want to implement. Here we are creating four paths:/dashboard: Our home page/login: The page where the user can authenticate/logout: A simple path to log the user out/users: Our first page where we want to list the users from the back end
Note that
dashboard is our page by default, so if the user types the URL /, the page will redirect automatically to this page. Also, take a look at the canActivate parameter: Here we are creating a reference to the class AuthGuard, which will allow us to check if the user is logged in. If not, it redirects to the login page. In the next section, I will show you how to create this class.
Now, all we need to do is create the menu. Remember in the layout section when we created the
left-panel.component.html file to look like this?
<nav>

    <a routerLink="/dashboard">Dashboard</a>

    <a routerLink="/users">Users</a>

  </nav>
Here is where our code meets reality. Now we can build the code and test it in the URL: You should be able to navigate from the Dashboard page to Users, but what happens if you type the URL
our.site.url/users in the browser directly?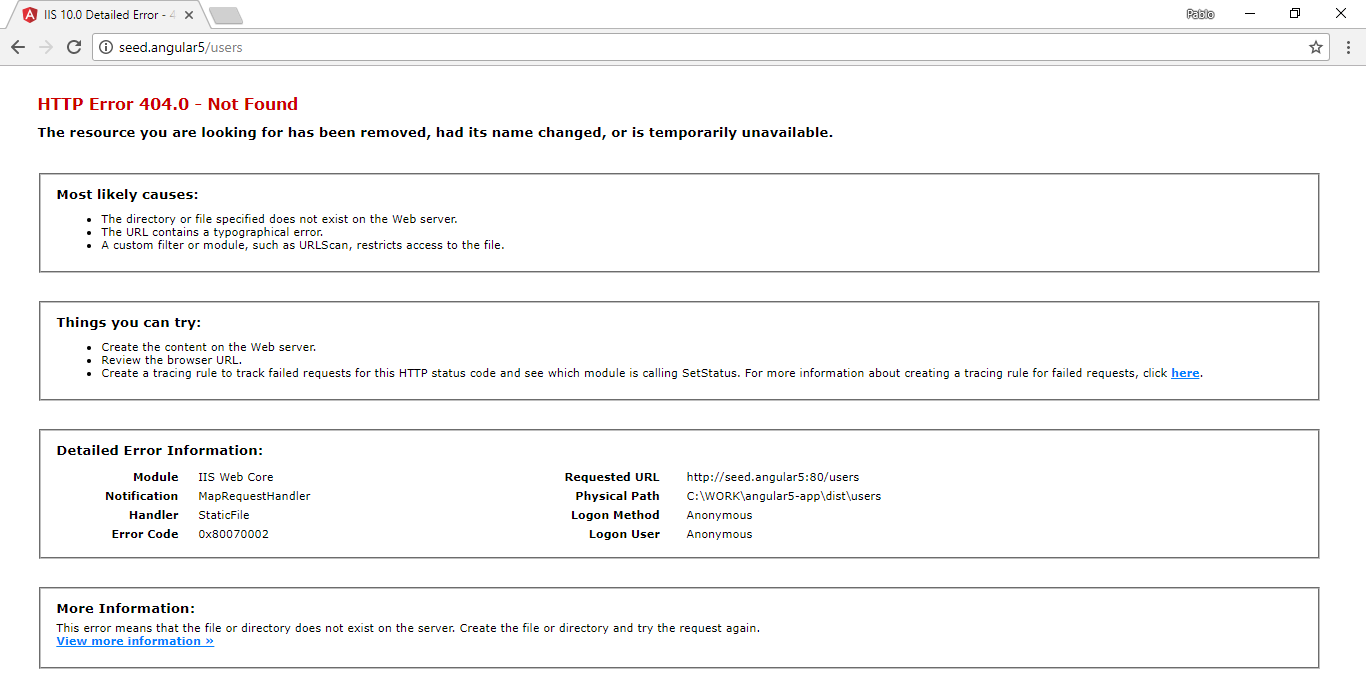
Note that this error also appears if you refresh the browser after already successfully navigating to that URL via the app’s side panel. To understand this error, allow me to refer to the official docs where it is really clear:
A routed application should support “deep links”. A deep link is a URL that specifies a path to a component inside the app. For example,http://www.mysite.com/users/42is a deep link to the hero detail page that displays the hero with id: 42.There is no issue when the user navigates to that URL from within a running client. The Angular router interprets the URL and routes to that page and hero.
But clicking a link in an email, entering it in the browser address bar, or merely refreshing the browser while on the hero detail page — all of these actions are handled by the browser itself, outside the running application. The browser makes a direct request to the server for that URL, bypassing the router.A static server routinely returns index.html when it receives a request forhttp://www.mysite.com/. But it rejectshttp://www.mysite.com/users/42and returns a 404 - Not Found error unless it is configured to return index.html instead.
To fix this issue is very simple, we just need to create the service provider file configuration. Since I’m working with IIS here, I will show you how to do it in this environment, but the concept is similar for Apache or any other web server.
So we create a file inside inside the
src folder called web.config that looks like this:
<?xml version="1.0"?>

<configuration>

  <system.webServer>

  <rewrite>

    <rules>

      <rule name="Angular Routes" stopProcessing="true">

        <match url=".*" />

        <conditions logicalGrouping="MatchAll">

          <add input="{REQUEST_FILENAME}" matchType="IsFile" negate="true" />

          <add input="{REQUEST_FILENAME}" matchType="IsDirectory" negate="true" />

        </conditions>

        <action type="Rewrite" url="/index.html" />

      </rule>

    </rules>

  </rewrite>

</system.webServer>

  <system.web>

    <compilation debug="true"/>

  </system.web>

</configuration>
Then we need to be sure that this asset will be copied to the deployed folder. All we need to do is change our Angular CLI settings file
angular-cli.json:
{

  "$schema": "./node_modules/@angular/cli/lib/config/schema.json",

  "project": {

    "name": "angular5-app"

  },

  "apps": [

    {

      "root": "src",

      "outDir": "dist",

      "assets": [

        "assets",

        "favicon.ico",

        "web.config" // or whatever equivalent is required by your web server

      ],

      "index": "index.html",

      "main": "main.ts",

      "polyfills": "polyfills.ts",

      "test": "test.ts",

      "tsconfig": "tsconfig.app.json",

      "testTsconfig": "tsconfig.spec.json",

      "prefix": "app",

      "styles": [

        "styles.css"

      ],

      "scripts": [],

      "environmentSource": "environments/environment.ts",

      "environments": {

        "dev": "environments/environment.ts",

        "prod": "environments/environment.prod.ts"

      }

    }

  ],

  "e2e": {

    "protractor": {

      "config": "./protractor.conf.js"

    }

  },

  "lint": [

    {

      "project": "src/tsconfig.app.json",

      "exclude": "**/node_modules/**"

    },

    {

      "project": "src/tsconfig.spec.json",

      "exclude": "**/node_modules/**"

    },

    {

      "project": "e2e/tsconfig.e2e.json",

      "exclude": "**/node_modules/**"

    }

  ],

  "test": {

    "karma": {

      "config": "./karma.conf.js"

    }

  },

  "defaults": {

    "styleExt": "css",

    "component": {}

  }

}
Authentication
Do you remember how we had the class
AuthGuard implemented to set the routing configuration? Every time we navigate to a different page we will use this class to verify if the user is authenticated with a token. If not, we’ll redirect automatically to the login page. The file for this is canActivateAuthGuard.ts—create it inside the helpers folder and have it look like this:
import { CanActivate, Router } from '@angular/router';

import { Injectable } from '@angular/core';

import { Observable } from 'rxjs/Observable';

import { Helpers } from './helpers';

import { ActivatedRouteSnapshot, RouterStateSnapshot } from '@angular/router';

@Injectable()

export class AuthGuard implements CanActivate {

  constructor(private router: Router, private helper: Helpers) {}

  canActivate(route: ActivatedRouteSnapshot, state: RouterStateSnapshot): Observable<boolean> | boolean {

    if (!this.helper.isAuthenticated()) {

      this.router.navigate(['/login']);

      return false;

    }

    return true;

  }

}
So every time we change the page the method
canActivate will be called, which will check if the user is authenticated, and if not, we use our Router instance to redirect to the login page. But what is this new method on the Helper class? Under the helpers folder let’s create a file helpers.ts. Here we need to manage localStorage, where we will store the token we get from the back end.
Note
Regarding localStorage, you can also use cookies or sessionStorage, and the decision will depend on the behavior we want to implement. As the name suggests, sessionStorage is only available for the duration of the browser session, and is deleted when the tab or window is closed; it does, however, survive page reloads. If the data you are storing needs to be available on an ongoing basis, then localStorage is preferable to sessionStorage. Cookies are primarily for reading server-side, whereas localStorage can only be read client-side. So the question is, in your app, who needs this data---the client or the server? |
import { Injectable } from '@angular/core';

import { Observable } from 'rxjs';

import { Subject } from 'rxjs/Subject';

@Injectable()

export class Helpers  {

    private authenticationChanged = new Subject<boolean>();

    constructor() {


    }

    public isAuthenticated():boolean {

        return (!(window.localStorage['token'] === undefined ||

            window.localStorage['token'] === null ||

            window.localStorage['token'] === 'null' ||

            window.localStorage['token'] === 'undefined' ||

            window.localStorage['token'] === ''));

    }

    public isAuthenticationChanged():any {

        return this.authenticationChanged.asObservable();

    }

    public getToken():any {

        if( window.localStorage['token'] === undefined ||

            window.localStorage['token'] === null ||

            window.localStorage['token'] === 'null' ||

            window.localStorage['token'] === 'undefined' ||

            window.localStorage['token'] === '') {

            return '';

        }

        let obj = JSON.parse(window.localStorage['token']);

        return obj.token;

    }

    public setToken(data:any):void {

        this.setStorageToken(JSON.stringify(data));

    }

    public failToken():void {

        this.setStorageToken(undefined);

    }

    public logout():void {

        this.setStorageToken(undefined);

    }

    private setStorageToken(value: any):void {

        window.localStorage['token'] = value;

        this.authenticationChanged.next(this.isAuthenticated());

    }

}
Is our authentication code making sense now? We’ll come back to the
Subject class later, but right now let’s circle back for a minute to the routing configuration. Take a look at this line:
 _{ path: 'logout', component: LogoutComponent},_

_~~~_

This is our component to log out of the site, and it's just a simple class to clean out the `localStorage`. Let's create it under the `components/login` folder with the name of `logout.component.ts`:

~~~ts

import { Component, OnInit } from '@angular/core';

import { Router } from '@angular/router';

import { Helpers } from '../../helpers/helpers';

@Component({

  selector: 'app-logout',

  template:'<ng-content></ng-content>'

})

export class LogoutComponent implements OnInit {

  constructor(private router: Router, private helpers: Helpers) { }

  ngOnInit() {

    this.helpers.logout();

    this.router.navigate(['/login']);

  }

}
So every time we go to the URL
/logout, the localStorage will be removed and the site will redirect to the login page. Finally, let’s create login.component.ts like this:
import { Component, OnInit } from '@angular/core';

import { Router } from '@angular/router';

import { TokenService } from '../../services/token.service';

import { Helpers } from '../../helpers/helpers';

@Component({

  selector: 'app-login',

  templateUrl: './login.component.html',

  styleUrls: [ './login.component.css' ]

})

export class LoginComponent implements OnInit {

  constructor(private helpers: Helpers, private router: Router, private tokenService: TokenService) { }

  ngOnInit() {


  }

  login(): void {

    let authValues = {"Username":"pablo", "Password":"secret"};

    this.tokenService.auth(authValues).subscribe(token => {

      this.helpers.setToken(token);

      this.router.navigate(['/dashboard']);

    });

  }

}
As you can see, for the moment we’ve hard-coded our credentials here. Note that here we are calling a service class; we will create these services classes to get access to our back end in the next section.
Finally, we need to go back to the
app.component.ts file, the layout of the site. Here, if the user is authenticated, it will show the menu and header sections, but if not, the layout will change to show just our login page.
export class AppComponent implements AfterViewInit {

  subscription: Subscription;

  authentication: boolean;

  constructor(private helpers: Helpers) {

  }

  ngAfterViewInit() {

    this.subscription = this.helpers.isAuthenticationChanged().pipe(

      startWith(this.helpers.isAuthenticated()),

      delay(0)).subscribe((value) =>

        this.authentication = value

      );

  }

  title = 'Angular 5 Seed';

  ngOnDestroy() {

    this.subscription.unsubscribe();

  }

}
Remember the
Subject class in our helper class? This is an Observable. Observables provide support for passing messages between publishers and subscribers in your application. Every time the authentication token changes, the authentication property will be updated. Reviewing the app.component.html file, it will probably make more sense now:
<div *ngIf="authentication">

  <app-head></app-head>

  <button type="button" mat-button (click)="drawer.toggle()">

    Menu

  </button>

  <mat-drawer-container class="example-container" autosize>

    <mat-drawer #drawer class="example-sidenav" mode="side">

      <app-left-panel></app-left-panel>

    </mat-drawer>

    <div>

      <router-outlet></router-outlet>

    </div>

  </mat-drawer-container>

</div>

<div *ngIf="!authentication"><app-login></app-login></div>
Services
At this point we are navigating to different pages, authenticating our client side, and rendering a very simple layout. But how we can get data from the back end? I strongly recommend doing all back-end access from service classes in particular. Our first service will be inside the
services folder, called token.service.ts:
import { Injectable } from '@angular/core';

import { HttpClient, HttpHeaders } from '@angular/common/http';

import { Observable } from 'rxjs/Observable';

import { of } from 'rxjs/observable/of';

import { catchError, map, tap } from 'rxjs/operators';

import { AppConfig } from '../config/config';

import { BaseService } from './base.service';

import { Token } from '../models/token';

import { Helpers } from '../helpers/helpers';

@Injectable()

export class TokenService extends BaseService {

  private pathAPI = this.config.setting['PathAPI'];

  public errorMessage: string;

  constructor(private http: HttpClient, private config: AppConfig, helper: Helpers) { super(helper); }

  auth(data: any): any {

    let body = JSON.stringify(data);

    return this.getToken(body);

  }

  private getToken (body: any): Observable<any> {

    return this.http.post<any>(this.pathAPI + 'token', body, super.header()).pipe(

        catchError(super.handleError)

      );

  }

}
The first call to the back end is a POST call to the token API. The token API does not need the token string in the header, but what happen if we call another endpoint? As you can see here,
TokenService (and service classes in general) inherit from the BaseService class. Let’s take a look at this:
import { Injectable } from '@angular/core';

import { HttpClient, HttpHeaders } from '@angular/common/http';

import { Observable } from 'rxjs/Observable';

import { of } from 'rxjs/observable/of';

import { catchError, map, tap } from 'rxjs/operators';

import { Helpers } from '../helpers/helpers';

@Injectable()

export class BaseService {

    constructor(private helper: Helpers) { }

    public extractData(res: Response) {

        let body = res.json();

        return body || {};

      }


      public handleError(error: Response | any) {

        // In a real-world app, we might use a remote logging infrastructure

        let errMsg: string;

        if (error instanceof Response) {

          const body = error.json() || '';

          const err = body || JSON.stringify(body);

          errMsg = `${error.status} - ${error.statusText || ''} ${err}`;

        } else {

          errMsg = error.message ? error.message : error.toString();

        }

        console.error(errMsg);

        return Observable.throw(errMsg);


    }


      public header() {


        let header = new HttpHeaders({ 'Content-Type': 'application/json' });


        if(this.helper.isAuthenticated()) {

          header = header.append('Authorization', 'Bearer ' + this.helper.getToken());

        }


        return { headers: header };

      }


      public setToken(data:any) {


        this.helper.setToken(data);

      }

      public failToken(error: Response | any) {


        this.helper.failToken();

        return this.handleError(Response);

      }

 }
So every time we make an HTTP call, we implement the header of the request just using
super.header. If the token is in localStorage then it will be appended inside the header, but if not, we will just set the JSON format. Another thing we can see here is what happens if authentication fails.
The login component will call the service class and the service class will call the back end. Once we have the token, the helper class will manage the token, and now we are ready to get the list of users from our database.
To get data from the database, first be sure we match the model classes with the back-end view models in our response.
In
user.ts:
export class User {

  id: number;

  name: string;

}
And we can create now the
user.service.ts file:
import { Injectable } from '@angular/core';

import { HttpClient, HttpHeaders } from '@angular/common/http';

import { Observable } from 'rxjs/Observable';

import { of } from 'rxjs/observable/of';

import { catchError, map, tap } from 'rxjs/operators';

import { BaseService } from './base.service';

import { User } from '../models/user';

import { AppConfig } from '../config/config';

import { Helpers } from '../helpers/helpers';

@Injectable()

export class UserService extends BaseService {

  private pathAPI = this.config.setting['PathAPI'];

  constructor(private http: HttpClient, private config: AppConfig, helper: Helpers) { super(helper); }

  /** GET heroes from the server */

  getUsers (): Observable<User[]> {

    return this.http.get(this.pathAPI + 'user', super.header()).pipe(

    catchError(super.handleError));

  }
The Back End
Quick Start
Welcome to the first step of our Web API Core 2 application. The first thing we need is to create an ASP.Net Core Web Application, which we will call
SeedAPI.Web.API.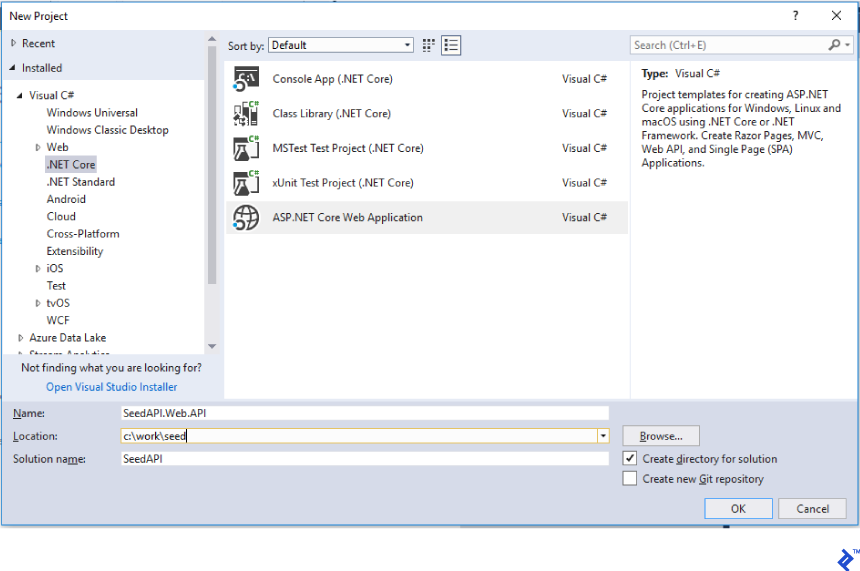
Be sure to choose the Empty template for a clean start like you can see below:
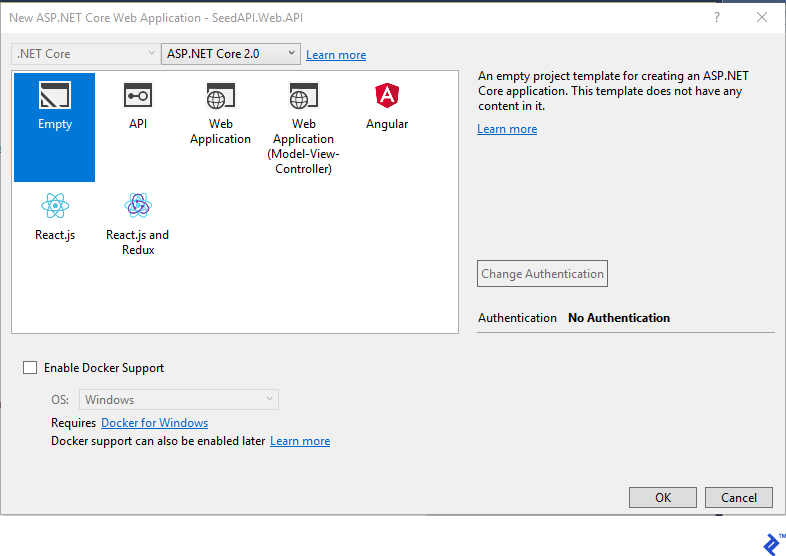
That’s all, we create the solution starting with an empty web application. Now our architecture will be as we list below so will have to create the different projects:
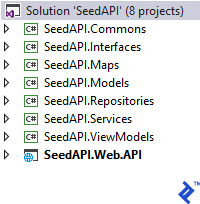
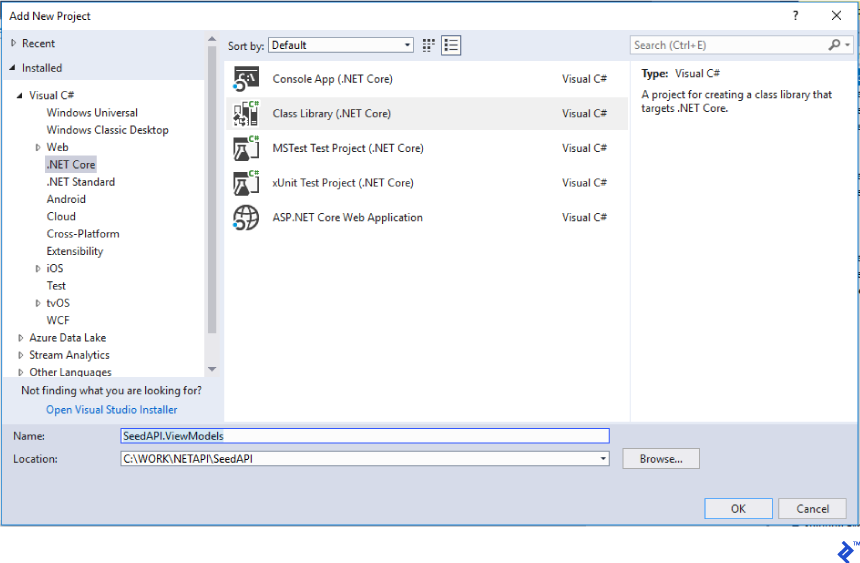
To do this, for each one just right-click the Solution and add a “Class Library (.NET Core)” project.
The Architecture
In the previous section we created eight projects, but what are they for? Here is a simple description of each one:
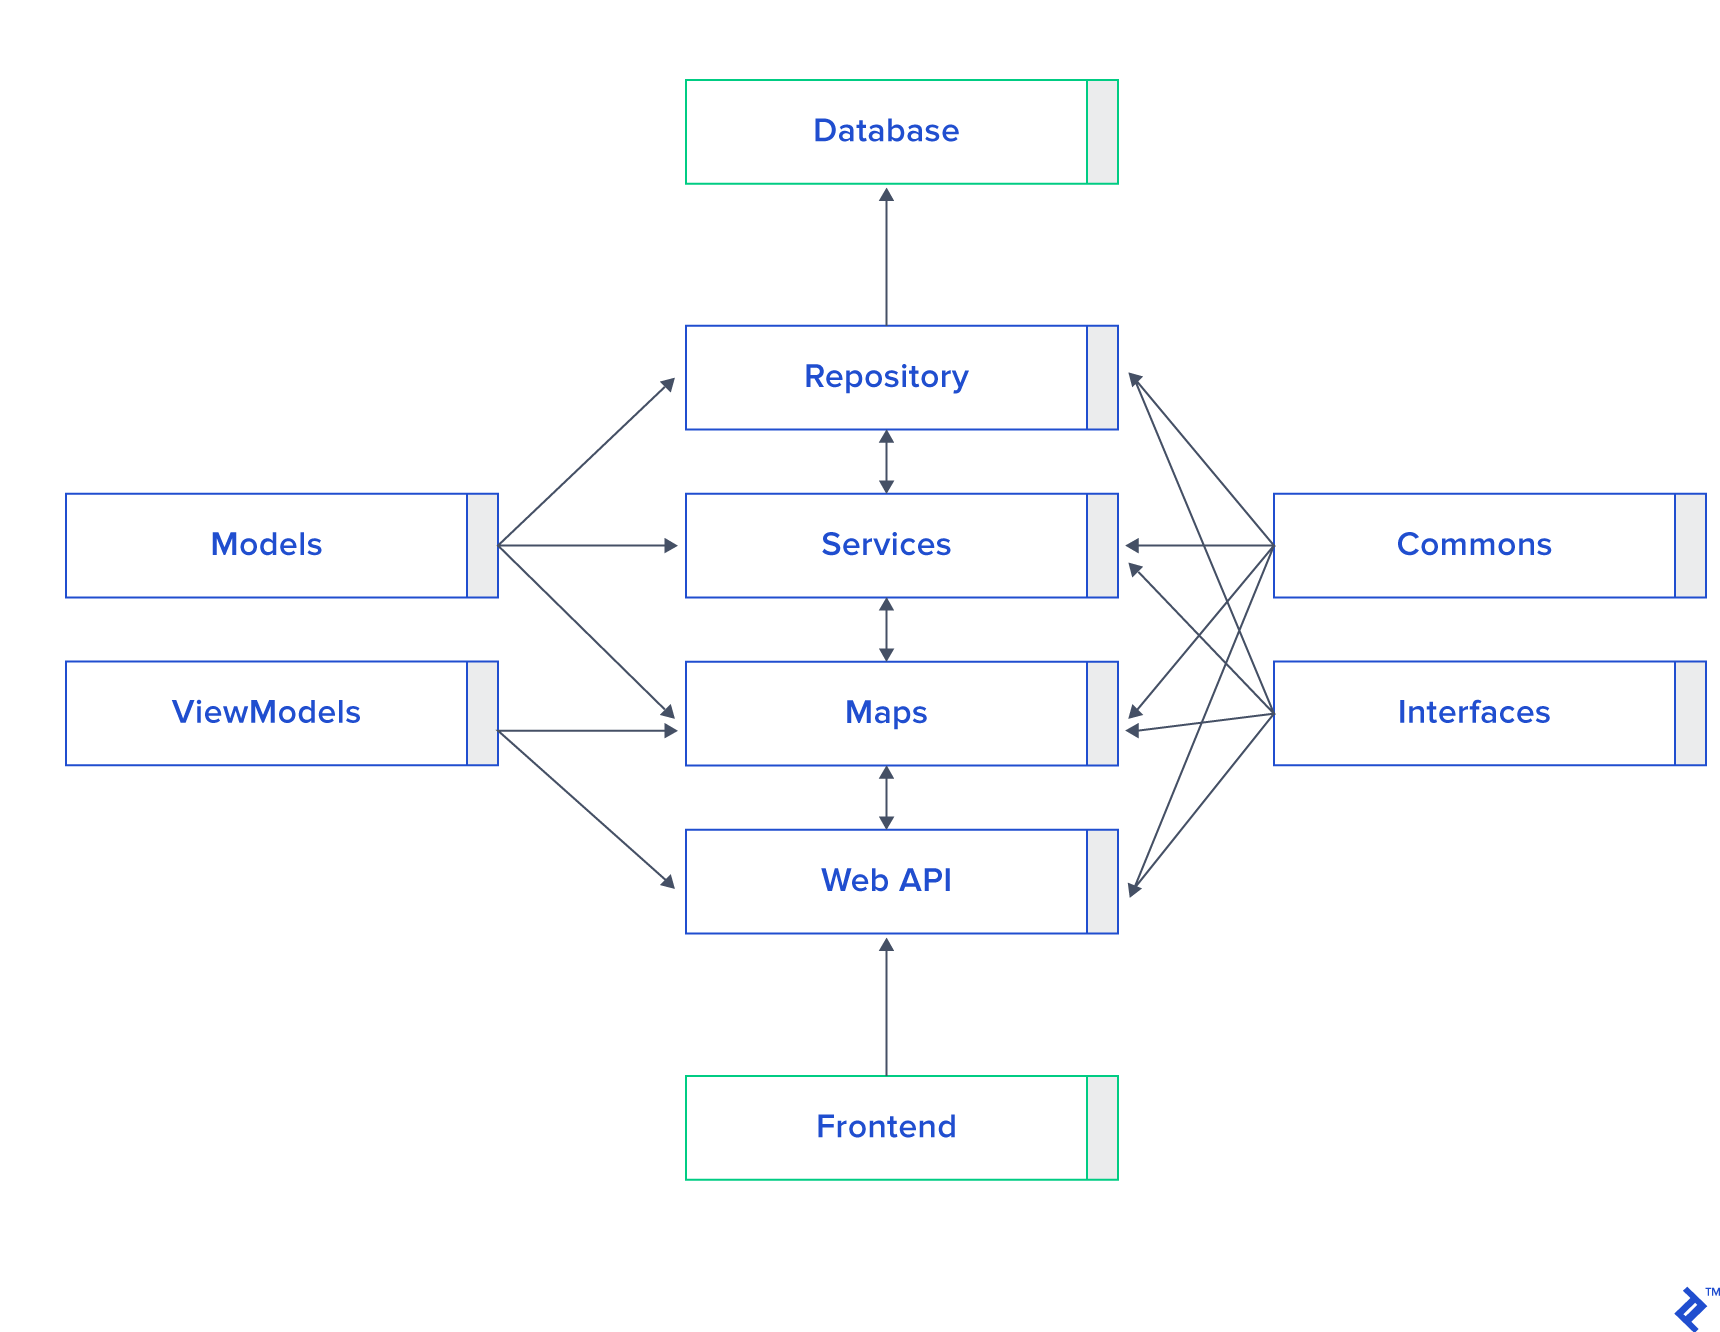
Web.API: This is our startup project and where endpoints are created. Here we will set up JWT, injection dependencies, and controllers.ViewModels: Here we perform conversions from the type of data that controllers will return in the responses to the front end. It is a good practice to match these classes with the front-end models.Interfaces: This will be helpful in implementing injection dependencies. The compelling benefit of a statically typed language is that the compiler can help verify that a contract which your code relies upon is actually met.Commons: All the shared behaviors and utility code will be here.Models: It is a good practice not to match the database directly with the front-end-facingViewModels, so the purpose ofModelsis to create entity database classes independent of the front end. That will allow us in future to change our database without necessarily having an impact on our front end. It also helps when we simply want to do some refactoring.Maps: Here is where we mapViewModelstoModelsand vice-versa. This step is called between controllers and Services.Services: A library to store all the business logic.Repositories: This is the only place where we call the database.
The references will look like this:
JWT-based Authentication
In this section, we will see the basic configuration of token authentication and go a bit deeper on the subject of security.
To start setting the JSON web token (JWT) let’s create the next class inside the
App_Start folder called JwtTokenConfig.cs. The code inside will look like this:
namespace SeedAPI.Web.API.App_Start

{

    public class JwtTokenConfig

    {

        public static void AddAuthentication(IServiceCollection services, IConfiguration configuration)

        {

            services.AddAuthentication(JwtBearerDefaults.AuthenticationScheme)

            .AddJwtBearer(options =>

            {

                options.TokenValidationParameters = new TokenValidationParameters

                {

                    ValidateIssuer = true,

                    ValidateAudience = true,

                    ValidateLifetime = true,

                    ValidateIssuerSigningKey = true,

                    ValidIssuer = configuration["Jwt:Issuer"],

                    ValidAudience = configuration["Jwt:Issuer"],

                    IssuerSigningKey = new SymmetricSecurityKey(Encoding.UTF8.GetBytes(configuration["Jwt:Key"]))

                };

                services.AddCors();

            });

        }

    }

}
The values of the validation parameters will depend on the requirement of each project. The valid user and audience we can set reading the configuration file
appsettings.json:
"Jwt": {

    "Key": "veryVerySecretKey",

    "Issuer": "http://localhost:50498/"

  }
Then we need only call it from the
ConfigureServices method in startup.cs:
 // This method gets called by the runtime. Use this method to add services to the container.

        public void ConfigureServices(IServiceCollection services)

        {

            DependencyInjectionConfig.AddScope(services);

            JwtTokenConfig.AddAuthentication(services, Configuration);

            DBContextConfig.Initialize(services, Configuration);

            services.AddMvc();

        }
Now we are ready to create our first controller called
TokenController.cs. The value we set in appsettings.json to "veryVerySecretKey" should match the one we use to create the token, but first, let’s create the LoginViewModel inside our ViewModels project:
namespace SeedAPI.ViewModels

{

    public class LoginViewModel : IBaseViewModel

    {

        public string username { get; set; }

        public string password { get; set; }

    }

}
And finally the controller:
namespace SeedAPI.Web.API.Controllers

{

    [Route("api/Token")]

    public class TokenController : Controller

    {

        private IConfiguration _config;

        public TokenController(IConfiguration config)

        {

            _config = config;

        }

        [AllowAnonymous]

        [HttpPost]

        public dynamic Post([FromBody]LoginViewModel login)

        {

            IActionResult response = Unauthorized();

            var user = Authenticate(login);

            if (user != null)

            {

                var tokenString = BuildToken(user);

                response = Ok(new { token = tokenString });

            }

            return response;

        }

        private string BuildToken(UserViewModel user)

        {

            var key = new SymmetricSecurityKey(Encoding.UTF8.GetBytes(_config["Jwt:Key"]));

            var creds = new SigningCredentials(key, SecurityAlgorithms.HmacSha256);

            var token = new JwtSecurityToken(_config["Jwt:Issuer"],

              _config["Jwt:Issuer"],

              expires: DateTime.Now.AddMinutes(30),

              signingCredentials: creds);

            return new JwtSecurityTokenHandler().WriteToken(token);

        }

        private UserViewModel Authenticate(LoginViewModel login)

        {

            UserViewModel user = null;

            if (login.username == "pablo" && login.password == "secret")

            {

                user = new UserViewModel { name = "Pablo" };

            }

            return user;

        }

    }

}
The
BuildToken method will create the token with the given security code. The Authenticate method just has user validation hard-coded for the moment, but we will need to call the database to validate it in the end.The Application Context
Setting up Entity Framework is really easy since Microsoft launched the Core 2.0 version—EF Core 2 for short. We are going to go into depth with a code-first model using
identityDbContext, so first be sure you have installed all the dependencies. You can use NuGet to manage it: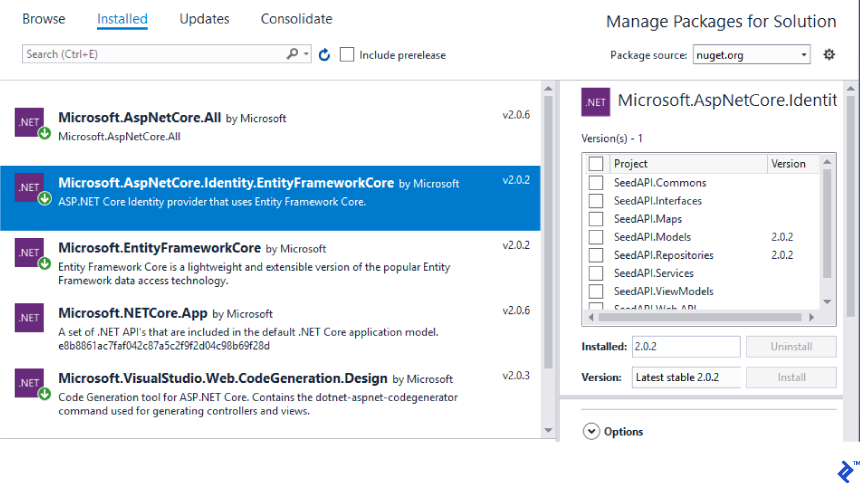
Using the
Models project we can create here inside the Context folder two files, ApplicationContext.cs and IApplicationContext.cs. Also, we will need an EntityBase class.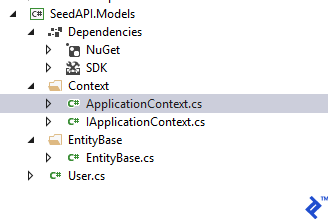
The
EntityBase files will be inherited by each entity model, but User.cs is an identity class and the only entity that will inherit from IdentityUser. Below are both classes:
namespace SeedAPI.Models

{

    public class User : IdentityUser

    {

        public string Name { get; set; }

    }

}
namespace SeedAPI.Models.EntityBase

{

    public class EntityBase

    {

        public DateTime? Created { get; set; }

        public DateTime? Updated { get; set; }

        public bool Deleted { get; set; }

        public EntityBase()

        {

            Deleted = false;

        }

        public virtual int IdentityID()

        {

            return 0;

        }

        public virtual object[] IdentityID(bool dummy = true)

        {

            return new List<object>().ToArray();

        }

    }

}
Now we are ready to create
ApplicationContext.cs, which will look like this:
namespace SeedAPI.Models.Context

{

    public class ApplicationContext : IdentityDbContext<User>, IApplicationContext

    {

        private IDbContextTransaction dbContextTransaction;

        public ApplicationContext(DbContextOptions options)

            : base(options)

        {

                   }


        public DbSet<User> UsersDB { get; set; }

        public new void SaveChanges()

        {

            base.SaveChanges();

        }

        public new DbSet<T> Set<T>() where T : class

        {

            return base.Set<T>();

        }

        public void BeginTransaction()

        {

            dbContextTransaction = Database.BeginTransaction();

        }

        public void CommitTransaction()

        {

            if (dbContextTransaction != null)

            {

                dbContextTransaction.Commit();

            }

        }

        public void RollbackTransaction()

        {

            if (dbContextTransaction != null)

            {

                dbContextTransaction.Rollback();

            }

        }

        public void DisposeTransaction()

        {

            if (dbContextTransaction != null)

            {

                dbContextTransaction.Dispose();

            }

        }

    }

}
We are really close, but first we, will need to create more classes, this time in the
App_Start folder located in the Web.API project. The first class is to initialize the application context and the second one is to create sample data just for the purpose of testing during development.
namespace SeedAPI.Web.API.App_Start

{

    public class DBContextConfig

    {

        public static void Initialize(IConfiguration configuration, IHostingEnvironment env, IServiceProvider svp)

        {

            var optionsBuilder = new DbContextOptionsBuilder();

            if (env.IsDevelopment()) optionsBuilder.UseSqlServer(configuration.GetConnectionString("DefaultConnection"));

            else if (env.IsStaging()) optionsBuilder.UseSqlServer(configuration.GetConnectionString("DefaultConnection"));

            else if (env.IsProduction()) optionsBuilder.UseSqlServer(configuration.GetConnectionString("DefaultConnection"));

            var context = new ApplicationContext(optionsBuilder.Options);

            if(context.Database.EnsureCreated())

            {

                IUserMap service = svp.GetService(typeof(IUserMap)) as IUserMap;

                new DBInitializeConfig(service).DataTest();

            }

        }

        public static void Initialize(IServiceCollection services, IConfiguration configuration)

        {

            services.AddDbContext<ApplicationContext>(options =>

              options.UseSqlServer(configuration.GetConnectionString("DefaultConnection")));

        }

    }

}
namespace SeedAPI.Web.API.App_Start

{

    public class DBInitializeConfig

    {

        private IUserMap userMap;

        public DBInitializeConfig (IUserMap _userMap)

        {

            userMap = _userMap;

        }

        public void DataTest()

        {

            Users();

        }

        private void Users()

        {

            userMap.Create(new UserViewModel() { id = 1, name = "Pablo" });

            userMap.Create(new UserViewModel() { id = 2, name = "Diego" });

        }

    }

}
And we call them from our startup file:
 // This method gets called by the runtime. Use this method to add services to the container.

        public void ConfigureServices(IServiceCollection services)

        {

            DependencyInjectionConfig.AddScope(services);

            JwtTokenConfig.AddAuthentication(services, Configuration);

            DBContextConfig.Initialize(services, Configuration);

            services.AddMvc();

        }

// ...

 // This method gets called by the runtime. Use this method to configure the HTTP request pipeline.

        public void Configure(IApplicationBuilder app, IHostingEnvironment env, IServiceProvider svp)

        {

            if (env.IsDevelopment())

            {

                app.UseDeveloperExceptionPage();

            }

            DBContextConfig.Initialize(Configuration, env, svp);

            app.UseCors(builder => builder

                .AllowAnyOrigin()

                .AllowAnyMethod()

                .AllowAnyHeader()

                .AllowCredentials());

            app.UseAuthentication();

            app.UseMvc();

        }
Dependency Injection
It is a good practice to use dependency injection to move among different projects. This will help us to communicate between controllers and mappers, mappers and services, and services and repositories.
Inside the folder
App_Start we will create the file DependencyInjectionConfig.cs and it will look like this:
namespace SeedAPI.Web.API.App_Start

{

    public class DependencyInjectionConfig

    {

        public static void AddScope(IServiceCollection services)

        {

            services.AddScoped<IApplicationContext, ApplicationContext>();

            services.AddScoped<IUserMap, UserMap>();

            services.AddScoped<IUserService, UserService>();

            services.AddScoped<IUserRepository, UserRepository>();

        }

    }

}
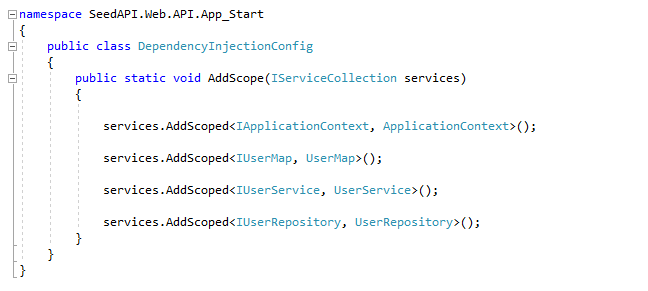
We will need to create for each new entity a new
Map, Service, and Repository, and match them to this file. Then we just need to call it from the startup.cs file:
// This method gets called by the runtime. Use this method to add services to the container.

        public void ConfigureServices(IServiceCollection services)

        {

            DependencyInjectionConfig.AddScope(services);

            JwtTokenConfig.AddAuthentication(services, Configuration);

            DBContextConfig.Initialize(services, Configuration);

            services.AddMvc();

        }
Finally, when we need to get the users list from the database, we can create a controller using this dependency injection:
namespace SeedAPI.Web.API.Controllers

{

    [Route("api/[controller]")]

    [Authorize]

    public class UserController : Controller

    {

        IUserMap userMap;

        public UserController(IUserMap map)

        {

            userMap = map;

        }

        // GET api/user

        [HttpGet]

        public IEnumerable<UserViewModel> Get()

        {

            return userMap.GetAll(); ;

        }

        // GET api/user/5

        [HttpGet("{id}")]

        public string Get(int id)

        {

            return "value";

        }

        // POST api/user

        [HttpPost]

        public void Post([FromBody]string user)

        {

        }

        // PUT api/user/5

        [HttpPut("{id}")]

        public void Put(int id, [FromBody]string user)

        {

        }

        // DELETE api/user/5

        [HttpDelete("{id}")]

        public void Delete(int id)

        {

        }

    }

}
Look how the
Authorize attribute is present here to be sure that the front end has logged in and how dependency injection works in the constructor of the class.
We finally have a call to the database but first, we need to understand the
Map project.
The Maps Project
This step is just to map
ViewModels to and from database models. We must create one for each entity, and, following our previous, example the UserMap.cs file will look like this:
namespace SeedAPI.Maps

{

    public class UserMap : IUserMap

    {

        IUserService userService;

        public UserMap(IUserService service)

        {

            userService = service;

        }

        public UserViewModel Create(UserViewModel viewModel)

        {

            User user = ViewModelToDomain(viewModel);

            return DomainToViewModel(userService.Create(user));

        }

        public bool Update(UserViewModel viewModel)

        {

            User user = ViewModelToDomain(viewModel);

            return userService.Update(user);

        }

        public bool Delete(int id)

        {

            return userService.Delete(id);

        }

        public List<UserViewModel> GetAll()

        {

            return DomainToViewModel(userService.GetAll());

        }

        public UserViewModel DomainToViewModel(User domain)

        {

            UserViewModel model = new UserViewModel();

            model.name = domain.Name;

            return model;

        }

        public List<UserViewModel> DomainToViewModel(List<User> domain)

        {

            List<UserViewModel> model = new List<UserViewModel>();

            foreach (User of in domain)

            {

                model.Add(DomainToViewModel(of));

            }

            return model;

        }

        public User ViewModelToDomain(UserViewModel officeViewModel)

        {

            User domain = new User();

            domain.Name = officeViewModel.name;

            return domain;

        }

    }

}
Looks like once more, dependency injection is working in the constructor of the class, linking Maps to the Services project.
The Services Project
There is not too much to say here: Our example is really simple and we don’t have business logic or code to write here. This project would prove useful in future advanced requirements when we need to calculate or do some logic before or after the database or controller steps. Following the example the class will look pretty bare:
namespace SeedAPI.Services

{

    public class UserService : IUserService

    {

        private IUserRepository repository;

        public UserService(IUserRepository userRepository)

        {

            repository = userRepository;

        }

        public User Create(User domain)

        {

            return repository.Save(domain);

        }

        public bool Update(User domain)

        {

            return repository.Update(domain);

        }

        public bool Delete(int id)

        {

            return repository.Delete(id);

        }

        public List<User> GetAll()

        {

            return repository.GetAll();

        }

    }

}
The Repositories Project
We’re getting to the last section of this tutorial: We just need to make calls to the database, so we create a
UserRepository.cs file where we can read, insert, or update users in the database.
namespace SeedAPI.Repositories

{

    public class UserRepository : BaseRepository, IUserRepository

    {

        public UserRepository(IApplicationContext context)

            : base(context)

        { }

        public User Save(User domain)

        {

            try

            {

                var us = InsertUser<User>(domain);

                return us;

            }

            catch (Exception ex)

            {

                //ErrorManager.ErrorHandler.HandleError(ex);

                throw ex;

            }

        }

        public bool Update(User domain)

        {

            try

            {

                //domain.Updated = DateTime.Now;

                UpdateUser<User>(domain);

                return true;

            }

            catch (Exception ex)

            {

                //ErrorManager.ErrorHandler.HandleError(ex);

                throw ex;

            }

        }

        public bool Delete(int id)

        {

            try

            {

                User user = Context.UsersDB.Where(x => x.Id.Equals(id)).FirstOrDefault();


                if (user != null)

                {

                    //Delete<User>(user);

                    return true;

                }

                else

                {

                    return false;

                }

            }

            catch (Exception ex)

            {

                //ErrorManager.ErrorHandler.HandleError(ex);

                throw ex;

            }

        }

        public List<User> GetAll()

        {

            try

            {

                return Context.UsersDB.OrderBy(x => x.Name).ToList();

            }

            catch (Exception ex)

            {

                //ErrorManager.ErrorHandler.HandleError(ex);

                throw ex;

            }

        }

    }

}
Summary
In this article, I explained how to create a good architecture using Angular 5 and Web API Core 2. At this point, you’ve created the base for a big project with code that supports a large growth in requirements.
The truth is, nothing competes with JavaScript in the front end and what can compete with C# if you need the support of SQL Server and Entity Framework in the back end? So the idea of this article was to combine the best of two worlds and I hope you’ve enjoyed it.