Sunday, 28 October 2018

Use the Angular project template with ASP.NET Core


The updated Angular project template provides a convenient starting point for ASP.NET Core apps using Angular and the Angular CLI to implement a rich, client-side user interface (UI).
The template is equivalent to creating an ASP.NET Core project to act as an API backend and an Angular CLI project to act as a UI. The template offers the convenience of hosting both project types in a single app project. Consequently, the app project can be built and published as a single unit.

Create a new app

If you have ASP.NET Core 2.1 installed, there's no need to install the Angular project template.
Create a new project from a command prompt using the command dotnet new angular in an empty directory. For example, the following commands create the app in a my-new-app directory and switch to that directory:
console
dotnet new angular -o my-new-app
cd my-new-app
Run the app from either Visual Studio or the .NET Core CLI:
Open the generated .csproj file, and run the app as normal from there.
The build process restores npm dependencies on the first run, which can take several minutes. Subsequent builds are much faster.
The project template creates an ASP.NET Core app and an Angular app. The ASP.NET Core app is intended to be used for data access, authorization, and other server-side concerns. The Angular app, residing in the ClientApp subdirectory, is intended to be used for all UI concerns.

Add pages, images, styles, modules, etc.

The ClientApp directory contains a standard Angular CLI app. See the official Angular documentationfor more information.
There are slight differences between the Angular app created by this template and the one created by Angular CLI itself (via ng new); however, the app's capabilities are unchanged. The app created by the template contains a Bootstrap-based layout and a basic routing example.

Run ng commands

In a command prompt, switch to the ClientApp subdirectory:
console
cd ClientApp
If you have the ng tool installed globally, you can run any of its commands. For example, you can run ng lintng test, or any of the other Angular CLI commands. There's no need to run ng serve though, because your ASP.NET Core app deals with serving both server-side and client-side parts of your app. Internally, it uses ng serve in development.
If you don't have the ng tool installed, run npm run ng instead. For example, you can run npm run ng lint or npm run ng test.

Install npm packages

To install third-party npm packages, use a command prompt in the ClientApp subdirectory. For example:
console
cd ClientApp
npm install --save <package_name>

Publish and deploy

In development, the app runs in a mode optimized for developer convenience. For example, JavaScript bundles include source maps (so that when debugging, you can see your original TypeScript code). The app watches for TypeScript, HTML, and CSS file changes on disk and automatically recompiles and reloads when it sees those files change.
In production, serve a version of your app that's optimized for performance. This is configured to happen automatically. When you publish, the build configuration emits a minified, ahead-of-time (AoT) compiled build of your client-side code. Unlike the development build, the production build doesn't require Node.js to be installed on the server (unless you have enabled server-side prerendering).

Run "ng serve" independently

The project is configured to start its own instance of the Angular CLI server in the background when the ASP.NET Core app starts in development mode. This is convenient because you don't have to run a separate server manually.
There's a drawback to this default setup. Each time you modify your C# code and your ASP.NET Core app needs to restart, the Angular CLI server restarts. Around 10 seconds is required to start back up. If you're making frequent C# code edits and don't want to wait for Angular CLI to restart, run the Angular CLI server externally, independently of the ASP.NET Core process. To do so:
  1. In a command prompt, switch to the ClientApp subdirectory, and launch the Angular CLI development server:
    console
    cd ClientApp
    npm start
    
     Important
    Use npm start to launch the Angular CLI development server, not ng serve, so that the configuration in package.json is respected. To pass additional parameters to the Angular CLI server, add them to the relevant scripts line in your package.json file.
  2. Modify your ASP.NET Core app to use the external Angular CLI instance instead of launching one of its own. In your Startup class, replace the spa.UseAngularCliServer invocation with the following:
    C#
    spa.UseProxyToSpaDevelopmentServer("http://localhost:4200");
    
When you start your ASP.NET Core app, it won't launch an Angular CLI server. The instance you started manually is used instead. This enables it to start and restart faster. It's no longer waiting for Angular CLI to rebuild your client app each time.

Server-side rendering

As a performance feature, you can choose to pre-render your Angular app on the server as well as running it on the client. This means that browsers receive HTML markup representing your app's initial UI, so they display it even before downloading and executing your JavaScript bundles. Most of the implementation of this comes from an Angular feature called Angular Universal.
 Tip
Enabling server-side rendering (SSR) introduces a number of extra complications both during development and deployment. Read drawbacks of SSR to determine if SSR is a good fit for your requirements.
To enable SSR, you need to make a number of additions to your project.
In the Startup class, after the line that configures spa.Options.SourcePath, and before the call to UseAngularCliServer or UseProxyToSpaDevelopmentServer, add the following:
C#
app.UseSpa(spa =>
{
    spa.Options.SourcePath = "ClientApp";

    spa.UseSpaPrerendering(options =>
    {
        options.BootModulePath = $"{spa.Options.SourcePath}/dist-server/main.bundle.js";
        options.BootModuleBuilder = env.IsDevelopment()
            ? new AngularCliBuilder(npmScript: "build:ssr")
            : null;
        options.ExcludeUrls = new[] { "/sockjs-node" };
    });

    if (env.IsDevelopment())
    {
        spa.UseAngularCliServer(npmScript: "start");
    }
});
In development mode, this code attempts to build the SSR bundle by running the script build:ssr, which is defined in ClientApp\package.json. This builds an Angular app named ssr, which isn't yet defined.
At the end of the apps array in ClientApp/.angular-cli.json, define an extra app with name ssr. Use the following options:
JSON
{
  "name": "ssr",
  "root": "src",
  "outDir": "dist-server",
  "assets": [
    "assets"
  ],
  "main": "main.server.ts",
  "tsconfig": "tsconfig.server.json",
  "prefix": "app",
  "scripts": [],
  "environmentSource": "environments/environment.ts",
  "environments": {
    "dev": "environments/environment.ts",
    "prod": "environments/environment.prod.ts"
  },
  "platform": "server"
}
This new SSR-enabled app configuration requires two further files: tsconfig.server.json and main.server.ts. The tsconfig.server.json file specifies TypeScript compilation options. The main.server.tsfile serves as the code entry point during SSR.
Add a new file called tsconfig.server.json inside ClientApp/src (alongside the existing tsconfig.app.json), containing the following:
JSON
{
    "extends": "../tsconfig.json",
    "compilerOptions": {
      "baseUrl": "./",
      "module": "commonjs"
    },
    "angularCompilerOptions": {
      "entryModule": "app/app.server.module#AppServerModule"
    }
}
This file configures Angular's AoT compiler to look for a module called app.server.module. Add this by creating a new file at ClientApp/src/app/app.server.module.ts (alongside the existing app.module.ts) containing the following:
TypeScript
import { NgModule } from '@angular/core';
import { ServerModule } from '@angular/platform-server';
import { ModuleMapLoaderModule } from '@nguniversal/module-map-ngfactory-loader';
import { AppComponent } from './app.component';
import { AppModule } from './app.module';

@NgModule({
    imports: [AppModule, ServerModule, ModuleMapLoaderModule],
    bootstrap: [AppComponent]
})
export class AppServerModule { }
This module inherits from your client-side app.module and defines which extra Angular modules are available during SSR.
Recall that the new ssr entry in .angular-cli.json referenced an entry point file called main.server.ts. You haven't yet added that file, and now is time to do so. Create a new file at ClientApp/src/main.server.ts (alongside the existing main.ts), containing the following:
TypeScript
import 'zone.js/dist/zone-node';
import 'reflect-metadata';
import { renderModule, renderModuleFactory } from '@angular/platform-server';
import { APP_BASE_HREF } from '@angular/common';
import { enableProdMode } from '@angular/core';
import { provideModuleMap } from '@nguniversal/module-map-ngfactory-loader';
import { createServerRenderer } from 'aspnet-prerendering';
export { AppServerModule } from './app/app.server.module';

enableProdMode();

export default createServerRenderer(params => {
  const { AppServerModule, AppServerModuleNgFactory, LAZY_MODULE_MAP } = (module as any).exports;
 
  const options = {
    document: params.data.originalHtml,
    url: params.url,
    extraProviders: [
      provideModuleMap(LAZY_MODULE_MAP),
      { provide: APP_BASE_HREF, useValue: params.baseUrl },
      { provide: 'BASE_URL', useValue: params.origin + params.baseUrl }
    ]
  };

  const renderPromise = AppServerModuleNgFactory
    ? /* AoT */ renderModuleFactory(AppServerModuleNgFactory, options)
    : /* dev */ renderModule(AppServerModule, options);
    
  return renderPromise.then(html => ({ html }));
});
This file's code is what ASP.NET Core executes for each request when it runs the UseSpaPrerenderingmiddleware that you added to the Startup class. It deals with receiving params from the .NET code (such as the URL being requested), and making calls to Angular SSR APIs to get the resulting HTML.
Strictly-speaking, this is sufficient to enable SSR in development mode. It's essential to make one final change so that your app works correctly when published. In your app's main .csproj file, set the BuildServerSideRenderer property value to true:
XML
<!-- Set this to true if you enable server-side prerendering -->
<BuildServerSideRenderer>true</BuildServerSideRenderer>
This configures the build process to run build:ssr during publishing and deploy the SSR files to the server. If you don't enable this, SSR fails in production.
When your app runs in either development or production mode, the Angular code pre-renders as HTML on the server. The client-side code executes as normal.

Pass data from .NET code into TypeScript code

During SSR, you might want to pass per-request data from your ASP.NET Core app into your Angular app. For example, you could pass cookie information or something read from a database. To do this, edit your Startup class. In the callback for UseSpaPrerendering, set a value for options.SupplyData such as the following:
C#
options.SupplyData = (context, data) =>
{
    // Creates a new value called isHttpsRequest that's passed to TypeScript code
    data["isHttpsRequest"] = context.Request.IsHttps;
};
The SupplyData callback lets you pass arbitrary, per-request, JSON-serializable data (for example, strings, booleans, or numbers). Your main.server.ts code receives this as params.data. For example, the preceding code sample passes a boolean value as params.data.isHttpsRequest into the createServerRenderer callback. You can pass this to other parts of your app in any way supported by Angular. For example, see how main.server.ts passes the BASE_URL value to any component whose constructor is declared to receive it.

Drawbacks of SSR

Not all apps benefit from SSR. The primary benefit is perceived performance. Visitors reaching your app over a slow network connection or on slow mobile devices see the initial UI quickly, even if it takes a while to fetch or parse the JavaScript bundles. However, many SPAs are mainly used over fast, internal company networks on fast computers where the app appears almost instantly.
At the same time, there are significant drawbacks to enabling SSR. It adds complexity to your development process. Your code must run in two different environments: client-side and server-side (in a Node.js environment invoked from ASP.NET Core). Here are some things to bear in mind:
  • SSR requires a Node.js installation on your production servers. This is automatically the case for some deployment scenarios, such as Azure App Services, but not for others, such as Azure Service Fabric.
  • Enabling the BuildServerSideRenderer build flag causes your node_modules directory to publish. This folder contains 20,000+ files, which increases deployment time.
  • To run your code in a Node.js environment, it can't rely on the existence of browser-specific JavaScript APIs such as window or localStorage. If your code (or some third-party library you reference) tries to use these APIs, you'll get an error during SSR. For example, don't use jQuery because it references browser-specific APIs in many places. To prevent errors, you must either avoid SSR or avoid browser-specific APIs or libraries. You can wrap any calls to such APIs in checks to ensure they aren't invoked during SSR. For example, use a check such as the following in JavaScript or TypeScript code:
    JavaScript
    if (typeof window !== 'undefined') {
        // Call browser-specific APIs here
    }
Angular Evolution - Version 1.x to 6

Angular.js, one of the famous JavaScript frameworks for developing rich web applications using HTML5 and latest versions of JavaScript (ES5 and above), has evolved over time.
Angular started as a framework aimed to develop rich web applications, faster and better. It provided structure to the not so evolved JavaScript. As browsers got better, new language features were added to JavaScript. To keep up with these changes, Angular has evolved too.
This tutorial is from the DotNetCurry(DNC) Magazine with in-depth tutorials and best practices in JavaScript and .NET. This magazine is aimed at Developers, Architects and Technical Managers and covers TypeScript, Angular, React, C#, Design Patterns, .NET Core, MVC, Azure, DevOps, ALM, and more. Subscribe to this magazine for FREE and receive all previous, current and upcoming editions, right in your Inbox. No Spam Policy.
This article tries to summarize this evolution process. It attempts to look back at the original context of Angular application development and its progress.
This article does not intend to be a tutorial for all the features over time, rather it tries to summarize and provide a bucket list of enhancements over time.
Angular Evolution

Angular Evolution - v1.x to v6

AngularJS 1.x Context

AngularJS 1.x is seen as MV* framework.
The Model-View-Controller (MVC) and its variations Model-View-Presenter(MVP) and Model-View-View-Model(MVVM) frameworks have been used with applications for a very long time. Be it web applications developed using Java, Microsoft ASP.NET or iOS apps using Objective C, they have all used an architectural pattern. It is a good fit for all applications that have a view to present to the user.
AngularJS’s MV* approach was to support any variations of these famous patterns. In an AngularJS application, that runs in a web browser,
  1. Controller is a function defined using the API. An object $scope is injected in the function.
  2. View is defined by HTML templates. Templates can bind data on $scope from the controller.
  3. Objects on $scope could be either Model or View-Model, depending on overall architecture including server-side.
angular-mvc-framework
Figure 1: MV* framework
Even though this is a proven architectural pattern and is the standard solution for an application with view, there are certain disadvantages.
Modern web applications required reusable components or custom HTML elements. One should be able to reuse these elements by adding it in the markup and providing state on the fly. Largely, AngularJS 1.x applications achieved it with Directive, which allowed creating custom HTML elements with AngularJS. They allowed manipulating DOM.
Angular 2 application created a category of directives called Components, which allowed creating custom HTML elements and reusing them.
Angular 2 onwards, there is no explicit controller. The framework is not seen as MV* framework anymore.
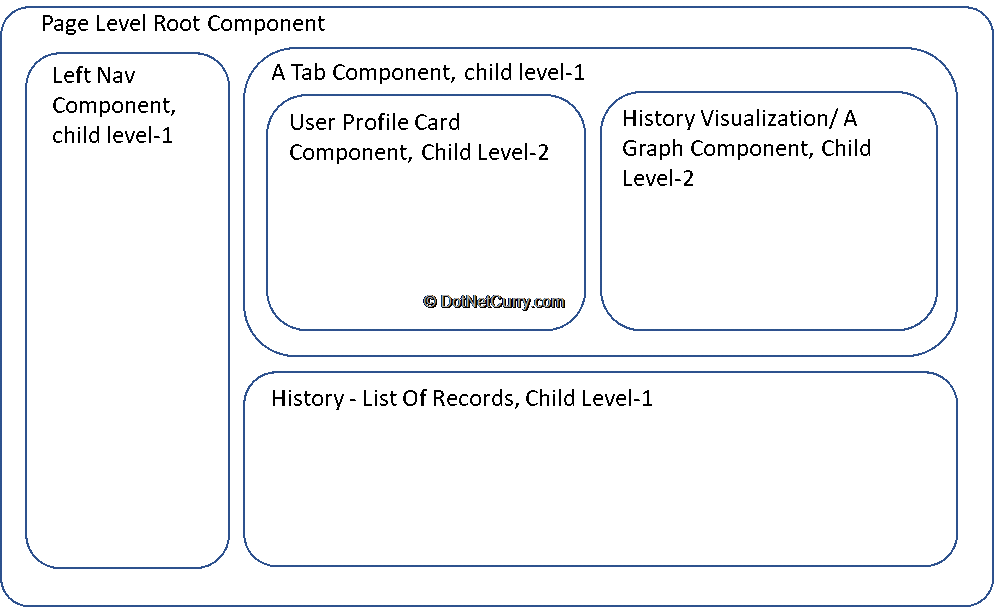
An Angular application is now seen as composition of components. See Figure 2 where each component has its own view. It may use HTML elements to render data. It may also have multiple child components providing their own view and functionality.
angular-components
Figure 2: Composition of components

Unidirectional data flow

With AngularJS 1.x, two-way data binding is a powerful feature. The data on $scope object in the controller is bound to the template/view. If a change happens to this object, it’s updated in the view. If the view changes values, it’s updated on the $scope object, as well as all other view references.
There could be child elements, views or components (AngularJS 1.5 onwards components were introduced) that are tied to the object. When a change occurs in the child component, it’s reflected in the parent and everywhere else that’s maintaining reference to this object.
This incurred high performance cost.
Angular 2 encourages using unidirectional data flow. State propagation (when data changes) always flows from parent component to the child, not the other way around.
If child component has to change parent’s state, it will send an event to the parent. The parent component propagates state change and updates itself as well as all child elements dependent on the state.
Note: There are patterns like Redux that ease maintaining application state and ensure unidirectional data flow between parent and child components. Moving to the component model of developing UI applications makes it easy to use such a pattern. It’s difficult to achieve the same results with MVC and AngularJS 1.x.

Change Detection

Continuing on the data binding topic we discussed in a previous section, it has been one of the important features of AngularJS 1.x.
The Model object is bound to the view in the HTML template. With two-way data binding, changes to the model are reflected in the view and vice-versa. It means model (object structure) is in sync with the DOM (Document Object Model), which is nothing, but the view.
This feature is very beneficial but is also challenging. For the view to be in sync with the model objects, change detection needs to happen.
AngularJS 1.x framework addressed it with dirty checks. The process is asynchronous.
However, the framework looped through the entire DOM structure to identify changes and synchronize view and the model. The process was costly and relatively slow.
Certain other frameworks like ReactJS addressed its Virtual DOM that differed changes and updated only the changed sections in the view.
This change detection process saw a major improvement with Angular 2 and above. Following are some of the improvements in Angular 2 and above.
Improvements in Angular 2

ZoneJS:

Angular included ZoneJS, which provides execution context for a piece of JavaScript code.
Angular uses it for change detection. Angular extended it (forked the library) and called it ngZone.
With the help of this API, Angular identifies asynchronous operations that might have caused a change. The asynchronous operations could include DOM events like button click, text field value change or an XHR/fetch API call to retrieve data from the server. This API has hooks to trigger synchronizing view.

Change Detection Strategy:

Angular 2 and above has two change detection strategies:
Default
Each component in Angular has its own change detector. It is created during the compilation process and hence is specific to each component. Making it specific helps improve performance.
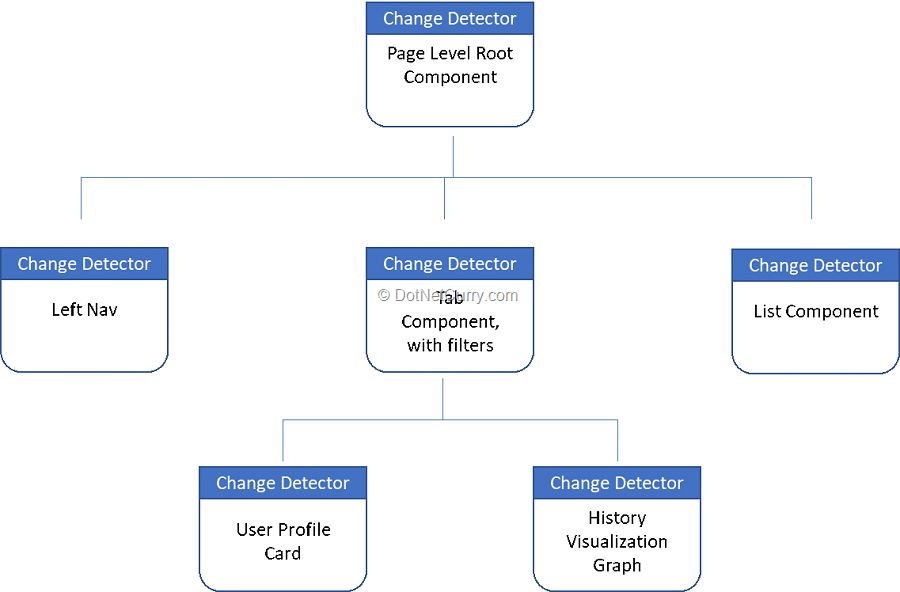
DOM is organized as a tree while it’s rendered on the view. Components primarily render the elements and nodes creating a component tree in an Angular application. As each component has its own change detector, we have a tree of change detectors.
NgZones API, specifically ApplicationRef’s onTurnDone event triggers change detector process. As mentioned earlier, NgZones provides execution context and hence it can identify events that can cause change, be it a button click or successful XHR call response.
The change detectors run through component tree and provide the resultant DOM to update the view. This process is fast primarily due to component specific change detectors. See Figure 3.
angular-component-tree
onPush
With Angular 2 and above, performance can also be improved with onPush change detection strategy.
Immutable objects: JavaScript objects (non-primitive types) are call by reference. When we compare two objects, in reality we are comparing references, not the data or values.
With mutable objects, data might get updated with a change, but the reference will remain the same. Here a simple comparison will not be enough to detect a change. Hence the Angular framework will have to perform a deep comparison, which is a costly operation. The default change detection strategy incurs this additional cost in performance.
As we use immutable objects in a component, we can instruct the component to check for value change only when object reference changes. It will perform better as it reduces work.
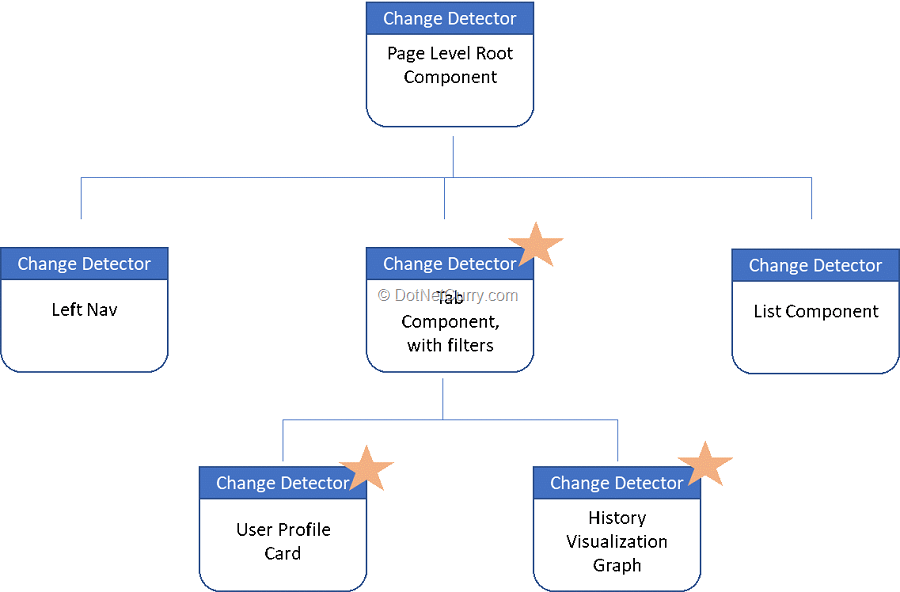
Consider Figure 3. Tab Component with filter has two child components. The child components User Profile Card and History Visualization Card uses filter input from the parent component.
When user changes filter condition, the onPush strategy on the child components and immutable objects are passed-in through input attributes. Angular compares the object references and change detector for just the components invoked. It makes the change detection even more efficient. See Figure 4.
change-detection

RxJS

Traditionally, Promise API has been very effective with JavaScript applications. They are asynchronous API for long running operations. The long running operation could be an XHR call or iterating through a large result-set in the browser.
Promises help invoke success or failure callback once the long running operation is ready with the results.
However, it’s a one-time operation.
The promise is closed once result or error is obtained. There is no possibility to stream multiple results. Chaining multiple promises is clunky.
An observable is a next step to promises. RxJS is an implementation of Observables and much more. Observable can stream multiple results until it’s closed. It is easy to create an observable from multiple regular operations like looping through an array or converting to an observable from a promise associated with a HTTP call etc.
An observable could also be UI interactions. Actions emitted from a text field as the user is typing-in the text, is a stream, and could be handled effectively with an observable.
Operators - RxJS also comes with ready-made solutions for recurring scenarios working with observables.
Following are some examples.
  • Retry - We could attempt to retry a failed HTTP call
  • Debounce - Certain observables like UI actions typing in a text field could emit results too quickly, with-in tens of milliseconds. If we are using the data real-time to make a HTTP call, too many calls are triggered. An operator like debounce could be used to wait for certain milliseconds before triggering the next call.

TypeScript

TypeScript is an extension to JavaScript, in other words, it’s a superset to JavaScript. It is an open source project backed by Microsoft. Angular takes advantage of additional features and benefits with the language.
  • Data Types - Supports defining data type while creating a variable
  • Decorator - Supports decorating additional behavior to a class or a function.
  • Generics – Supports building a function or a class that defines data type dynamically. Makes it future proof, as a function parameter’s data type or return type need not be defined while creating the function. Similarly, class field type or parameters for a method on the class need not be defined while creating the class. The function creating an object of generic class or calling generic function can specify the type on the fly.
  • Classes - Similar to ES6, classes can be created in TypeScript code. However, it includes future JavaScript features like controlling visibility of a class field or a method with public, private or protected. A “similar” proposal has been made for JavaScript for creating private fields. It is a Stage 3 proposal in ECMA Script at the time of this writing. Click here to view the proposal.
  • Interfaces - An interface allows defining structure or shape of an object. It helps define contacts for the API.
  • Enum – TypeScript provides an easy way to create named constants with enums.
  • IDE friendly – TypeScript with types, compiler and other related features makes it easy for IDEs like Visual Studio Code to provide developer friendly help on APIs and function signatures, navigating to the definitions and references. It will also be possible for IDEs to identify and show errors & warnings better and faster as we type the code.
While Angular was being built, the Angular team announced developing a language extension on top of TypeScript, called AtScript. However, TypeScript team driven by Microsoft chose to implement the additional AtScript features in TypeScript version 1.5. With it, Angular chose to make TypeScript a primary language for Angular. However, there are variations to use Angular with basic JavaScript or Dart.

Changes with each version of Angular

The sections we discussed so far have detailed AngularJS 1.x pros and cons and the purpose of Angular 2.
Upgradation to Angular 2 was a major shift in approach and application architecture. The upgradation process was relatively challenging.
Beyond Angular 2 (v4, v5 and now v6), it has been an incremental update to the framework. Majority of the changes are non-breaking. They are enhancements, new features and bug fixes.
The rest of this article will take a different approach going forward. The latest release will be discussed first, going down to connect with Angular 2 at the end.

Angular 6 – What’s New?

Angular 6 released early May 2018 has considerable improvements to Angular CLI and the Angular eco-system. Following are some of the major improvements.

Support For Angular Elements

Angular Elements is a step in the direction to support Web Components. With the update, an Angular component can be registered as a custom component. A custom component can be used outside Angular context. We may include the script and use the component in a React, Angular or even a simple HTML page.
It enables Angular to be used in a smaller context. It doesn’t have to be all or nothing for Angular applications. Sections of the applications, especially reusable components, could be built in Angular and reused elsewhere.

Angular CLI updates

Angular CLI version has been made consistent with rest of the libraries in Angular Monorepo. The version number has a jump to 6.x from 1.7.x. Some of the important features are as follows.
ng add
Enables adding features to an existing project. For example, a pre-existing Angular application can add material design features with ng add @angular/material command.
ng update
With each version update, this feature enables the project to be in sync. It helps project dependencies synchronize to the latest versions. Third party libraries too can provide this feature for applications using the libraries. It can be done with schematic, which needs to be provided by a third-party library.
New starter components with ng generate
Traditionally ng generate helps add Angular artifacts like components or services to the project. With the update, additional starter components can be added to the project.
Specifically, with Angular Material:
  1. Use ng add @angular/material to register new starter components
  2. To add a side nav starter components to the project use ng generate @angular/material:material-nav --name:a-custom-name

Support for workspace and library
A CLI workspace supports more than one project at one place. These projects can be applications or libraries. A library is a special type of project that could readily be published as a package in NPM or Yarn. Applications consume libraries.
Traditionally we install libraries from an NPM registry (into node_modules) and import in the code file using the library. If the library is part of the application we are developing, it helps identify it as a separate library. The Module system will look for the built library in tsconfig, if not found, it will look for it in node_modules
We can build the library using ng build library-name command. Use --prod flag if the intent is to publish the build to a registry.

Ivy Renderer

The Angular team is working on a new renderer that could under the hood decrease the bundle size, render the application faster and boost change detection so much so that it is faster compared to the current view engine. It is expected to be a non-breaking change with no changes required for the current applications once upgraded to a version that supports the new renderer.
The render works in a pipeline. It is designed by keeping tree-shaking in mind, which helps reduce size of the bundles. Ivy also helps debug template code by adding debug points and pointing to the line of HTML code that caused an error. This is a powerful feature.
Ivy renderer is officially not included in Angular 6. However, Ivy runtime is in active development followed by compiler support. New features are being included in beta releases.

Provide with Injectable

Angular 6 now allows providing a service with injectable decorator. A service could be provided at module level or at component level. Angular creates an instance of the service based on it.
A service provided in component tree has a smaller life cycle. As new instances of component are created, the Service is instantiated multiple times. However, providing a Service at module level reuses the same service instances in many components.
For better tree-shaking capabilities, Angular 6 allows for providing a service at module level with injectable decorator. Tree shaking is a bundle optimization process that helps reduce the bundle size. Smaller bundles help browser load, bootstrap and run an application faster. Earlier, service could be provided with providers parameter on @ngModuledecorator for the module. This approach will continue to work even now.
The decorator injectable is used on the Service class. A parameter providedIn can use the string root or a module name that should be providing the service. As the name suggests, root provides the service with the root module. Providing with a module name works better in lazy load scenarios.
import { Injectable } from '@angular/core';
 
@Injectable({
  providedIn: 'root',
})
export class CustomerSampleService {
  constructor() { }
}

Angular 5

Angular 5 was released in Nov 2017. While the version before it (Angular 4) provided features and new syntax for developers, this version focused on performance and reducing bundle size for better bootstrap time. In fact, the first few releases (v4, v5, v6) after a major version change (v2) has considerable improvements to performance and Angular bundle size.

Efficient bundles

Angular 5 made improvements to generating efficient production bundles. The size of the bundle was reduced. Smaller bundle size meant faster load time for an Angular application.
For the projects generated using Angular CLI, a Build Optimizer was included. It achieved efficient bundle size because of the following reasons:
- The tree-shaking was improved with the Build Optimizer in Angular 5. Tree-shaking is a process by which unused and dead code can be removed from a bundle that is being generated. The build optimizer marks parts of the application pure, hence implementing effective tree shaking.
- Angular 5 was updated to use RxJS 5.5. It introduced pipeable operators (earlier called lettable operators), which allowed importing one of many, non-default operators with traditional ES6 syntax. This helped tree shaking capabilities, when used with Angular CLI.
Note: Projects setup to use Web Pack directly need to update build process to include ModuleConcatenationPlugin, which is available for WebPack version 3 and above.
Following need not be done any more:
Import ‘rxjs/add/operator/scan’
Import ‘rxjs/add/operator/filter’
We may use the following syntax,
Import {scan, filter} from ‘rxjs/operators’
Note: Also, it’s plural operators (rxjs/operators) as opposed to singular operator (rxjs/add/operator/xyz) now.
- It is a common practice in Angular to use many decorators. They add dynamic capabilities to the code units. The Compiler would use this code. With Ahead of Time compilation (AoT), one wouldn’t need the decorator to be still part of the bundle. Hence, they were cleaned-up from a generated bundle, thereby reducing size of the bundle.
- Multiple polyfils are not required anymore with Angular 5. Following are a couple of examples:
  • There were new pipes added to handle internationalization of numbers, dates and currency values. Before this change, Angular was using browser’s i18n API. It would mean there are subtle changes on how browsers are providing values to the application and it needed polyfills as well.
  • Angular 5 updated the pipes with its own implementation instead of depending on browser. It would also mean, we wouldn’t need polyfills to be included.
  • Angular had been using Reflective Injector for instantiating and injecting classes. Reflective injector is dynamic, needed additional map files and polyfills. It was replaced by Static Injector, which is performant, primarily because there is no dynamic decision making. It instantiates and injects Angular artifact configured by developer. It also allowed the need of polyfills and map files.

Enhancement to compilation at development time

ng serve used for live compilation and reloads at the development time had an addition to support Ahead of Time compilation. Use ng serve --aot. This will eliminate variation when publishing a build, which would have been done with AOT.
- Angular compiler is hooked into TypeScript transform improving speed of live compilation and reload at the development time. It will make it easy for developers to see the changes reflected in the app being debugged.

Deprecated @angular/http module

HttpClientModule and HttpClient in @angular/common/http introduced little earlier will become mainstream client API to access services over HTTP. It would mean @angular/http is deprecated. Applications will have to upgrade and remove references to @angular/http.
HttpClient comes with more features,
  • Additional progress events while making Http calls.
  • Request and response objects are immutable
  • JSON response doesn’t required to be parsed. JSON objects are readily available.
  • Use interceptors to add middleware logic in the Http calls’ pipeline

Improved Decorator Support

Angular 5 enhancement to decorators allow lambdas and dynamic values to be used in the decorators. Lambdas allow using unnamed functions instead of traditional function syntax for callbacks and values provided in a decorator.

Angular 4

Angular 4.0.0 was released in March 2017. It was the first major version after Angular 2 and considering that, many developer focused features and enhancements were included. However, most of these changes were non-breaking.
A major version update between 1.x to 2.x was an architecture shift in building rich UI applications with Angular. Many applications were rewritten in Angular 2. Organizations, developers and projects spent a lot of time and resources in upgrading their apps from Angular 1.x to 2.x.
However Angular 4 was a totally different scenario. It had incremental changes, and improvements to the framework and applications that were written using the framework.

No major version 3.x

MonoRepo: Angular 2 has been a single repository, with individual packages downloadable through npm with the @angular/package-name convention. For example @angular/core, @angular/http, @angular/router so on.
Considering this approach, it was important to have a consistent version numbering among various packages. Hence, the Angular team skipped a major version 3. It was to keep up the framework with Angular Router’s version. Doing so would help avoid confusions with certain parts of the framework on version 4, while the others on version 3.
Following are some more improvements in Angular 4.x
Move animations out of @angular/core
One of the problems Angular had been facing is with size of the bundles. For projects, the framework and all vendor dependencies could grow pretty big. In an effort to reduce the bundle footprint, animations were moved out. Any project migrating from Angular 2 to 4 most likely would install and import animations package explicitly.
import BrowserAnimationsModule from @angular/platform-browser/animations.
Note: reference the module in imports array of @NgModule
Improved View Engine
Under the hood, AOT compilation process improved with version 4. It reduced size of the compiled component by almost half. A smaller bundle size was achieved with this change.
Angular Universal
Server-side rendering capabilities were made mainstream with version 4. Angular Universal allowed server-side rendering for better search engine crawling/indexing capabilities.
Improved conditional statements in the template
ng-if supported else conditions with Angular v4 onwards. The ng-if and else statements supported conditional rendering in the view. It was an enhancement to this feature.
Read the following DotNetCurry article for comprehensive list of Angular 4 features- www.dotnetcurry.com/angular/1385/angular-4-cheat-sheet

Conclusion

Angular brought a major shift with the version 2. However, there are many applications today running on AngularJS 1.x probably due to the cost and effort associated with migrating to Angular 2.
However, considering the improvements, adoption of latest technologies like TypeScript, RxJS etc., I feel it is worth the effort. The migration not only helps with clearing the tech debt, but also helps make the application faster, leaner and better.

Angular Tutorial (Update to Angular 7)

As Angular 7 has just been released a few days ago. This tutorial is updated to show you how to create an Angular 7 project and the new fe...