One of the biggest challenges with any application is managing data. In the world of Angular, there are a lot of patterns to follow to manage your application. These typically involve using decorators like
Input and Output, or things like RxJs Observables to watch for data changes. However, there is a reactive state technology that solves this challenge called NgRx.
NgRx is an open source library that provides reactive state management for your Angular applications. Inspired by Redux, NgRx provides a way to maintain data in your Angular application as a single source of truth. NgRxuses streams to interact with a data store. This data store connects to your components and services, and ultimately simplifies the entire process of data management in your Angular application. Instead of injecting services everywhere and managing communication between them, NgRx manages your application from one singular source. Using NgRx, you work with your application in terms of its overall state, instead of individual components.
In some of my recent posts, I’ve mentioned an application I built called Goose Weather. You can view it at https://www.gooseweather.com. Building it was a great learning experience because I got a chance to use a lot of the newer features of Angular and NgRx. The application uses NOAA APIs and the OpenWeatherMapAPI service to create a weather forecast. I know it’s a bit of a stretch to use NgRx for this application, but propagating the weather data to the display cards shows how you could use it in a more complex application.
In case you were wondering, I named Goose Weather for my wife. She wanted to be a meteorologist growing up, and my nickname for her has always been Goose (queue aww sounds). So when I was coming up with a name, “Goose Weather” was the natural winner. To answer your next question, she never became a meteorologist, but instead, became a tax accountant (queue snoring).
In the following sections, I’m going to discuss how NgRx works, and then walk through how I set it up with Goose Weather.
How NgRx works
There are five parts that constitute NgRx:
- Store
- Reducers (and Meta-Reducers)
- Actions
- Selectors
- Effects
The basic implementation looks like the following:
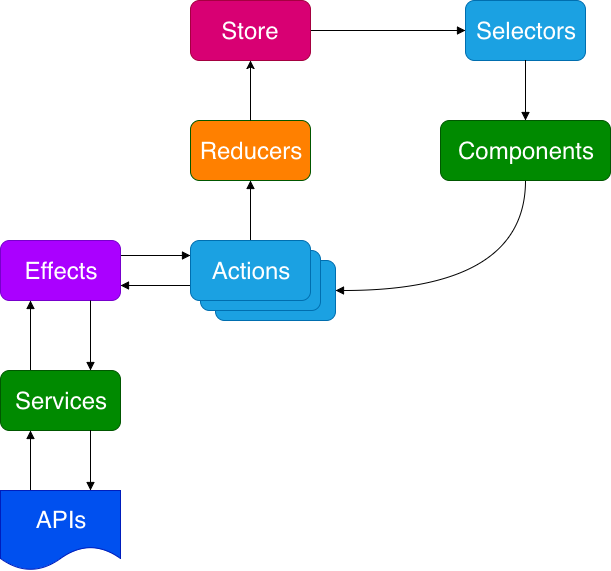
- Your application’s state is maintained in the store. The store is immutable.
- Your application’s components can subscribe to the store and get automatic updates of state through selectors.
- Selectors enable components to get a slice (a part) of your application’s state, and also mutate state with selector functions.
- Actions modify the state of the store by using reducers (functions) that enable changes while keeping it immutable.
- Meta-Reducers (not shown) are hooks where you can pre or post-process actions before they get invoked.
- Effects occur as a result from actions, and can also create actions when called. Effects primary responsibility is to create async side-effects (like service calls to APIs), that ultimately generate other actions.
This is a big change in the way that traditional applications are built, and creates a paradigm that greatly simplifies complex applications.
NgRx can also simplify the architecture of your application, as you can use it to replace property and event bindings. This is obviously based on the project, and there are many ways to use a hybrid approach or not even use NgRx at all. For guidelines on structuring your application, I recommend the Pluralsight course “Angular NgRx: Getting Started” with Duncan Hunter and Deborah Kurata.
Before you Start Coding
Before we start, I need to point out that there is a bit of a learning curve with NgRx. I recommend getting familiar with RxJS Operators and Observablesin particular. It also helps to take a look at the RxJS documentation at the Reactivex Overview site and Angular’s Documentation on RxJS. I’m also assuming since you’re reading a blog post on NgRx, that you’re already familiar with the basics about Angular2+ projects and the CLI. If not, I recommend reviewing the documentation here.
I really came to understand observables through error handling. I wrote a post on this titled Exception Handling with NgRx Effects that has a good intro to using observables vs. promises etc. if you’re having trouble understanding RxJs as well.

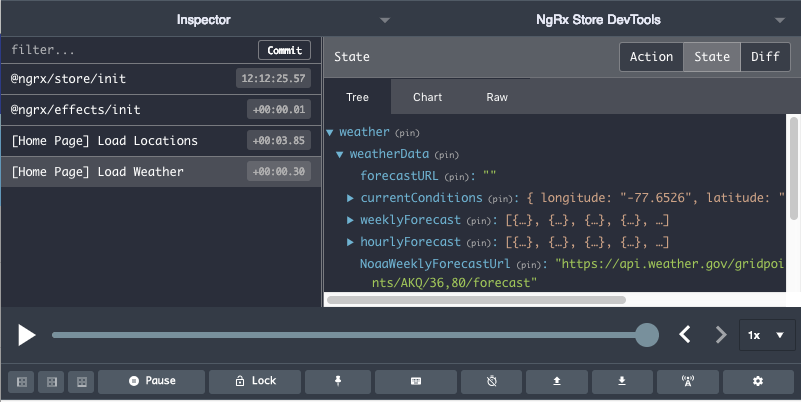
The last step before you see NgRx in action is to add on the NgRx Redux Devtools Extension to Chrome. You won’t be able to use this until you’ve setup NgRx, but it will enable you to view the store data while you are developing your application.
NgRx with Goose Weather
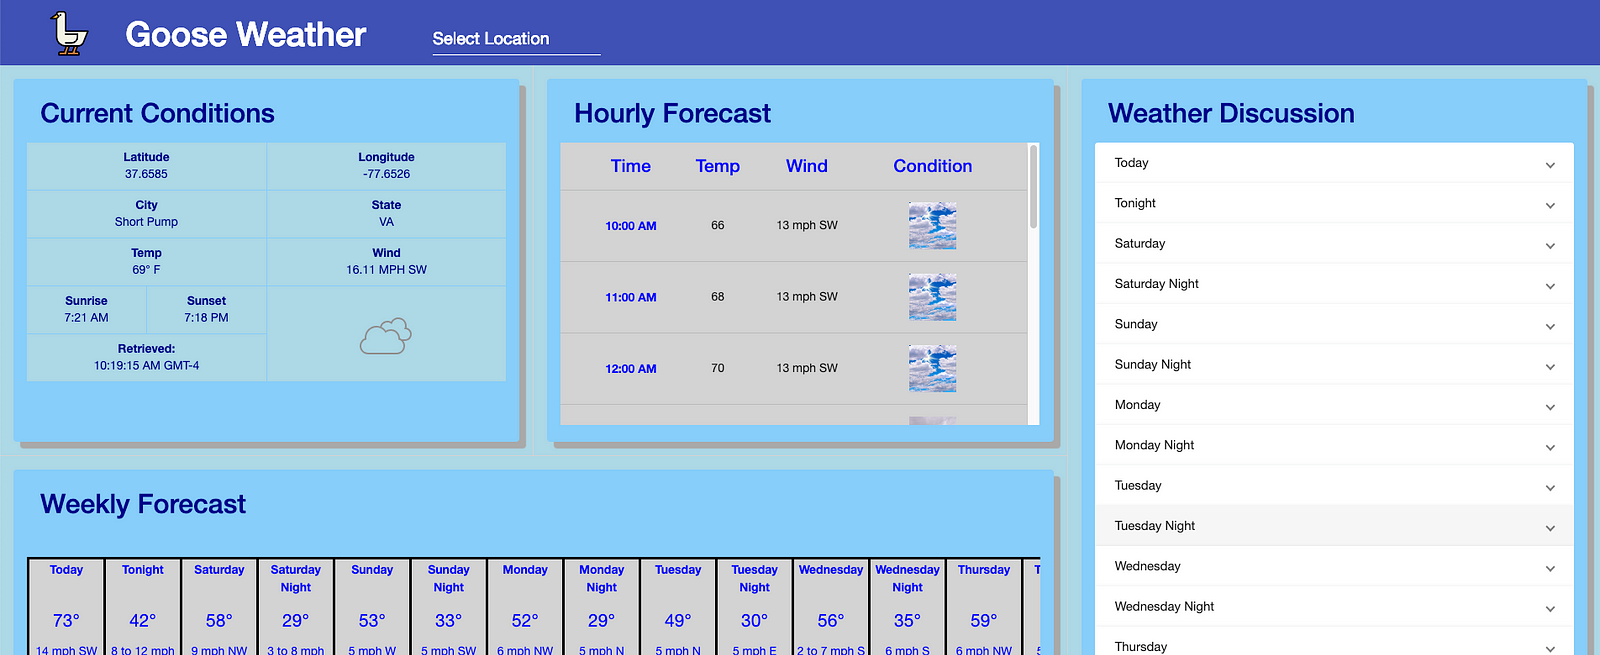
The overall Goose Weather application is essentially a main weather component displaying several children components that are Material Cards. Additionally, there is an input field available in the main toolbar that lets you select a different location. The locations available for selection are preset with the Capital Cities of all 50 US States (not international since using the NOAA APIs).
The goal for us is to:
Dispatch the weather to the store on initial application startup.
Dispatch the weather to the store when the location has changed via the toolbar selection.
Connect all display cards to be automatically updated when the store values are updated.
The actual Goose Weather application has already implemented NgRx. To do this walkthrough, I have a branch on my GitHub repo that has the application in an older state. We’re going to pull that down and work forward from that state to demonstrate how to use NgRx.
Let’s get to coding!
- Go to the GitHub repo, and use the following command to pull down the learn-ngrx branch:
git clone - single-branch - branch learn-ngrx https://github.com/andrewevans02/goose-weather.git
- Next go on into the cloned repo with
cd goose-weather. - Now install the dependences with a run of
npm i. - Goose Weather also uses the Open Weather Map API to be able to retrieve the latest forecast. In order to use this API, you’ll need to create a free account and key using the getting started guide on their website.
- Once you have your Open Weather Map API Key, export it as an environment variable called
$OPEN_WEATHER_MAP_API_KEYwith
export OPEN_WEATHER_MAP_API_KEY='<your_open_weather_map_api_key>'
- Once you’ve got your key and environment variable exported, run
npm run environment-variablesto populate the API key into the project’senvironment.tsandenvironment.prod.tsfiles. To persist the environment variables, add the export to your bash profile or environment variables. - Now, let’s run the project with
ng serveat the project’s root directory to make sure it’s running. - Open your browser on
http://localhost:4200/and you should see the Goose Weather page.
In the following sections, I’m going to walkthrough setting up NgRx. To make things easier (and faster), I’m also going to cheat a little and give you GitHub Gists in the subsequent sections. Just copy & paste those in and I’ll provide explanations as we walk through each step.
Install Dependencies and Scaffold the Project
First, we’re going to install the NgRx dependencies and use the NgRx Schematics to bootstrap the application. Angular Schematics are really useful and you can use them to quickly scaffold a site. For more info on Angular Schematics, I recommend checking out this post on the Angular Blog here.
- First, run the following command to install the dependencies. It will add the libraries for the store, effects, store-devtools, and the schematics to the project.
npm i @ngrx/store @ngrx/effects @ngrx/store-devtools @ngrx/schematics --save
- Run the following at the root of the project to change the CLI to use the NgRx Schematics.
ng config cli.defaultCollection @ngrx/schematics
- Run schematics to generate the actions and reducers that will makeup the store with:
ng generate store AppState --root --module app.module.ts
- To finish the initial setup, run the following two commands to generate the weather and location actions that we will be creating.
ng generate action actions/weather
ng generate action actions/location
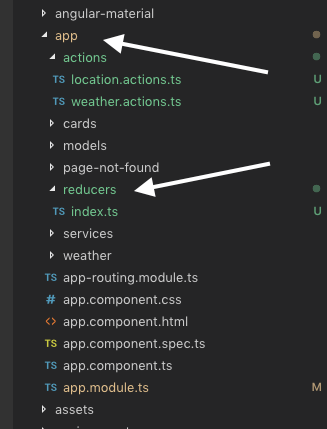
- When you finish this step, you should have an
actionsfolder and areducersfolder as seen here:
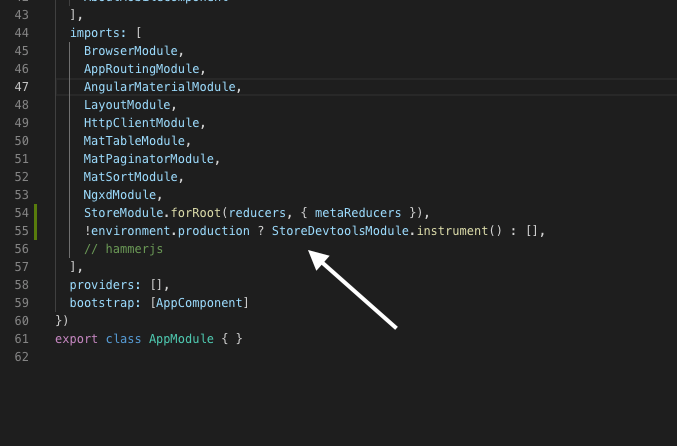
- If you open the
app.module.tsfile, you should also see an import for the store module and an import telling the application not to work with the store-devtools if in production.
Defining State and Reducers
With the main project scaffolded, we are going to set up what your application state will look like next. The way you can define this is by first defining your state objects, and then by defining the reducers which dictate how state changes occur when actions are dispatched.
If you go back to the intro, you’ll remember the way that the flows work with NgRx is that actions go through reducers to change the applications state.
Actions can operate with or without reducers. A common flow is to fire off an action, and then use a reducer to handle how that action interacts with the store.
Now in your project, open the
reducers/index.ts file and copy & paste the following:
Now what is this file doing? Well a whole lot, but it’s not as scary as it looks. Let’s work through it line by line.
Here we build out what the application state looks like. There are many ways to do this, and I’m just using a naive approach here as this application’s interactions with NgRx are very simple.
The structures here are defining application state that includes:
- Location
- Weather
Here, we define two reducers (1) weather and (2) location. If you notice they return payload objects. This is a normal convention with NgRx. The payload is what the store is going to update itself to be. If the payload only consists of one value, it’s often convention to not include a
payload wrapper and just return the value (i.e. action.locationData instead of action.payload.locationData). I’m just including payload here to show potential conventions that could be used.
Here, we are defining selectors. Selectors are ways that your application components access the state directly. The nomenclature for this is to either refer to the state as a whole, or if you are selecting specific parts, you are selecting a slice of state. Selectors can also transform state, and have many other potential functions that can be utilized for interacting with the store. This application is fairly simple so we can get away with just needing a selector for the weather data (selectWeather) and for errors (selectError). More complex applications include multiple selectors and even functions within the selectors. I recommend checking out the documentation if you want more info on how selectors works here.
Finally, at the end of the file we define meta-reducers. These are hooks that enable you to pre-process actions or add middleware. You could define them to look for actions like
INIT or UPDATE, which are the default actions that NgRx does when the application starts up or when the store changes respectively. Meta-reducers are also a great way to handle localStorage. I haven’t defined any for this application because it is very simple, but they can be very powerful and I recommend checking out Alex Okrushko’s post on ways to improve using NgRx here.Defining Actions
The next step is to define the actions that will dispatch changes to the storeusing the application state and reducers we just defined. Actions should be treated as events, and live close to where they are dispatched from. It’s also a good idea to include the name of the page that the action is being fired from when you declare the action type. So for example “[Home Page] load locations” would be an action of type LoadLocation fired from the Home Page.
Open up the
actions/location.actions.ts file, and copy & paste the following into it:
What is this file doing? Well it’s defining what your location actions will look like. In the first section, we are defining the types of actions:
Next, you see classes for each action type being defined. Notice the use of payload here to define what is being sent with the action. As I mentioned before, if the action only returns a single argument then normally you would not wrap it with payload. I included payload here to demonstrate convention for larger applications.
Finally, you see these action classes being exported out to the project:
These actions are how your code will interact with your store. Basically, think of it as a protocol for your app to interact with reducers.
To finish up this section, open the
actions/weather.actions.ts file and copy & paste the following. I’m not going to going to go over the weather actionscode here since it follows similar convention to what I just explained for location actions.On a side note, the LoadWeather action here is considered a “fetch” action in NgRx. Fetch actions normally follow the convention to have (1) Load, (2) LoadSuccess, or (3) LoadFailed. This is to handle the load itself, success, and failure respectively. Goose Weather only has one load for the weather data, so I just left it as a “LoadWeather” here. In a more complex application, this could have been renamed.
Creating an Effect for the Actions
With the actions and reducers setup, the last step is to build out an effect that will run whenever the location is updated. Basically we want to set it up so anytime the location changes, a new weather forecast is retrieved.
Recalling what we talked about in the intro:
Effects occur as a result from actions, and can also create actions when called. Effects primary responsibility is to create async side-effects (like service calls to APIs), that ultimately generate other actions.
For the sake of the Goose Weather application, let’s consider the following scenarios:
- The user loads the application initially, and needs to have an initial forecast retrieved by the application’s weather service
- The user changes locations using the toolbar, and needs to have a new forecast pulled for the new location.
First, let’s use a schematic to build the effect. Go to the project’s root and run the following:
ng generate effect effects/weather - root -m app.module.ts
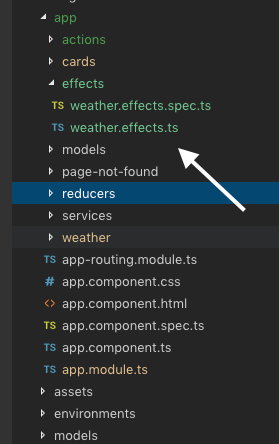
It will create an effect called WeatherEffects in the
/effects folder. It also will add an import for effects to the app module like you see here: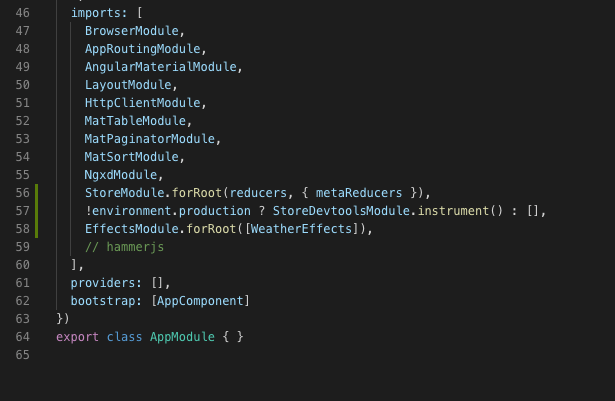
Now that you’ve created your effect, copy & paste the following into the
weather.effect.ts file:
So what’s this doing and how does this work?
- Using the
Effectdecorator, the application’s instance of NgRx becomes aware of this effect on startup. - This effect listens for actions of type LoadLocations and then uses mergeMap to pass the location data from the action to a call to the applications weather service.
- Then the effect will dispatch a new LoadWeather action to include the new forecast information.
- When the dispatch to the store is complete, the store is updated
- If there are any errors that occur in the service call, the effect dispatches a LocationsError action with the error to the store.
For a more detailed walkthrough of how the error handling works, please checkout my post Exception Handling with NgRx Effects. Special thanks to Tim Deschryver and Alex Okrushko for their help with this.
Connecting NgRx to Angular Components
With the reducers, actions, and effects setup, let’s now connect our components to be able to receive streamed information from the store.
First, open the
src/weather/weather.component.ts file and inject the store into the store’s constructor with a private store: Store<AppState>.
Now change the
savePosition and onSelectionChanged methods to look like the following:
What did this do? In both the
savePosition andonSelectionChangedmethods , a change in location triggers a dispatch of LoadLocations to update the store. When the LoadLocations action fires, the WeatherEffect we created earlier will fire off to retrieve the forecast for that location.Notice also that before making a service call inonSelectionChanged, a LoadWeather action is dispatched with anullvalue forweatherData. This was just to create the condition where the card’s progress spinners show when the weahter data is being retrieved. As an alternative approach, I also could have setweatherDatatonullwhen I dispatch a LoadLocations action. I left it the way it is here to clearly define location and weather actions.
You also need to handle errors to be displayed on the application. So add an observable for errors that is initialized in the ngOnInit lifecycle hook method as you see here:
Then enable the error message to be displayed at the top of the weather.component.html file with the template change as follows:
Now that we have updated the weather component, we also need to update the components that display the weather forecast as cards. The components that display the weather forecast are in the “/cards” directory as seen here:
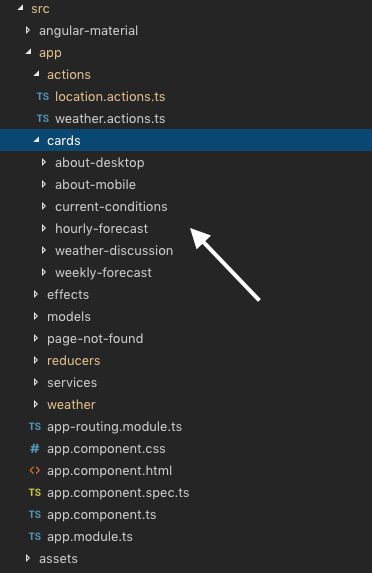
I’m just going to show you how to update the weekly-forecast component. You’ll also need to do this to the rest of the cards.
First, copy and paste this into the weekly-forecast.component.ts file:
This creates an observable that becomes a stream of data from the store using the selectWeather selector.
Next, copy and paste the following into the weekly-forecast.component.html file here:
As you see here, the async pipe handles the observable subscription and only shows if the data when present (otherwise it shows a spinner).
This use of unwrapping the observable with the async pipe is considered a best practice, as it handles the subscribe and destroy of the observable.
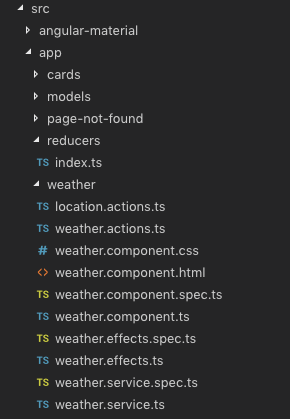
File Cleanup
The last step before we run the application is just to move some of the files around so that they’re coupled more closely with were they are utilized. The schematics that we used to generate our application created folders for effects, reducers, and actions. Additionally, if you notice I included a services folder that include the main service that retrieves the weather forecast. Now that we have built everything out, lets move the action files, effects files, and service files to be within the weather component folder. This is because the weather component is what uses these actions, effects, and services directly. So now the NgRx files are coupled with the component that is using them. Your final weather folder should look like this:
Putting it All Together
Now that you’ve built out NgRx in the application and connected it to the components, go to your terminal and run
ng serve to see it in action. You should see something like the following: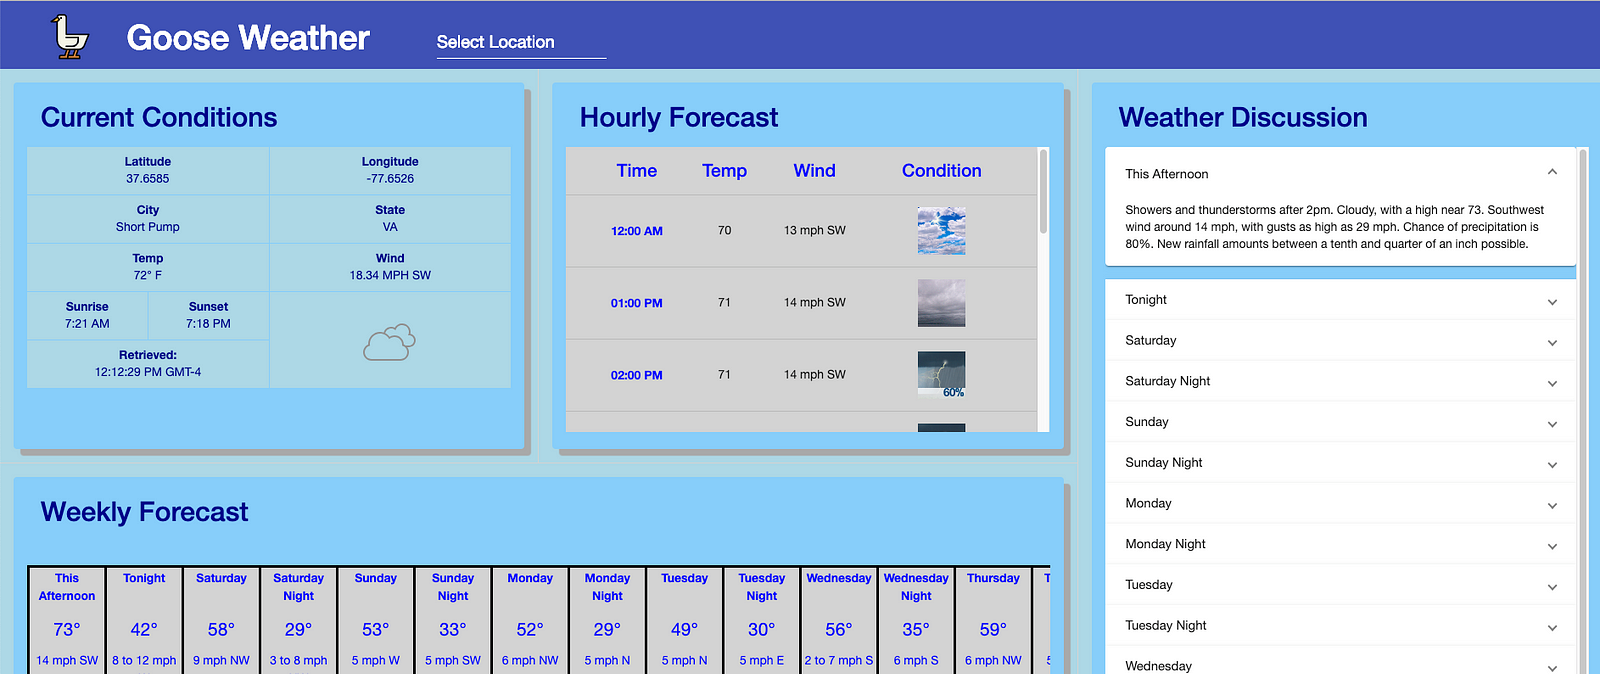
If you open the Redux Devtools extension, you can also see how the state is updated when the application runs:
Closing Thoughts
I hope my post here has given you a good intro to using NgRx. My weather application is only using a few actions and reducers, but NgRx is much more robust and can do many more things. I encourage you to review the official NgRx site documentation and get more acquainted with the technology. Feel free to leave comments and enjoy flying with NgRx!
No comments:
Post a Comment