Saturday 31 October 2015

How to use AngularJS in ASP.NET MVC and Entity Framework

These days, it seems like everyone is talking about AngularJS and ASP.NET MVC. So in this post we will learn how to combine the best of both worlds and use the goodness of AngularJS in ASP.NET MVC by demonstrating how to use AngularJS in an ASP.NET MVC application. Later in the post, we will see how to access data using the Entity Framework database as a first approach, then we’ll explore how to access the data in AngularJS and then pass to the view using the controller. In short, this post will touch upon:

·  adding an AngularJS library in ASP.NET MVC;·  reference of AngularJS, bundling and minification;
·  fetching data using the Entity Framework database;·  returning JSON data from an ASP.NET controller;
·  consuming JSON data in an AngularJS service;·  using AngularJS service in AngularJS controller to pass data to the view; and
·  rendering data on an AngularJS View
To start, let’s create ASP.NET MVC application and right click on the MVC project. From the context menu, click on Manage Nuget Package. Search for the AngularJS package and install into the project.
After successfully adding the AnngularJS library, you can find those files inside the Scripts folders.
Reference of AngularJS library
You have two options to add an AngularJS library reference in the project: MVC minification and bundling or by adding AngularJS in the Script section of an individual view. If you use bundling, then AngularJS will be available in the whole project. However you have the option to use AngularJS on a particular view as well.
Let’s say you want to use AngularJS on a particular view (Index.cshtml) of the Home controller. First you need to refer to the AngularJS library inside the scripts section as shown below:
@section scripts{

    <script src="~/Scripts/angular.js">script>

}


Next, apply the ng-app directive and any other required directives on the HTML element as shown below:

<div ng-app="" class="row">

     <input type="text" ng-model="name" />

     {{name}}

div>
When you run the application you will find AngularJS is up and running in the Index view. In this approach you will not be able to use AngularJS on the other views because the AngularJS library is only referenced in the Index view.
You may have a requirement to use AngularJS in the whole MVC application. In this case, it’s better to use bundling and minification of MVC and all the AngularJS libraries at the layout level. To do this, open BundleConfig.cs from the App_Start folder and add a bundle for the AngularJS library as shown below:
 public static void RegisterBundles(BundleCollection bundles)

        {

            bundles.Add(new ScriptBundle("~/bundles/angular").Include(

                        "~/Scripts/angular.js"));
After adding the bundle in the BundleConfig file, next you need to add the AngularJS bundle in the _Layout.cshtml as listed below:
<head>

    <meta charset="utf-8" />

    <meta name="viewport" content="width=device-width, initial-scale=1.0">

    <title>@ViewBag.Title - My ASP.NET Applicationtitle>

    @Styles.Render("~/Content/css")

    @Scripts.Render("~/bundles/modernizr")

    @Scripts.Render("~/bundles/angular")

    @Scripts.Render("~/bundles/jquery")

    @Scripts.Render("~/bundles/bootstrap")

    @RenderSection("scripts", required: false)

head>
After creating an AngularJS bundle and referring to it in _Layout.cshtml, you should be able to use AngularJS in the entire application.
Data from Database and in the AngularJS
So far we have seen how to set up AngularJS at a particular view level and the entire application level. Now let’s go ahead and create an end to end MVC application in which we will do the following tasks:
1.  Fetch data from the database using the EF database first approach2.  Return JSON from the MVC controller3.  Create an AngularJS service to fetch data using the $http4.  Create an AngularJS controller5.  Create an AngularJS view on the MVC view to display data in the table
Connect to a database using the EF database first approach
To connect to a database with the EF database-first approach, right click on the MVC application and select a new item. From the data tab, you need to select the option ADO.NET Entity Model as shown in the image below:
From the next screen, select the “EF Designer from database” option.
On the next screen, click on the New Connection option. To create a new connection to the database:
1.  Provide the database server name2.  Choose the database from the drop down. Here we are working with the “School” database, so we’ve selected that from the drop down.
On the next screen, leave the default name of the connection string and click next.
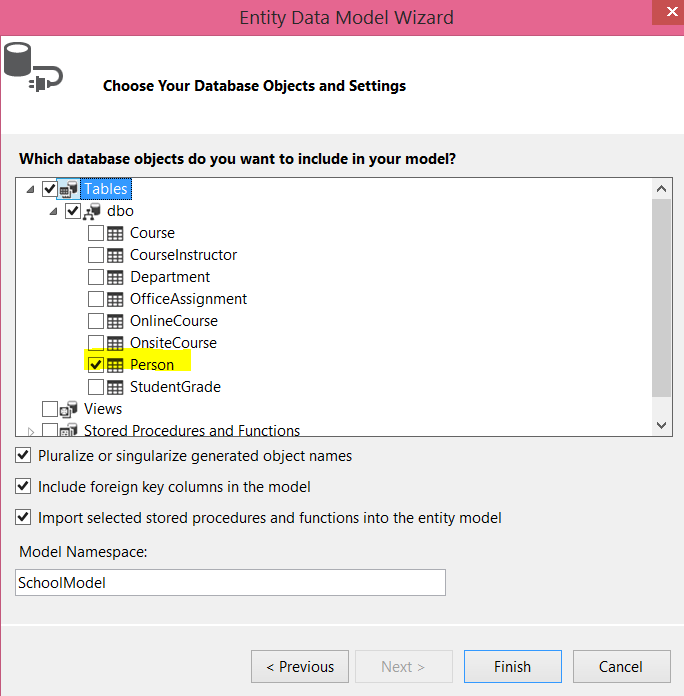
On the next screen, select the tables and other entities you want to keep as the part of the model. To keep it simple I am using only the “Person” table in the model.
As of now we have created the connection with the database and a model has been added to the project. You should see an edmx file has been added as part of the project.
Return JSON from the MVC controller
To return the Person data as JSON, let us go ahead and add an action in the controller with the return type JsonResult. Keep in mind that you can easily write a Web API to return JSON data; however the purpose of this post is to show you how to work with AngularJS, so I’ll stick with the simplest option, which is creating an action which returns JSON data:

public JsonResult GetPesrons()

        {

            SchoolEntities e = new SchoolEntities();

            var result = e.People.ToList();

            return Json(result, JsonRequestBehavior.AllowGet);


        }

Create an AngularJS service to fetch data using the $http
Here I assume that you already have some knowledge about these AngularJS terms, but here’s a quick review/intro of the key concepts:
Controller
A controller is the JavaScript constructor function which contains data and business logic. The controller and the view talk to each other using the $scope object. Each time a controller is used on the view, an instance gets created. So if we use it 10 times, 10 instances of the constructor will get created. 
Service
A service is the JavaScript function by which an instance gets created once per application life cycle. Anything shared across the controller should be part of the service. A service can be created in five different ways. The most popular way is by using the service method or the factory method. AngularJS provides many built in services also: for example, the $http service can be used to call a HTTP based service from an Angular app, but a service must be injected before it is used.
Modules
Modules are the JavaScript functions which contain other functions like a service or a controller. There should be at least one module per Angular app.
Note: These are the simplest definitions of these AngularJS concepts. You can find more in depth information on the web.
Now let’s start creating the module! First, right-click on the project and add a JavaScript file. You can call it anything you’d like, but in this example, let’s call it StudentClient.js.
In the StudentClient.js we have created a module and a simple controller. Later we will modify the controller to fetch the data from the MVC action.
var StudentApp = angular.module('StudentApp', [])


StudentApp.controller('StudentController', function ($scope) {


    $scope.message = "Infrgistics";


});
To use the module and the controller on the view, first you need to add the reference of the StudentClient.js and then set the value of ng-app directive to the module name StudentApp. Here’s how you do that:
@section scripts{


     <script src="~/StudentClient.js">script>

}

<div ng-app="StudentApp" class="row">

    <div ng-controller="StudentController">

        {{message}}

    div>

div>
At this point if you run the application, you will find Infragistics rendered on the view. Let’s start with creating the service. We will create the custom service using the factory method. In the service, using the $http in-built service will call the action method of the controller.  Here we’re putting the service in the same StudentService.js file.
StudentApp.factory('StudentService', ['$http', function ($http) {


    var StudentService = {};

    StudentService.getStudents = function () {

        return $http.get('/Home/GetPersons');

    };

    return StudentService;


}]);  
Once the service is created, next you need to create the controller. In the controller we will use the custom service and assign returned data to the $scope object. Let’s see how to create the controller in the code below:
StudentApp.controller('StudentController', function ($scope, StudentService) {


    getStudents();

    function getStudents() {

        StudentService.getStudents()

            .success(function (studs) {

                $scope.students = studs;

                console.log($scope.students);

            })

            .error(function (error) {

                $scope.status = 'Unable to load customer data: ' + error.message;

                console.log($scope.status);

            });

    }

});
Here we’ve created the controller, service, and module. Putting everything together, the StudentClient.js file should look like this:
var StudentApp = angular.module('StudentApp', []);

StudentApp.controller('StudentController', function ($scope, StudentService) {


    getStudents();

    function getStudents() {

        StudentService.getStudents()

            .success(function (studs) {

                $scope.students = studs;

                console.log($scope.students);

            })

            .error(function (error) {

                $scope.status = 'Unable to load customer data: ' + error.message;

                console.log($scope.status);

            });

    }

});


StudentApp.factory('StudentService', ['$http', function ($http) {


    var StudentService = {};

    StudentService.getStudents = function () {

        return $http.get('/Home/GetPersons');

    };

    return StudentService;


}]);
On the view, we can use the controller as shown below, but keep in mind that we are creating an AngularJS view on the Index.cshtml. The view can be created as shown below:
@section scripts{


     <script src="~/StudentClient.js">script>

}

<div ng-app="StudentApp" class="container">

    <br/>

    <br/>

    <input type="text" placeholder="Search Student" ng-model="searchStudent" />

    <br />

    <div ng-controller="StudentController">

        <table class="table">

            <tr ng-repeat="r in students | filter : searchStudent">

                <td>{{r.PersonID}}td>

                <td>{{r.FirstName}}td>

                <td>{{r.LastName}}td>

            tr>

        table>

    div>

div>

On the view, we are using ng-app, ng-controller, ng-repeat, and ng-model directives, along with “filter” to filter the table on the input entered in the textbox. Essentially these are the steps required to work with AngularJS in ASP.NET MVC application.
Conclusion
In this post we focused on a few simple but important steps to work with AngularJS and ASP.NET MVC together. We also touched upon the basic definitions of some key AngularJS components, the EF database-first approach, and MVC. In further posts we will go into more depth on these topics, but I hope this post will help you in getting started with AngularJS in ASP.NET MVC. Thanks for reading!

ASP.NET 5 and AngularJS Part 2, Using the MVC 6 Web API


This is the second part in a multiple part blog series on building ASP.NET 5 (ASP.NET vNext) apps with AngularJS. In this series of blog posts, I show how you can create a simple Movie app using ASP.NET 5, MVC 6, and AngularJS.
You can download the code discussed in this blog post from GitHub:
In this blog post, I explain how to expose data from your server using the MVC 6 Web API. We’ll retrieve a list of movies from the Web API and display the list of movies in our AngularJS app by taking advantage of an AngularJS template.

Enabling ASP.NET MVC

The first step is to enable MVC for our application. There are two files that we need to modify to enable MVC.
First, we need to modify the project.json file so it includes MVC 6:
1
2
3
4
5
6
7
8
9
10
11
12
13
14
15
16
17
18
19
20
{
    "webroot": "wwwroot",
    "version": "1.0.0-*",
    "exclude": [
        "wwwroot"
    ],
    "packExclude": [
        "**.kproj",
        "**.user",
        "**.vspscc"
    ],
    "dependencies": {
        "Microsoft.AspNet.Server.IIS": "1.0.0-beta1",
        "Microsoft.AspNet.Mvc": "6.0.0-beta1"
    },
    "frameworks" : {
        "aspnet50" : { },
        "aspnetcore50": { }
    }
}
The project.json file is used by the NuGet package manager to determine the packages required by the project. We’ve indicated that we need the MVC 6 (beta1) package.
We also need to modify the Startup.cs file in the root of our MovieAngularJS project. Change the contents of the Startup.cs file so it looks like this:
1
2
3
4
5
6
7
8
9
10
11
12
13
14
15
16
17
18
19
20
21
22
using System;
using Microsoft.AspNet.Builder;
using Microsoft.AspNet.Http;
using Microsoft.Framework.DependencyInjection;
 
namespace MovieAngularJSApp
{
    public class Startup
    {
 
        public void ConfigureServices(IServiceCollection services)
        {
            services.AddMvc();
        }
 
        public void Configure(IApplicationBuilder app)
        {
            app.UseMvc();
        }
 
    }
}
The ConfigureServices() method is used to register MVC with the built-in Dependency Injection framework included in ASP.NET 5. The Configure() method is used to register MVC with OWIN.

Creating the Movie Model

Let’s create a Movie model class that we can use to pass movies from the server to the browser (from the Web API to AngularJS). Create a Models folder in the root of the MovieAngularJS project:
Models Folder
Notice that you create the Models folder outside of the wwwroot folder. Source code does not belong in wwwroot.
Add the following C# class named Movie.cs to the Models folder:
1
2
3
4
5
6
7
8
9
10
11
12
13
using System;
 
namespace MovieAngularJSApp.Models
{
    public class Movie
    {
        public int Id { get; set; }
 
        public string Title { get; set; }
 
        public string Director { get; set; }
    }
}

Creating the Web API Controller

Unlike earlier versions of ASP.NET, the same controller base class is used for both MVC controllers and Web API controllers. Because we’ve pulled in the NuGet package for MVC 6, we are now ready to start creating Web API controllers.
Add an API folder to the root of your MovieAngularJS project:
API Folder
Notice that you don’t add the API folder inside of your wwroot folder. All of your source code – including source code for your controllers – should be located outside of the wwwroot folder.
Next, add a Web API controller by right-clicking the API folder and selecting Add, New Item. Choose the Web API Controller Class template and name the new controller MoviesController.cs:
Add MVC Controller
Enter the following code for the Web API controller:
1
2
3
4
5
6
7
8
9
10
11
12
13
14
15
16
17
18
19
20
21
22
23
24
25
using System;
using System.Collections.Generic;
using System.Linq;
using Microsoft.AspNet.Mvc;
using MovieAngularJSApp.Models;
 
 
namespace MovieAngularJSApp.API.Controllers
{
    [Route("api/[controller]")]
    public class MoviesController : Controller
    {
        // GET: api/values
        [HttpGet]
        public IEnumerable<Movie> Get()
        {
            return new List<Movie> {
                new Movie {Id=1, Title="Star Wars", Director="Lucas"},
                new Movie {Id=2, Title="King Kong", Director="Jackson"},
                new Movie {Id=3, Title="Memento", Director="Nolan"}
            };
        }
 
    }
}
In the code above, the Get() action returns a list of movies. You can test whether the action is working by starting your app and navigating to /api/movies in your browser. In Google Chrome, you’ll get an XML representation of the movies:
XML Results

Creating the AngularJS App

We are going to display the list of movies using an AngularJS template. First, we need to create our AngularJS app.
Right-click on the Scripts folder and select Add, New Item. Select the AngularJS Module template and click the Add button.
AngularJS Module
Enter the following code for the new AngularJS module:
1
2
3
4
5
6
7
(function () {
    'use strict';
 
    angular.module('moviesApp', [
        'moviesServices'
    ]);
})();
The code above defines a new AngularJS module named moviesApp. The moviesApp has a dependency on another AngularJS module named moviesServices. We create the moviesServices below.

Creating the AngularJS Controller

Our next step is to create a client-side AngularJS controller. Create a new Controllers folder under the Scripts folder:
AngularJS Controller
Right-click the Controller folder and select Add, New Item. Add a new AngularJS Controller using $scope named moviesController.js to the Controllers folder. Enter the following content for the moviesController.js file:
1
2
3
4
5
6
7
8
9
10
11
12
13
(function () {
    'use strict';
 
    angular
        .module('moviesApp')
        .controller('moviesController', moviesController);
 
    moviesController.$inject = ['$scope', 'Movies'];
 
    function moviesController($scope, Movies) {
        $scope.movies = Movies.query();
    }
})();
The AngularJS controller above depends on a Movies service that supplies the list of movies. The Movies service is passed to the controller using dependency injection. The Movies service is passed as the second parameter to the moviesController() function.
The moviesController.$inject() method call is required to enable the moviesController to work with minification. AngularJS dependency injection works off the name of parameters. In the previous blog post, I setup Grunt and UglifyJS to minify all of the JavaScript files. As part of the process of minification, all function parameter names are shortened (mangled). The $inject() method call enables dependency injection to work even when the parameter names are mangled.

Creating the AngularJS Movies Service

We’ll use an AngularJS Movies service to interact with the Web API. Add a new Services folder to the existing Scripts folder. Next, right-click the Services folder and select Add, New Item. Add a new AngularJS Factory named moviesService.js to the Services folder:
Enter the following code for moviesService.js:
1
2
3
4
5
6
7
8
9
10
11
12
13
14
(function () {
    'use strict';
 
    var moviesServices = angular.module('moviesServices', ['ngResource']);
 
    moviesServices.factory('Movies', ['$resource',
      function ($resource) {
          return $resource('/api/movies/', {}, {
              query: { method: 'GET', params: {}, isArray: true }
          });
      }]);
 
 
})();
The movieServices depends on the $resource object. The $resource object performs Ajax requests using a RESTful pattern.
In the code above, the moviesServices is associated with the /api/movies/ route on the server. In other words, when you perform a query against the moviesServices in your client code then the Web API MoviesController is invoked to return a list of movies.

Creating the AngularJS Template

The final step is to create the AngularJS template that displays the list of movies. Right-click the wwwroot folder and add a new HTML page named index.html.
Add HTML
Modify the contents of index.html so it looks like this:
1
2
3
4
5
6
7
8
9
10
11
12
13
14
15
16
17
18
19
20
21
22
23
24
25
26
27
28
29
30
31
<!DOCTYPE html>
<html ng-app="moviesApp">
<head>
    <meta charset="utf-8" />
    <title>Movies</title>
 
    <script src="//ajax.googleapis.com/ajax/libs/angularjs/1.3.8/angular.min.js"></script>
    <script src="//ajax.googleapis.com/ajax/libs/angularjs/1.3.8/angular-resource.js"></script>
    <script src="app.js"></script>
</head>
<body ng-cloak>
    <div ng-controller="moviesController">
 
        <table>
            <thead>
                <tr>
                    <th>Title</th>
                    <th>Director</th>
                </tr>
            </thead>
            <tbody>
                <tr ng-repeat="movie in movies">
                    <td>{{movie.Title}}</td>
                    <td>{{movie.Director}}</td>
                </tr>
            </tbody>
        </table>
 
    </div>
</body>
</html>
There are several things that you should notice about this HTML file:
  • Notice that the <html> element includes an ng-app directive. This directive associates the moviesApp with the HTML file.
  • Notice that <script> tags are used to add the angular and angular-resource JavaScript libraries from the Google CDN.
  • Notice that the <body> element includes an ng-controller directive. This directive associates the moviesController with the contents of the <div> element.
  • Notice that the movies are displayed by using an ng-repeat directive. The title and the director are displayed for each movie.
  • Notice that the <body> element includes an ng-cloak directive. The ng-cloak directive hides an AngularJS template until the data has been loaded and the template has been rendered.
When you open the index.html page in your browser, you can see the list of movies displayed in the HTML table.
The Results

Summary

In this blog post, we created an AngularJS app that calls a Web API action to retrieve a list of movies. We displayed the list of movies in an HTML table by taking advantage of an AngularJS template.
In the next blog post, I discuss how you can take advantage of AngularJS routing to divide a client-side AngularJS app into multiple virtual pages.

Angular Tutorial (Update to Angular 7)

As Angular 7 has just been released a few days ago. This tutorial is updated to show you how to create an Angular 7 project and the new fe...