Introduction
When I was a beginner for ASP.NET MVC, I faced a question many times: how many ways do you know to use/pass multiple models in/to a view? At that time, I knew only two ways, then I learned some other ways to achieve the same. In this article, I will share my learning so far. Hope it will be helpful for others.
Pre-requisite: you should be at intermediate level with C# and ASP.NET MVC. If you are absolute new to C# and ASP.NET MVC, please look for other resources to understand terms used here. You can put comment below article in case you need any detail. I will be happy to help. Thanks.
There are many ways of using multiple models in a view, most frequently used are given below:
ViewDataViewBagPartialViewTempDataViewModelTuple
All the above ways of using multiple models in view have their place but we need to think and pick which one fits our requirements. All techniques have their own advantages and disadvantages.
To understand the article better, please download the attached code, have an overview of the code, then follow the steps given in this article.
Overview of Sample Demo
The attached code solution has six views demonstrating the following:
- How to pass multiple models using
ViewData - How to pass multiple models using
ViewBag - How to pass multiple models using
PartialView - How to pass multiple models using
TempData - How to pass multiple models using
ViewModel - How to pass multiple models using
Tuple
In the sample demo, all views will have similar HTML structure to get same layout but implementation to pass models to the view will be different.
Structure of the HTML tags is shown below only code inside the
scripts tag will be changed as per the scenarios.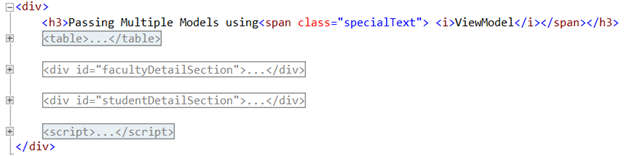
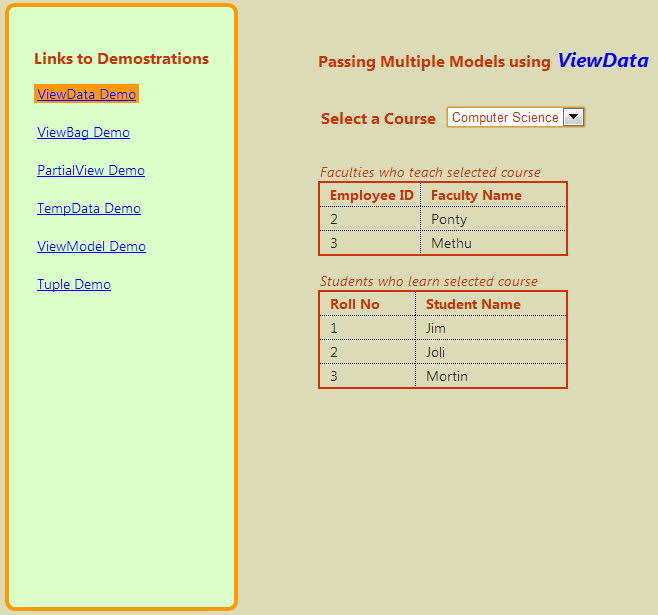
Output of all demos will be similar to the screenshot shown below:
Creating Basic Structure of Sample Demo
Let's get started by creating a sample demo application. Follow the below steps:
- Open Visual Studio 2012, select ASP.NET MVC4 Web Application template and give it project name as
MultipleModelDemoand click OK. If you are using Visual Studio 2013 and MVC 5, Please look into theUpdate for VS 2013 / MVC 5 section below.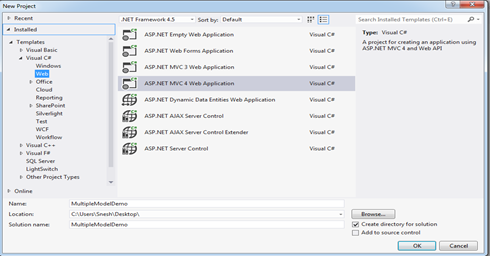
- Select a template as Basic application then click OK. Visual Studio adds a
MultipleModelDemoproject in solution as shown below in screenshot.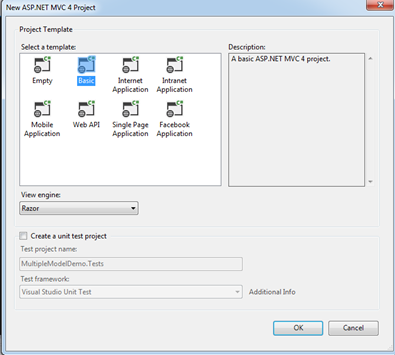
- Right click on the Models folder, add a Models.cs file. Now we need to add three models named as
Course,FacultyandStudentby writing the following code as shown below:public class Course { public int CourseId { get; set; } public string CourseName { get; set; } } public class Faculty { public int FacultyId { get; set; } public string FacultyName { get; set; } public List<Course> AllotedCourses { get; set; } } public class Student { public int EnrollmentNo { get; set; } public string StudentName { get; set; } public List<Course> EnrolledCourses { get; set; } }
- Add a class file under the Models folder named as Repository.cs file, which will have the implementation of methods to get hardcoded data for application in order to keep it convenient.Following is the code for
GetCoursemethod which will return a list of courses:
public List<Course> GetCourses()
{
    return new List<Course> {
        new Course () {  CourseId = 1, CourseName = "Chemistry"},
        new Course () {  CourseId = 2, CourseName = "Physics"},
        new Course () {  CourseId = 3, CourseName = "Math" },
        new Course () {  CourseId = 4, CourseName = "Computer Science" }
    };
}
Following is the codeGetFacultiesmethod which will return a list of faculties:
public List<Faculty> GetFaculties()
{
    return new List<Faculty> {
        new Faculty () {  FacultyId = 1, FacultyName= "Prakash",
            AllotedCourses = new List<Course>
            {new Course () { CourseId = 1, CourseName = "Chemistry"},
                             new Course () { CourseId = 2, CourseName = "Physics"},
                             new Course () { CourseId = 3, CourseName = "Math"},
        }},
        new Faculty () {  FacultyId = 2, FacultyName= "Ponty" ,
            AllotedCourses = new List<Course>
            {new Course () { CourseId = 2, CourseName = "Physics"},
                             new Course () { CourseId = 4, CourseName = "Computer Science"}
        }},
        new Faculty () {  FacultyId = 3, FacultyName= "Methu",
            AllotedCourses = new List<Course>
            {new Course () { CourseId = 3, CourseName = "Math"},
                             new Course () { CourseId = 4, CourseName = "Computer Science"}
        }}
    };
}
Following is the code forGetStudentsmethod which will return a list of students:
public List<Student> GetStudents()
{
    List<Student> result = new List<Student> {
        new Student () { EnrollmentNo = 1, StudentName= "Jim",
            EnrolledCourses = new List<Course>
            { new Course () { CourseId = 1, CourseName = "Chemistry"},
                              new Course () { CourseId = 2, CourseName = "Physics"},
                              new Course () { CourseId = 4, CourseName = "Computer Science"}
        }},

        new Student () {  EnrollmentNo = 2, StudentName= "Joli",
            EnrolledCourses = new List<Course>
            { new Course () { CourseId = 2, CourseName = "Physics"} ,
                              new Course ()
                              { CourseId = 4, CourseName = "Computer Science"}
        }},

        new Student () {  EnrollmentNo = 3, StudentName= "Mortin",
            EnrolledCourses = new List<Course>
            {  new Course () { CourseId = 3, CourseName = "Math"},
                               new Course () { CourseId = 4, CourseName = "Computer Science"}
        }}
    };

    return result;
}
- Add a
HomeControllerto Controller folder. We will write the code inHomeControllerlater. - In Shared folder, we will modify the existing code in _Layout.cshtml file. First write the following code in
headtag:<head> <meta charset="utf-8" /> <meta name="viewport" content="width=device-width" /> @*Referenced js and css files which comes with template*@ <script src="~/Scripts/jquery-1.8.2.min.js"></script> <link href="~/Content/Site.css" rel="stylesheet" /> @*Referenced appcss file having custom CSS*@ <link href="~/Content/appcss/appcss.css" rel="stylesheet" /> </head>Write the following code inbodytag:
<body>
    @* Define the place for navigation links in left side of the page*@
    <div class="navigationPanel">
        <div style="margin: 40px 25px 2px 25px;">
            <h3>Links to Demostrations</h3>
            <a href="~/Home/ViewDataDemo">ViewData Demo</a>
            <br />
            <br />
            <a href="~/Home/ViewBagDemo">ViewBag Demo</a>
            <br />
            <br />
            <a href="~/Home/PartialViewDemo">PartialView Demo</a>
            <br />
            <br />
            <a href="~/Home/TempDataDemo">TempData Demo</a>
            <br />
            <br />
            <a href="~/Home/ViewModelDemo">ViewModel Demo</a>
            <br />
            <br />
            <a href="~/Home/TupleDemo">Tuple Demo</a>
        </div>
    </div>
    <div style="float: left; margin: 25px 2px 2px 80px;">
        @RenderBody()
    </div>
</body>
So far, we have created basic code which we will be using in all scenarios. Further, we will learn each scenario one by one.
Passing Multiple Models using ViewData
ViewData is used to pass data from a controller to a view. ViewData is a dictionary of objects that is a type ofViewDataDictionary class. ViewData is defined as property in ControllerBase class. Values stored inViewData require typecasting to their datatype in view. The values in ViewData are accessible using a key.- First, create a object of
Repositoryclass inHomeController.Repository _repository = new Repository();Add the following code in HomeController.
public ActionResult ViewDataDemo()
{
    ViewData["Courses"] = _repository.GetCourses();
    ViewData["Students"] = _repository.GetStudents();
    ViewData["Faculties"] = _repository.GetFaculties();
    return View();
}
HereViewDataDemoaction method will be passing all three models to its view usingViewData. - Add a view named as
ViewDataDemoand write the same code as written below inbodytag.<body style="background-color: #DBDBB7"> <h3>Passing Multiple Models using <span class=" specialText"> <i>ViewData </i> </span> </h3> <table> <tr> <td class="sltCourseText"> <h3>Select a Course </h3> </td> <td> <select id="sltCourse" class="sltStyle"> <option>Select Course </option> @*Iterating Course model using ViewData string as a key *@ @foreach (var item in ViewData["Courses"] as List <MultipleModelDemo.Models.Course>) { <option>@item.CourseName </option> } </select> </td> </tr> </table> <div id="facultyDetailSection"> <h4>Faculties who teach selected course </h4> <div id="facultyDetailTable"> </div> </div> <div id="studentDetailSection"> <h4>Students who learn selected course </h4> <div id="studentDetailTable"> </div> </div> </body>
Here we are iteratingCoursemodel usingViewDataand casting it into aList<Course>. - Inside the
bodytag, add ascripttag and write the following code. Here we would show the table only when user will select a valid course otherwise thefacultyDetailSectionandstudentDetailSectionshould not be appearing. We are usingfadeoutandfadeInfunction of jQuery for that purpose.<script> $(document).ready(function(){ $("#facultyDetailSection").fadeOut(0); $("#studentDetailSection").fadeOut(0); }); var selectedCourseName; $("#sltCourse").change(function () { selectedCourseName = $("#sltCourse").val().trim(); if (selectedCourseName === "Select Course") { $("#facultyDetailSection").fadeOut(); $("#studentDetailSection").fadeOut(); } else { getFacultyTable(); getStudentTable(); $("#facultyDetailSection").fadeIn(); $("#studentDetailSection").fadeIn(); } }); </script>Here on the change event ofCoursedropdown, we will read the value and confirm if there is a valid selection to display faculties and students. In case of a valid selection,getFacultyTableandgetStudentTablefunction will be executed. Add the following functions inscripttag:
    //Create table to display faculty detail
    function getFacultyTable() {
    $("#facultyDetailTable").empty();
    $("#facultyDetailTable").append("<table id='tblfaculty'
    class='tableStyle'><tr><th class='tableHeader' style='width:60px;'>
                                        Employee ID </th>
                                        <th class='tableHeader'>Faculty Name
                                        </th> </tr> </table>");

    //Get all faculties with the help of model
    //(ViewData["Faculties"]), and convert data into json format.
    var allFaculties = @Html.Raw(Json.Encode(ViewData["Faculties"]));

    for (var i = 0; i  < allFaculties.length; i++) {
        var allotedCourses = allFaculties[i].AllotedCourses;
        for (var j = 0; j  < allotedCourses.length; j++) {
            if(allotedCourses[j].CourseName === selectedCourseName)
                $("#tblfaculty").append
                (" <tr> <td class='tableCell'>"  +
                allFaculties[i].FacultyId
                    + " </td> <td class='tableCell'>"+
                    allFaculties[i].FacultyName+" </td> </tr>");
        }
    }
}

//Create table to display student detail
function getStudentTable() {
    $("#studentDetailTable").empty();
    $("#studentDetailTable").append(" <table id='tblStudent'
    class='tableStyle'> <tr> <th class='tableHeader' style='width:60px;'>
                                        Roll No </th> <th
                                        class='tableHeader'>Student Name
                                        </th> </tr> </table>");

    //Get all students with the help of model
    //(ViewData["Students"]), and convert data into json format.
    var allStudents = @Html.Raw(Json.Encode(ViewData["Students"]));

    for (var i = 0; i  < allStudents.length; i++) {
        var studentCourses = allStudents[i].EnrolledCourses;
        for (var j = 0; j  < studentCourses.length; j++) {
            if(studentCourses[j].CourseName === selectedCourseName)
                $("#tblStudent").append(" <tr>
                <td class='tableCell'>"  + allStudents[i].EnrollmentNo
                    + " </td> <td  class='tableCell'>
                    "+allStudents[i].StudentName+" </td> </tr>");
        }
    }
}
Note: As we have mentioned, all view will have same layout so further demos will have almost the same code as you have written in
body tag of ViewDataDemo.cshtml file, now in further demos we just need to modifyforeach function to fill data in dropdown and two lines of code in getFacultyTable and getStudentTableJavaScript function.Passing Multiple Models using ViewBag
ViewBag is also used to pass data from a controller to a view. It is a dynamic property which comes inControllerBase class that is why it doesn’t require typecasting for datatype.- Add the following code in
HomeController:public ActionResult ViewBagDemo() { ViewBag.Courses = _repository.GetCourses(); ViewBag.Students = _repository.GetStudents(); ViewBag.Faculties = _repository.GetFaculties(); return View(); }
HereViewBagDemoaction method will be passing data to view (ViewBagDemo.cshtml) file usingViewBag. - Add a view named as
ViewBagDemo. All code will be same as you have written in ViewDataDemo.cshtmlfile. Just modify input model toforeachfunction.@*Iterating Course model using ViewBag *@ @foreach (var item in ViewBag.Courses) { <option>@item.CourseName</option> }
- In
scripttag, replace the following line of code ingetFacultyTablefunction://Get all faculties with the help of model // (ViewBag.Faculties), and convert data into json format. var allFaculties = @Html.Raw(Json.Encode(ViewBag.Faculties));
- Replace the following line of code in
getStudentTablefunction://Get all students with the help of model(ViewBag.Students), //and convert data into json format. var allStudents = @Html.Raw(Json.Encode(ViewBag.Students));
Passing Multiple Models using PartialView
Partial view is used where you need to share the same code (Razor and HTML code) in more than one view. For more details about
PartialView, please visit here.- In Home controller, add the following code,
PartialViewDemoaction method will return a view having the list of all courses only. This action method will not have or pass any faculty or student information as of now.public ActionResult PartialViewDemo() { List<Course> allCourse = _repository.GetCourses(); return View(allCourse); }
- Add a view named as
PartialViewDemo. All HTML code will be same as you have written before. Just modifyforeachfunction.@*Iterating Course Model*@ @foreach(var item in Model) { <option>@item.CourseName </option> }
- In
scripttag, modifygetFacultyTablefunction as written below:function getFacultyTable() { $.ajax({ // Get Faculty PartialView url: "/Home/FacultiesToPVDemo", type: 'Get', data: { courseName: selectedCourseName }, success: function (data) { $("#facultyDetailTable").empty().append(data); }, error: function () { alert("something seems wrong"); } }); }
- Modify
getStudentTablefunction as written below:function getStudentTable() { $.ajax({ // Get Student PartialView url: "/Home/StudentsToPVDemo", type: 'Get', data: { courseName: selectedCourseName }, success: function (data) { $("#studentDetailTable").empty().append(data); }, error: function () { alert("something seems wrong"); } }); }
- Add a new Action method in
HomeControllerasStudentsToPVDemoand add the following code inStudentsToPVDemoaction method.public ActionResult StudentsToPVDemo(string courseName) { IEnumerable <Course> allCourses = _repository.GetCourses(); var selectedCourseId = (from c in allCourses where c.CourseName == courseName select c.CourseId).FirstOrDefault(); IEnumerable <Student> allStudents = _repository.GetStudents(); var studentsInCourse = allStudents.Where(s => s.EnrolledCourses.Any(c => c.CourseId == selectedCourseId)).ToList(); return PartialView("StudentPV", studentsInCourse); }
- Add a
PartialViewto the Shared folder by right clicking onStudentsToPVDemoaction method, give it name asStudentPV.StudentsToPVDemoaction will returnStudentPV PartialViewhaving the list of students studying in a particular course. - Add the following code in StudentPV.cshtml file.
@model  IEnumerable <MultipleModelDemo.Models.Student>
 <table id="tblFacultyDetail" class="tableStyle">
         <tr>
         <th class="tableHeader" style="width:60px;">Roll No </th>
         <th class="tableHeader">Student Name </th>
         </tr>
    @foreach (var item in Model)
    {
          <tr>
             <td  class="tableCell" >@item.EnrollmentNo </td>
             <td class="tableCell">@item.StudentName </td>
         </tr>
    }
 </table>
- Add a new action method to call
PatialViewfor faculties inHomeController. Name it asFacultiesToPVDemoand add the following code:public ActionResult FacultiesToPVDemo(string courseName) { IEnumerable <Course> allCourses = _repository.GetCourses(); var selectedCourseId = (from c in allCourses where c.CourseName == courseName select c.CourseId).FirstOrDefault(); IEnumerable <Faculty> allFaculties = _repository.GetFaculties(); var facultiesForCourse = allFaculties.Where(f => f.AllotedCourses.Any(c => c.CourseId == selectedCourseId)).ToList(); return PartialView("FacultyPV", facultiesForCourse); }
- Add a
PartialViewnamed asFacultyPVas we did for studentPartialView, write the same code as you have written in StudentPV.cshtml file. Just replace one line of code as:@model IEnumerable<MultipleModelDemo.Models.Faculty>
FacultiesToPVDemoaction will returnFacultyPV PartialViewhaving the list of faculties who teach a particular course.
Passing Multiple Models using TempData
TempData is a dictionary of objects that is a type of TempDataDictionary class. TempData is defined as property in ControllerBase class. Values stored in TempData require typecasting to datatype in view. The values in TempData are accessible using a key. It is similar to ViewData but the difference is that it allow us to send and receive the data from one controller to another controller and from one action to another action. It’s all about possible because it internally uses session variables.
For more information about
TempData, please visit here. Here, we will use TempData only to hold (at server sideHomeController) and pass (to the TempDataDemo.cshtml) List of Courses.- In home controller, add the following code:
public ActionResult TempDataDemo()
{
    // TempData demo uses repository to get List<courses> only one time
    // for subsequent request to get List<courses> it will use TempData
    TempData["Courses"] = _repository.GetCourses();

    // This will keep Courses data untill next request is served
    TempData.Keep("Courses");
    return View();
}
- Using
TempData, we can pass values from one action to another action.TempData["Courses"]having the list of course. We will access this list inFacultiesToTempDataDemoaction as shown below:public ActionResult FacultiesToTempDataDemo(string courseName) { var allCourses = TempData["Courses"] as IEnumerable <Course>; // Since there are two AJAX call on TempDataPage // So we keep to keep Courses data for the next one TempData.Keep("Courses"); var selectedCourseId = (from c in allCourses where c.CourseName == courseName select c.CourseId).FirstOrDefault(); IEnumerable <Faculty> allFaculties = _repository.GetFaculties(); var facultiesForCourse = allFaculties.Where(f => f.AllotedCourses.Any(c => c.CourseId == selectedCourseId)).ToList(); return PartialView("FacultyPV", facultiesForCourse); } public ActionResult StudentsToTempDataDemo(string courseName) { var allCourses = TempData["Courses"] as IEnumerable <Course>; // If there is change in course again...it may cause more AJAX calls // So we need to keep Courses data TempData.Keep("Courses"); var selectedCourseId = (from c in allCourses where c.CourseName == courseName select c.CourseId).FirstOrDefault(); IEnumerable <Student> allStudents = _repository.GetStudents(); var studentsInCourse = allStudents.Where(s => s.EnrolledCourses.Any(c => c.CourseId == selectedCourseId)).ToList(); return PartialView("StudentPV", studentsInCourse); }
- Add a view by right clicking on
TempDataDemoaction method. Write the same code as you have written in PartialViewDemo.cshtml. Only one line of code needs to modify as written below:@*Iterating Course model using TempData["Courses"] *@ @foreach (var item in TempData["Courses"] as List <MultipleModelDemo.Models.Course>) { <option>@item.CourseName </option> }
ModifyurlingetFacultyTableandgetStudentTablefunction respectively as written below:
url: "/Home/FacultiesToTempDataDemo",
url: "/Home/StudentsToTempDataDemo",
Both Action methodsFacultiesToTempDataDemoandStudentsToTempDataDemowill return the samePartialViewwhich we used forPartialViewdemo.
Passing Multiple Models using ViewModel
ViewModel is a pattern that allow us to have multiple models as a single class. It contains properties of entities exactly need to be used in a view. ViewModel should not have methods. It should be a collection of properties needed for a view.- We have three models (classes) named as
Student,CourseandFaculty. All are different models but we need to use all three models in a view. We will create aViewModelby adding a new folder calledViewModels and add a class file called ViewModelDemoVM.cs and write the following code as shown below:public class ViewModelDemoVM { public List <Course> allCourses { get; set; } public List <Student> allStudents { get; set; } public List <Faculty> allFaculties { get; set; } }
Note: As a good practice when you create anyViewModel, it should have suffix as VM orViewModel. - In the
HomeController, add the following code:public ActionResult ViewModelDemo() { ViewModelDemoVM vm = new ViewModelDemoVM(); vm.allCourses = _repository.GetCourses(); vm.allFaculties = _repository.GetFaculties(); vm.allStudents = _repository.GetStudents(); return View(vm); }
ViewModelDemois an action method that will return a view havingViewModelDemoVMwhich has lists of allCourses,FacultiesandStudents. - Right click on
ViewModelDemoto add a view is calledViewModelDemo. ViewModelDemo.cshtml view will useViewModelDemoVMasModelas shown below:@model MultipleModelDemo.ViewModel.ViewModelDemoVM
- Modify
foreachfunction.@*Iterating Course ViewModel *@ @foreach (var item in Model.allCourses) { <option>@item.CourseName</option> }
- Replace the following line of code in
getFacultyTablefunction://Get all faculties with the help of viewmodel //(Model.allFaculties), and convert data into json format. var allFaculties = @Html.Raw(Json.Encode(Model.allFaculties));
- Replace the following line of code in
getStudentTablefunction://Get all students with the help of viewmodel(Model.allStudents), //and convert data into json format. var allStudents = @Html.Raw(Json.Encode(Model.allStudents));
Passing Multiple Models using Tuple
Tuple is a new class introduced in .NET Framework 4.0. It is an ordered sequence, immutable, fixed-size collection of heterogeneous (allows us to group multiple kind of data types) objects.- Add the following code in Home controller.
public ActionResult TupleDemo()
{
    var allModels = new Tuple <List <Course>,
    List <Faculty>,  List <Student>>
    (_repository.GetCourses(), _repository.GetFaculties(),  _repository.GetStudents()) { };
     return View(allModels);
}
Here, we are defining atuplewhich is having lists of courses, faculties and students. We are passing thistupleto theView. - Add a
Viewnamed asTupleDemo. Write code as you have written in ViewModelDemo.cshtml file. Just need to replace few lines of code. Replace model declarations as shown below. Here, we will use the namespace used to avoid long fully qualified class names.@using MultipleModelDemo.Models; @model Tuple <List <Course>, List <Faculty>, List <Student>>
- Modify
foreachfunction:@*Iterating Course model using tuple *@ @foreach (var item in Model.Item1) { <option>@item.CourseName </option> }
HereModel.Item1is mapped toCoursemodel. - Inside the JavaScript function called
getFacultyTablereplace the following line of code:var allFaculties = @Html.Raw(Json.Encode(Model.Item2));HereModel.Item2is mapped withFacultymodel. - Inside the JavaScript function called
getStudentTable, replace the following line of code:var allStudents = @Html.Raw(Json.Encode(Model.Item3));HereModel.Item3is mapped withStudentmodel.
Update for VS 2013 / MVC 5
If you would like to use Visual Studio 2013 / MVC 5, Step 1 and 2 as given for MVC 4 would be different, So please follow the steps as given below and then start from steps 3 as given for MVC 4 above.
- Open Visual Studio 2013, Click on "New Project" and select ASP.NET Web Application template and give it project name as
MultipleModelDemoand click OK.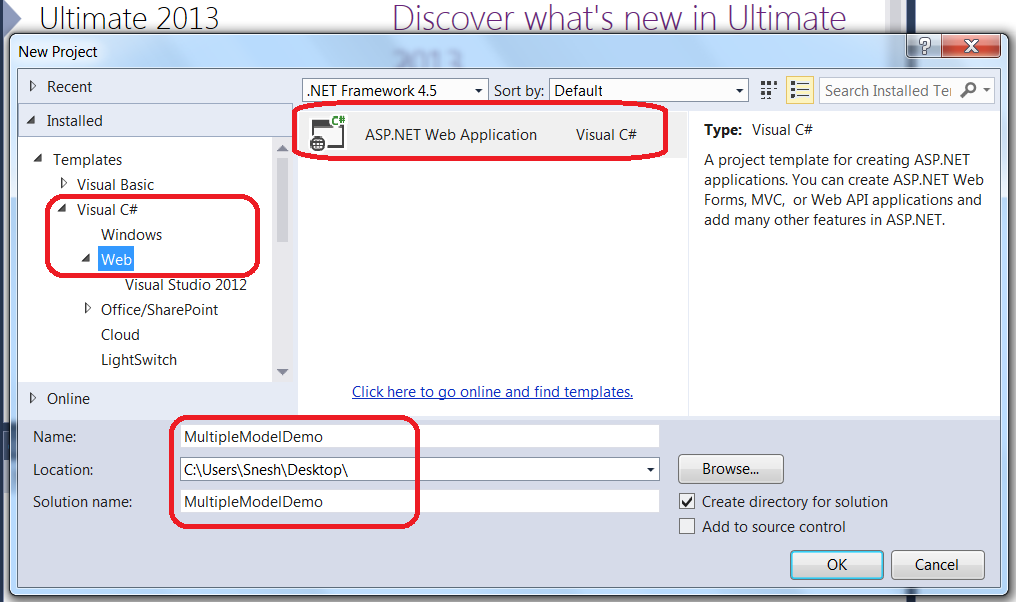
- Select a template as MVC and make sure that all check box given in lower section of popup are unchecked other than MVC. Before clicking OK, we need to change Authentication (since for this demo we are not using either Authentication or Unit Tests to keep it simple and to the point). Please find screen shots below for the same:

Changing the Authentication from "Individual User Account" to "No Authentication":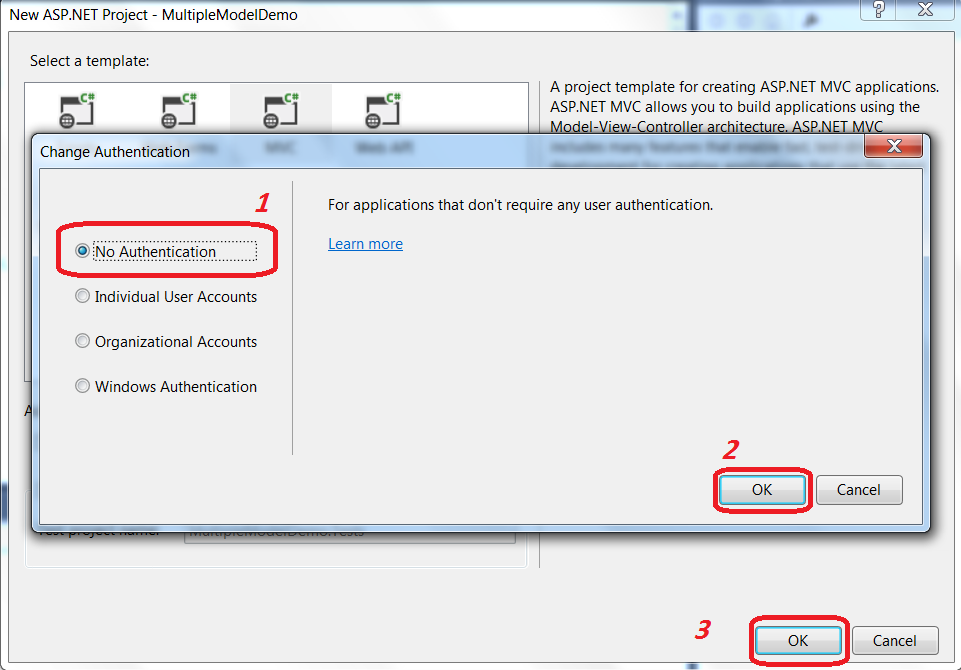
Visual Studio adds aMultipleModelDemoproject in solution. Now you can follow the step 3 and further as given for MVC 4.
Conclusion
In this article, we learned how to use multiple models in a view. In the article How to Choose the Best Way to Pass Multiple Models, I have shared my findings about when and where to pick a particular way to use multiple models in a view. Your inputs and queries are most welcome. Thanks.


