Download And Install MVC 4:
First, we will need to set up our visual studio to work with asp.net MVC 4 .
Download it from official site. Since Microsoft .NET platform introduced web platform installer, I find it very easy to get new product/patch/update installed and integrated very easily. As soon as it is done, we can move ahead to create our new exercise project with Asp.NET MVC 4 And Entity Framework.
The Exercise Project Background:
Did you ever think in total how many websites you signed up with? How many password combinations you used on all those sites? Can you remember the password of a site that you visited several months ago? Well, I did fell in this kind of issues several times. From this the idea came that an application be developed which will contain all these password information in a useful and organized way.
What about security? Why people will believe this application? Yeah, I know, don’t get too serious about it :D. Even so far, I don’t made a strict plan yet. Just let’s make the assumption for this tutorial at this moment.
Create New Project:
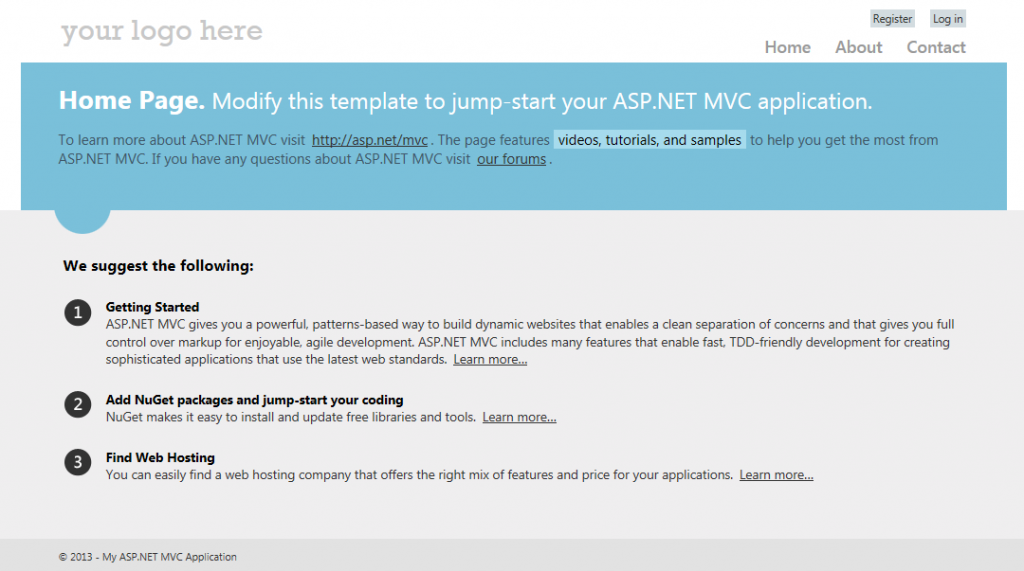
creating new project is similar to previous MVC 3 version. We will need to specify template engine, tell whether to create test project or not etc. After creation, a basic structure is already given. If we run this, we will see the home page like as follows:
Lets Start With Creating A Model Class:
if you are already a Asp.NET MVC developer, you might know that, it is possible to scaffold a controller and views from a defined model. That’s why, we will start with defining a model class which will be used to create controller/views automatically. In our projects ‘Models’ directory, create a new C# class as follows:
01
02
03
04
05
06
07
08
09
10
11
12
13
14
15
16
17
18
19
20
21
22
23
|
using System;
using System.Collections.Generic;
using System.Linq;
using System.Web;
using System.Data.Entity;
namespace MyPasswords.Models
{
public class Password
{
public int ID { get; set; }
public string Title { get; set; }
public string Category { get; set; }
public string URL { get; set; }
public string AppUserName { get; set; }
public string AppPassword { get; set; }
}
public class PasswordDBContext : DbContext
{
public DbSet<Password> Passwords { get; set; }
}
}
|
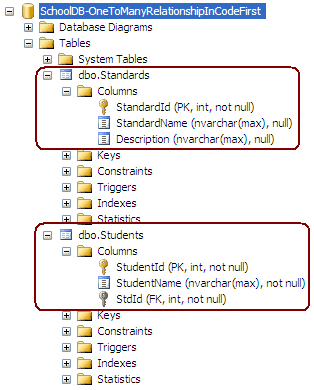
As you can notice here, we have created two classes one for the database table/entity with name ‘Password’ and another one is for DbContext which will act as the database container in our application. When you will create more tables, you can create this DbContext class separately as well.
Create Controllers And Views:
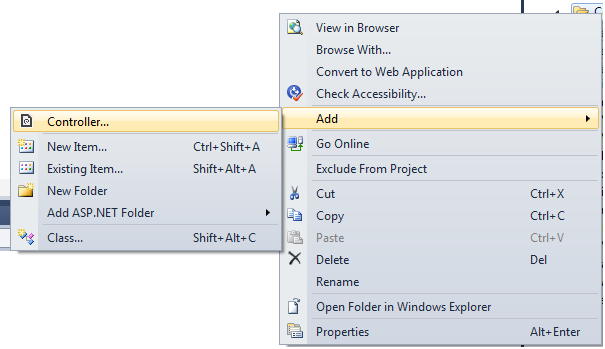
to create a new controller from the above created model, right-click on the ‘Controllers’ directory and use ‘Add’ -> ‘Controller’ option.
It will lead you to a new controller creation window where you will be able to select the model class and DataContext class to be mapped with and template engine as well. Set them as in the image below.
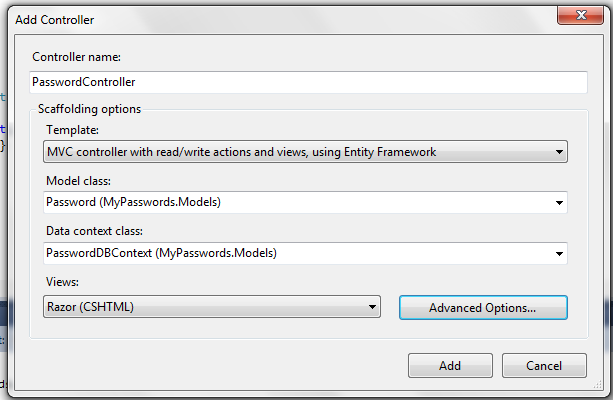
By defining the view template, we are creating views at the same time of controller creation, instead of creating them separately.
Connect To Database Server:
As we have create controller/model/views, its time to connect to the database server. In your web.config file, add a new connection string as below:
1
|
<add name="PasswordDBContext" connectionString="Data Source=.\SQLEXPRESS;Initial Catalog=MyPasswords;Integrated Security=True;MultipleActiveResultSets=True;App=EntityFramework" providerName="System.Data.SqlClient" />
|
Name it with your DBContext class and set server/database name as per your own preference. Notice that, we haven’t created any database on our SQL server yet. Yes, and it’s not required at all. Here is the magic of Entity framework, it facilitates us to create database/tables from the defined entity automatically without worrying to do that manually via SQL management studio.
Build And Run Our Asp.NET MVC 4 And Entity Framework Based Mini Application:
so, if you have done all the steps as above properly, you should now be able to build the application successfully and run properly as well. After running use the URL “http://localhost:{port}/Password” to navigate to our recently implemented controller:
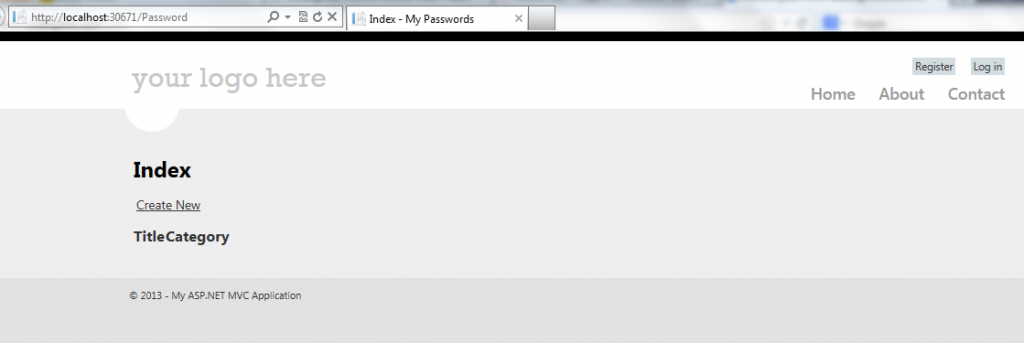
Here you can test the create new/update/delete all options whether they are functional or not ( They should be

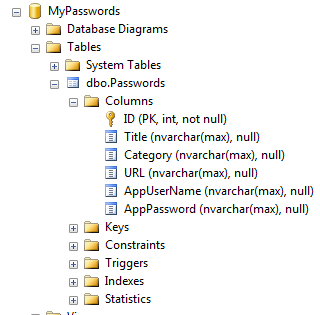
. Now if you go and check your database you should find it created properly on SQL server database:
Preparing For Future Modification:
So, far we have done a good job. Now, what if we need to add a new entity to the database or modify an entity? As database is already exist, entity framework won’t go to create or modify it of its own. So, lets prepare for such scenario so that we can update our database in future whenever a new modification occurs, right from visual studio environment, easily.
Here, I am happy to introduce you with visual studio’s Package manager console, if you are not familiar already. Use visual studio’s ‘Tools’->’Library Package Manager’->’Package Manager Console’ to launch this console.
First use the “Enable-Migrations” command in the console and you should have an output as below:
1
2
3
|
PM> Enable-Migrations -ContextTypeName MyPasswords.Models.PasswordDBContext
Checking if the context targets an existing database...
Code First Migrations enabled for project MyPasswords.
|
Now Execute ‘Add-Migration’ command, which will create a scaffold template from your entity. Output should be as follows:
1
2
3
|
PM> add-migration Test
Scaffolding migration 'Test'.
The Designer Code for this migration file includes a snapshot of your current Code First model. This snapshot is used to calculate the changes to your model when you scaffold the next migration. If you make additional changes to your model that you want to include in this migration, then you can re-scaffold it by running 'Add-Migration 201302260652175_Test' again.
|
As you can see here, when we will make changes in our model entities, we will have to run this command again specifying the generated template name. The template file should look something like as follows:
01
02
03
04
05
06
07
08
09
10
11
12
13
14
15
16
17
18
19
20
21
22
23
24
25
26
27
28
29
30
|
namespace MyPasswords.Migrations
{
using System;
using System.Data.Entity.Migrations;
public partial class Initial : DbMigration
{
public override void Up()
{
CreateTable(
"dbo.Passwords",
c => new
{
ID = c.Int(nullable: false, identity: true),
Title = c.String(),
Category = c.String(),
URL = c.String(),
AppUserName = c.String(),
AppPassword = c.String(),
})
.PrimaryKey(t => t.ID);
}
public override void Down()
{
DropTable("dbo.Passwords");
}
}
}
|
Now lets execute the ‘update-database’ command which will make necessary changes to database:
1
2
3
4
5
|
PM> update-database
Specify the '-Verbose' flag to view the SQL statements being applied to the target database.
Applying code-based migrations: [201302260652175_Test].
Applying code-based migration: 201302260652175_Testl.
Running Seed method.
|
And we are done with database update completely
. I like this feature a lot and I think, other developers should also as it will save a lot time to set up/modify database.