Satellizer is a token-based authentication module for AngularJS that comes with built-in support for Facebook, Google, LinkedIn, Twitter, GitHub, Yahoo and Windows Live OAuth providers, as well as a more traditional email and password sign-in flow.

The motivation to build Satellizer came from my frustration with existing
authentication solutions for AngularJS at the time of writing my blog post Create a TV Show Tracker using AngularJS, Node.js and MongoDB. Although Satellizer gained quite a bit of popularity, building it was not without its own set of challenges:
- Writing a library is very different from writing an application. Before Satellizer, I have never written a single JavaScript library, only web apps and boilerplates. I wasn't even sure where to start with building an AngularJS module.
- Deciding on the authentication flow: popup versus redirect, authentication library (e.g. Passport for Node.js or Omniauth for Ruby) versus the manual login flow on the back-end, embed client-side SDKs (Facebook, Google, LinkedIn) versus custom OAuth 1.0 and OAuth 2.0 implementations. These are some big decisions that could have resulted in a completely different library.
- Since I had decided to make Satellizer as flexible as possible by not relying on any third-party SDKs, I had to learn and master OAuth 1.0 and OAuth 2.0 authentication flows in order to implement it in the Satellizer module.
- Support for Internet Explorer.
Ok, enough of Satellizer's backstory. Let's get started and build something awesome with Satellizer and AngularJS. One last thing, if you find any typos or mistakes please report them so I could update the post as necessary.
Enjoy this tutorial.
2. Demo & Source Code
If you do not have time to read the entire post, here are the links for
Live Demo and
GitHub Project. This is what we will be building in this tutorial:
Disclaimer: This app is not intended to be a fully-featured Instagram clone but rather I want to demonstrate how easy it is to implement user authentication with Satellizer. I chose Instagram in particular because the
Satellizer Demo already comes with Facebook, Google, Twitter, LinkedIn, GitHub, Yahoo, Windows Live and Foursquare sign-in options, and so I wanted to implement something different this time.
3. Getting Started
Let's start by downloading the latest version of AngularJS. Be sure to click on
Browse additional modulesand download
angular-route.js and
angular-messages.js. The former is for routing (page navigation), while the latter is for displaying input validation error messages.

Create a new directory named
instagram. Inside, create another directory named
client. Inside
client, create
vendor directory. Finally, copy the files we just downloaded -
angular.js,
angular-messages.js and
angular-route.js. into
vendor directory.
In the client directory create a new file index.html with the following contents:
<!doctype html>
<html ng-app="Instagram">
<head>
  <meta charset="utf-8">
  <meta http-equiv="X-UA-Compatible" content="IE=edge">
  <meta name="viewport" content="width=device-width, initial-scale=1">
  <title>Instagram - Powered by Satellizer</title>
  <link rel="stylesheet" href="//maxcdn.bootstrapcdn.com/bootswatch/3.3.0/paper/bootstrap.min.css">
  <link rel="stylesheet" href="//code.ionicframework.com/ionicons/1.5.2/css/ionicons.min.css">
  <link rel="stylesheet" href="css/styles.css">
</head>
<body>

<div ng-view></div>

<script src="vendor/angular.js"></script>
<script src="vendor/angular-route.js"></script>
<script src="vendor/angular-messages.js"></script>
<script src="app.js"></script>

</body>
</html>
The
ng-app attribute is used for bootstrapping an AngularJS application. It designates the root element of the application and is usually placed on
or
tags. The
ng-view works alongside
ngRoute by including the rendered template of the current route into the main layout -
index.html in this case. When the current route changes, the included view changes with it as well.
Next, in the same directory create a new file called app.js. It will be the entry point of our AngularJS application.
angular.module('Instagram', ['ngRoute', 'ngMessages'])
  .config(function($routeProvider) {

  });
Angular uses modules to organize application code. A module can depend on other modules, in this case -
ngRoute and
ngMessages. Each module is like a mini-application with its own potential models, controllers, services, directives, filters, etc.
As you may have guessed already, the first argument is the name of the module and the second argument is an array of module dependencies. If you do not have any dependencies, an empty array must be provided either way. Omitting an array has a "getter" behavior. For example, when we need to reference a module in order to create a new controllers, services or directives we will simply useangular.module('Instagram') without the second argument.
The
.config() method above is executed during the provider registration and configuration phase. You can only inject
providers and
constants into configuration blocks, hence the
$routeProvider and not
$route. This is where you would set-up routes, override Satellizer's default options, or potentially modify HTTP requests/responses via
interceptors.
You can read more about AngularJS modules
here.
Note: The module name and the ng-app attribute value in index.html have to match.
Here is our project directory structure so far:
Let's go ahead and start a Python web server to see how our page looks. You could double click theindex.htmland that would still work for now, but as soon as we start making AJAX requests you will see an error that looks something like this:
Cross origin requests are only supported for protocol schemes: http, data, chrome-extension, https, chrome-extension-resource.
And that's why we need a web server. You don't have to use Python but it is by far the easiest one to use. If you are on a Mac OS X or Linux then you already have Python installed, but if you are on a Windows machine,
download and install Python 2.x or 3.x on your machine before proceeding.
Open the Terminal then navigate to our client directory and enter the following command:
$ python -m SimpleHTTPServer
Note: Windows users, be sure to check out
cmder console emulator. It is the closest thing to Linux and Mac OS X Terminal for Windows operating system. I absolutely love using it when I am coding on my Surface Pro 3.
Go to
http://localhost:8000 and you should see a blank page since we have not added any styles or content yet. Open Google Chrome's JavaScript Console
( Mac OS X: ⌥ + ⌘ + J or Windows: Ctrl + Shift + J) and verify there are no errors.
4. Bootstrapping UI
Since we have included a
Paper Bootstrap theme from CDN let's add a Navbar component to our
index.html page. Add the following code right before
<div ng-view></div> so that the Navbar could be visible on all pages.
<div class="navbar navbar-default navbar-static-top">
  <div class="container">
    <ul class="nav navbar-nav">
      <a href="/" class="navbar-brand"><i class="ion-images"></i> Instagram</a>
      <li><a href="#/">Home</a></li>
      <li><a href="#/login">Log in</a></li>
      <li><a href="#/signup">Sign up</a></li>
      <li><a ng-click="logout()" href="">Logout</a></li>
    </ul>
  </div>
</div>

Before moving on any further let's get the CSS styles out of the way. This blog post is not about CSS and for that reason I will not be covering it here. There is really not much to cover anyway since it is mostly Boostrap classes overrides. If you are interested in learning about CSS best practices I would recommend checking out the following blog posts:
Medium’s CSS is actually pretty f*ing good,
Don’t use IDs in CSS selectors? and
The Sass Way.
Create a new directory called css inside client, then inside this new css directory create styles.css file and paste the following:
body {
  background-color: #d8d8d8;
}

a {
  color: #3f729b;
}

a:hover {
  color: #1c5380;
}

.text-muted {
  color: #90939a;
}

.navbar {
  min-height: 50px;
  border: 0;
  box-shadow: 0 2px 5px 0 rgba(0, 0, 0, .26);
}

.navbar-header {
  float: left;
  padding-left: 15px;
}

.navbar-brand {
  height: 50px;
  padding: 0 15px;
  font-size: inherit;
  line-height: 50px;
}

.navbar-nav {
  float: left;
  margin: 0;
}

.navbar-nav > li {
  float: left;
}

.navbar-nav > li > a {
  padding: 0 15px;
  line-height: 50px;
}

.navbar-text {
  margin-top: 10px;
  margin-bottom: 10px;
}

.center-form {
  width: 315px;
  margin: 10% auto;
}

.signup-or-separator {
  position: relative;
  height: 29px;
  margin: 5px 0;
  text-align: center;
  background: none;
}

.signup-or-separator hr {
  width: 90%;
  margin: -16px auto 10px auto;
  border-top: 1px solid #dce0e0;
}

.signup-or-separator .text {
  display: inline-block;
  padding: 8px;
  margin: 0;
  background-color: #fff;
}

.has-feedback .form-control-feedback {
  top: 0;
  left: 0;
  width: 46px;
  height: 46px;
  line-height: 46px;
  color: #555;
}

[class^='ion-'] {
  font-size: 1.2em;
}

.has-feedback .form-control {
  padding-left: 42px;
}

.btn-instagram {
  color: #fff;
  background-color: #517fa4;
  border: 1px solid #456c8c;
}

.btn-instagram:hover,
.btn-instagram:focus {
  color: #fff;
  background-color: #303030;
}

.media-object {
  display: inline-block;
  width: 32px;
  height: 32px;
}

.media-heading {
  display: block;
  margin: 0;
  color: #3f729b;
}

.media-heading:hover {
  color: #1c5380;
}

.soften {
  height: 1px;
  background-image: -webkit-linear-gradient(left, rgba(0, 0, 0, 0), rgba(0, 0, 0, .1), rgba(0, 0, 0, 0));
  background-image: -moz-linear-gradient(left, rgba(0, 0, 0, 0), rgba(0, 0, 0, .1), rgba(0, 0, 0, 0));
  background-image: -ms-linear-gradient(left, rgba(0, 0, 0, 0), rgba(0, 0, 0, .1), rgba(0, 0, 0, 0));
  border: 0;
}

.thumbnail {
  border: 0;
  border-radius: 0;
  box-shadow: 0 0 0 1px rgba(0, 0, 0, .04),0 1px 5px rgba(0, 0, 0, .1);
}

And lastly, add the stylesheet reference to the
block of
index.html:
<link rel="stylesheet" href="css/styles.css">
5. Routing
Next, we will create a grid of thumbnails on the home page. For that we will need to setup Angular routes that render partial templates based on the URL. For example, when a user visits
http://localhost:8000/the router will render the
home.html template. Similarly, when
**http://localhost:8000/login **is visted, the router will render the
login.html template.
A template is just a snippet of HTML-like code that gets inserted into the
ng-view block of
index.html. By placing the Navbar inside i
ndex.html we know that it will be rendered in every template. If you want to have the Navbar displayed only on some pages, then you would need to place it on those specific templates, not inside
index.html. For more informationsee the
ng-include documentation to find out how you could embed external HTML fragments into your templates to avoid duplicating Navbar across multiple templates.
Open app.js in the client directory and add the following code inside the .config() function block:
$routeProvider
  .when('/', {
    templateUrl: 'views/home.html',
    controller: 'HomeCtrl'
  })
  .when('/login', {
    templateUrl: 'views/login.html',
    controller: 'LoginCtrl'
  })
  .when('/signup', {
    templateUrl: 'views/signup.html',
    controller: 'SignupCtrl'
  })
  .when('/photo/:id', {
    templateUrl: 'views/detail.html',
    controller: 'DetailCtrl'
  })
  .otherwise('/');
Each .when**() method above takes a relative URL path as its first argument and an object as its second argument. When we visit the index route "/"Angular will load home.html from the views directory and make HomeCtrl** controller available to that template.
The colon in /photos/:id route tells us that it is a dynamic route, where id is a unique Instagram photo id. For instance, this route will match the following URL:
http://localhost:8000/photos/85391138efe54d929d17e3c18bf634fe
The last, optional method .otherwise() will match any path that is not one of the specified routes above. This is where you could also redirect to a 404 page instead of a home page like we have above.
Ok, if you refresh the browser now, you will see a bunch of 404 File Not Found errors because$routeProvider is trying to load templates and controllers that do not yet exist. Let's fix that in the next section!
6. Home Page
Create two new directories named controllers and views. Inside controllers create the following JavaScript files:
- detail.js
- home.js
- login.js
- navbar.js
- signup.js
In the views directory create the following HTML files:
- detail.html
- home.html
- login.html
- signup.html
Note: The navbar.js controller does not have a corresponding template. We will include an inline controller directly on the Navbar component in index.html to handle the logout action and a few other things.
We need to include above JavaScript files from the controllers directory into index.html to load them.

Open
views/home.html template and paste the following code:
<div class="container">
<div ng-if="isAuthenticated() && currentUser.username">
<div class="row">
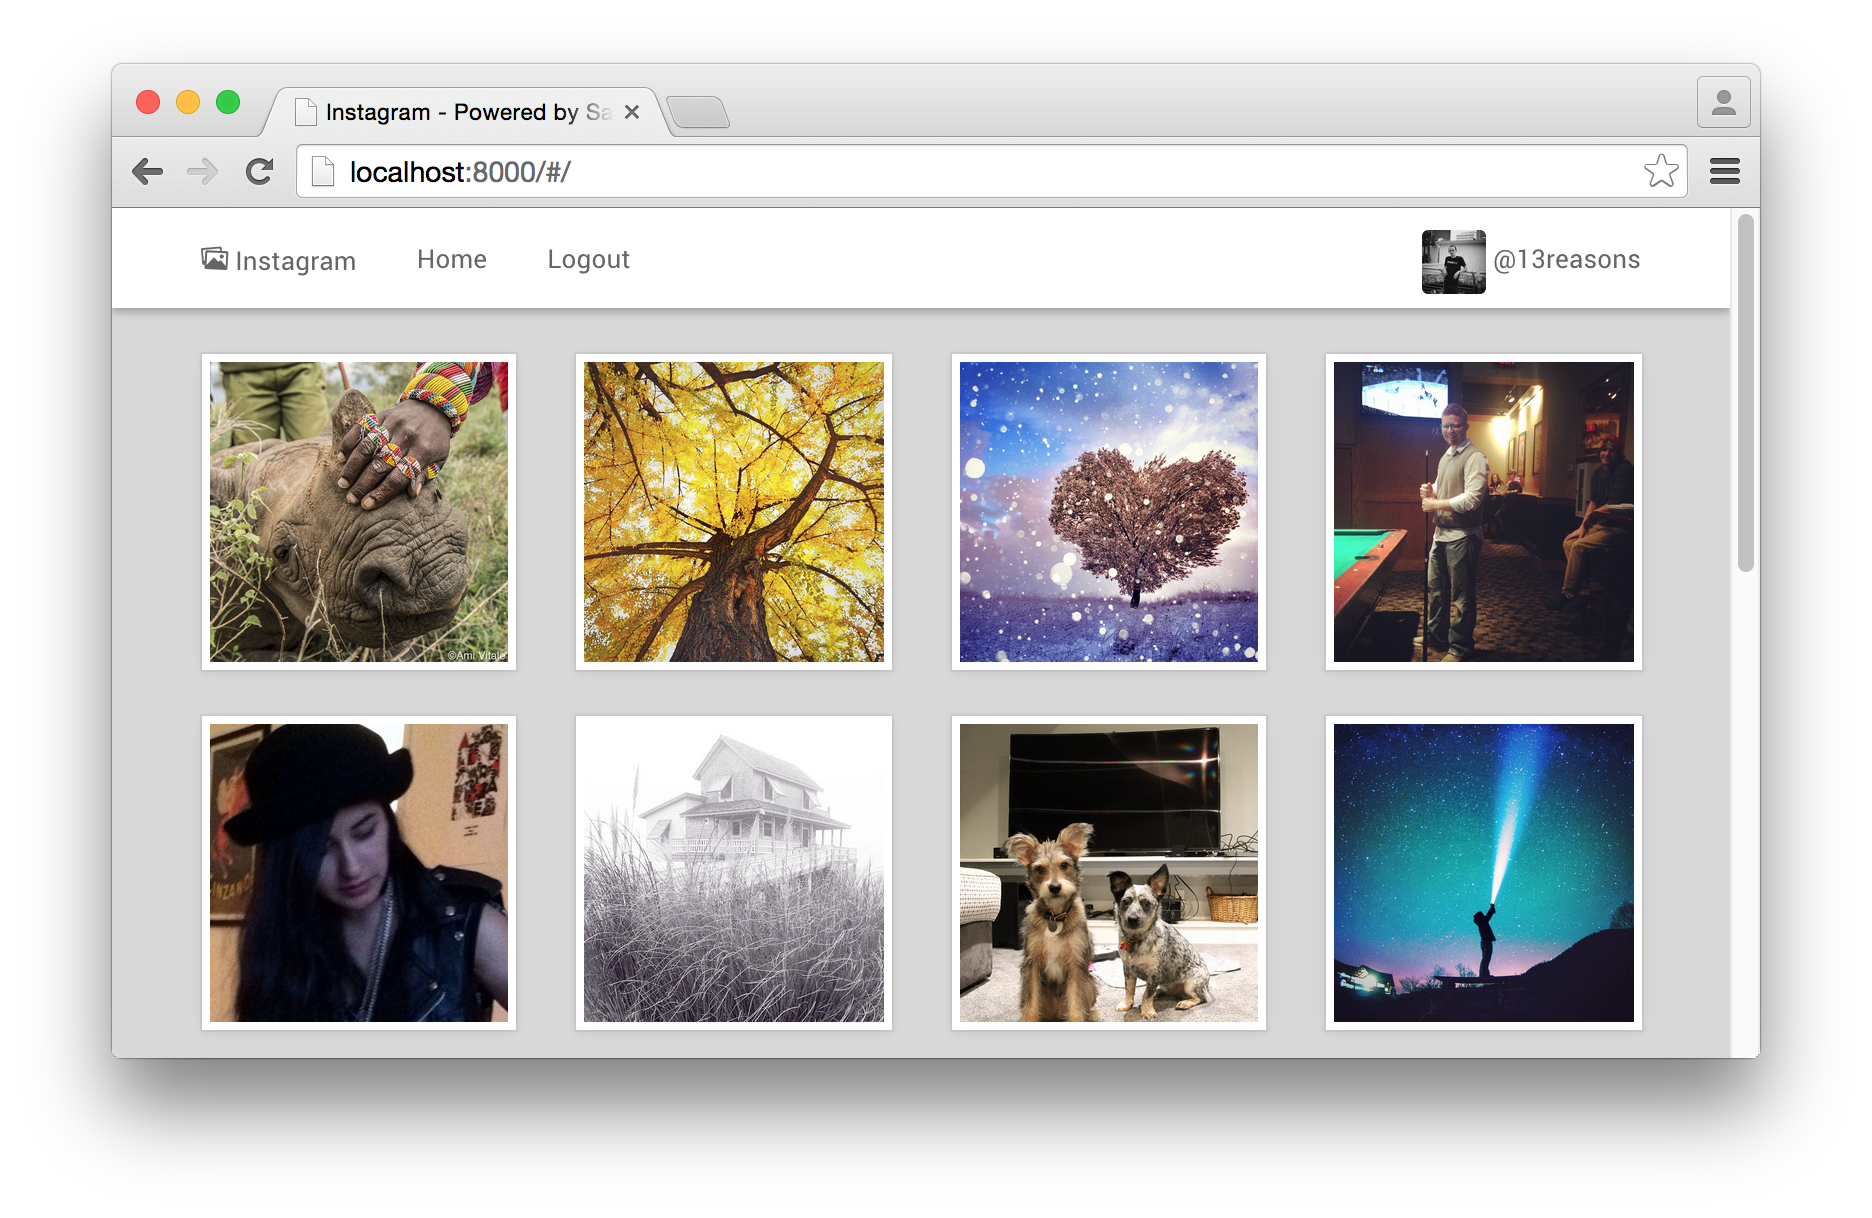
<div ng-repeat="photo in photos" class="col-lg-2 col-sm-3 col-xs-4">
<a href="#/photo/{{photo.id}}">
<img ng-src="{{photo.images.standard_resolution.url}}" class="thumbnail img-responsive">
</a>
</div>
</div>
</div>
<div ng-if="!isAuthenticated()">
<div class="jumbotron">
<h2><i class="ion-images"></i> Instagram</h2>
<p>This is a basic Instagram clone powered by <strong>Satellizer</strong>. To continue, please log in with your Instagram account or create a new email account.</p>
<p>
<a class="btn btn-lg btn-success" href="#/login"><i class="ion-log-in"></i> Log in</a>
<a class="btn btn-lg btn-primary" href="#/signup"><i class="ion-person-add"></i> Create account</a>
</p>
</div>
</div>
<div ng-if="isAuthenticated() && !currentUser.username" class="center-form panel">
<div class="panel-body">
<h5 class="text-center"><i class="ion-link"></i> Link Account</h5>
<p>To complete the registration process you must link your Instagram account.</p>
<button class="btn btn-block btn-instagram" ng-click="linkInstagram()">
<i class="ion-social-instagram"></i> Sign in with Instagram
</button>
</div>
</div>
</div>
This template consists of 3 main parts:
- User is authenticated via Email or OAuth 2.0 and has a valid Instagram username. What this means is that a user has successfully signed in with Instagram or created an Email account and later connected it with his or her Instagram account.
- User is not authenticated. This could a visitor seeing the page for the first time.
- User is authenticated via Email but does not have a valid Instagram username. At this point an account must be linked with Instagram before being able to do anything.
Note: I am using the Instagram username as a unique identifier to determine whether or not a user has signed in with Instagram and authorized the app.
I could have certaintly made my life much easier by using just the Instagram authentication, but I wanted to demonstrate how to handle account linking and account merging on the back-end because it seems like such a common problem.
Let's break it down line by line. The ng-if attribute is a special Angular directive that conditionally renders an HTML block based on some expression. If the expression inside ng-if evaluates to false then the element is removed from the DOM, otherwise a clone of the element is reinserted into the DOM.
The
ng-repeat attribute is another special Angular directive that is essentially a
for-each loop designed for Angular templates. Unlike Handlebars or Jade templates where you
wrap the for loop around the element, in Angular the
ng-repeat will iterate over the element itself on which it is defined.
In order to avoid fetching images quite literally from
{{photo.images.standard_resolution.url}} we need to use
ng-src attribute on
![]()
element. Angular will automatically evaluate that expression and insert a correct string value.
You may have noticed expressions like isAuthenticated(), linkInstagram() and currentUser. These are functions and objects that we are going to create next in the HomeCtrl controller.
Note: Don't forget to prepend
href paths with a hash, i.e.
#/login instead of
/login. That is necessary unless you are using HTML5 History API (pushState). However, it is not as simple as adding
one line of code, you still need to have web server rewrite rules or page redirects on the back-end to make the whole thing work.
Open controllers/home.js and paste the following code (we will implement these functions in the next section):
angular.module('Instagram')
.controller('HomeCtrl', function($scope) {
$scope.isAuthenticated = function() {
};
$scope.linkInstagram = function() {
};
});
I don't think I could explain Angular controllers any better than Todd Motto, the way he did in his
AngularJS guide. That post is the first thing anyone should read who is starting out with AngularJS. I am really surprised it has not been featured on front page of
https://angularjs.org.
Reload the browser and you should see the following page:

7. Satellizer
Go to
https://github.com/sahat/satellizer and click on the
Download ZIP button on the right sidebar. Extract the archive, then copy
satellizer.js to
instagram/client/vendor directory.
Open index.html and include the reference to Satellizer before app.js script tag:
<script src="vendor/satellizer.js"></script>

<script src="app.js"></script>
...
Open app.js, import the Satellizer module and add $authProvider parameter to the .config block:
angular.module('Instagram', ['ngRoute', 'ngMessages', 'satellizer'])
  .config(function($routeProvider, $authProvider) {
By default, Satellizer module comes with the following default OAuth providers at the moment of this writing: Google, Facebook, Twitter, LinkedIn, GitHub, Yahoo and Windows Live. For these providers you may only need to pass a
Client ID information as long as you are satisfied with the
default configuration options.
For Instagram, or any other generic OAuth 2.0 provider, you are required to pass additional information. In the same app.js file, after $routeProvider, add the following code:
$authProvider.loginUrl = 'http://localhost:3000/auth/login';
$authProvider.signupUrl = 'http://localhost:3000/auth/signup';
$authProvider.oauth2({
  name: 'instagram',
  url: 'http://localhost:3000/auth/instagram',
  redirectUri: 'http://localhost:8000',
  clientId: '799d1f8ea0e44ac8b70e7f18fcacedd1',
  requiredUrlParams: ['scope'],
  scope: ['likes'],
  scopeDelimiter: '+',
  authorizationEndpoint: 'https://api.instagram.com/oauth/authorize'
});

As you may have guessed, just by looking at the directory structure, we will be running the Express server on a separate port from the Angular app. Our API back-end will be completely independent of the front-end. I chose to do it this way because it seems like a common use case with single page apps and since I have never built a web app using this architecture before, I thought this would be a good time as any to do it.
I typically include my single page apps inside the public directory that is served by Express or some other web server. So, because of that, I never had to deal with CORS (cross original resource sharing) business.
First thing you will notice is that we are using
absolute URLs because our server is running on a different port. Our server could potentially be on an completely different host, e.g. Node.js back-end hosted on
Digital Ocean and AngularJS front-end hosted on
Heroku or
GitHub Pages.
Both loginUrl and signupUrl are server endpoints to handle user login and registration. Satellizer will send a POST request to these endpoints when we call $auth.login() and $auth.signup() from LoginCtrl andSignupCtrl controllers.
The name could be anything as long as you are consistent with yourself when calling $auth.authenticate()method.
The url server endpoint is where most of the work will be done. It will handle Instagram account creation, account merging, returning existing account if a user logs in a second time.
The
redirectUri must match the the
Redirect URI specified in your app on
instagram.com/developer as shown in the screenshot below. This is where Instagram will redirect to after user successfully authorizes our app to use their profile information, feed and potentially perform actions like commenting on and liking photos on their behalf.
The
scope and
scopeDelimiter are related to each other in that the
scope is used for requesting additional permissions such liking a photo, commenting on a photo, following or unfollowing users, while the
scopeDelimiter is a separator between multiple scopes. Built-in providers already have a proper scope separator so you don't have to think about that.
When I built Satellizer I used a comma to separate multiple scopes until I found out that Google and some other providers use space character instead. Instagram on the other hand uses an escaped space ("+"). To better illustrate this point here are a few examples:
- Facebook: scope=email,user_likes,user_friends
- Google: scope=openid%20email%20profile
- Instagram: scope=likes+comments+relationships
- GitHub: scope=user,public_repo,gist
Note: If you think that having a scope array and a scopeDelimiter string is too confusing, I could instead use a scope string, provided that you will be responsible for entering a scope in using a proper format specified by that OAuth provider. If you have any feedback on this matter please open an issueon GitHub.
Finally, the
authorizationEndpoint is the URL for the consent screen. Unfortunately, sometimes it requires a little bit of digging into an API documentation to find that URL. A
good documentation will make it easily accessible for developers.
Before going any further, let's create a new app on
instagram.com/developer/clients/register/ because you should be using your own
Client ID and
Client Secret, not mine. Enter your
application name,
description,then set
Redirect URI and
Website to
http://localhost:8000. Next, replace my
clientId string in
app.js and my
clientSecret in
server/config.js with the ones you just obtained from Instagram.
Go back to HomeCtrl controller in controllers/home.js and update your code. First, inject the following services:
.controller('HomeCtrl', function($scope, $window, $rootScope, $auth) {
Note: $scope, $window and $rootScope are built-in Angular services.
Next, we will use Satellizer's $auth service to implement isAuthenticated() and linkInstagram() functions:
$scope.isAuthenticated = function() {
  return $auth.isAuthenticated();
};

$scope.linkInstagram = function() {
  $auth.link('instagram')
    .then(function(response) {
      $window.localStorage.currentUser = JSON.stringify(response.data.user);
      $rootScope.currentUser = JSON.parse($window.localStorage.currentUser);
    });
};
Note: Hopefully you are familiar with the promises syntax using
.then /
.catch methods. If, however, you have only used callbacks up to this point and promises are completely alien to you then you may want to watch this
Egghead.io screencast on AngularJS promises.
I actually didn't understand how promises work in JavaScript until earlier this year when I started learning AngularJS.
If you refresh the browser you will not see anything new because
isAuthenticated() will still return
falseand the button with
linkInstagram() action will not be visible just yet.Let's step back for a moment to see what we have so far. This would be a great time to catch up and see if you have missed anything along the way.


8. Login Page
Open login.html and enter the following:
<div class="container">

    <div class="center-form panel">
      <div class="panel-body">
        <h4 class="text-center"><i class="ion-log-in"></i> Log in</h4>

        <form name="loginForm" ng-submit="emailLogin()" novalidate>
          <div class="form-group has-feedback" ng-class="{ 'has-error': loginForm.email.$invalid && loginForm.email.$dirty }">
            <input server-error class="form-control input-lg" type="text" name="email" ng-model="email" placeholder="Email" required autofocus>
            <span class="ion-at form-control-feedback"></span>
            <div class="help-block" ng-if="loginForm.email.$dirty" ng-messages="loginForm.email.$error">
              <div ng-message="required">Please enter your email</div>
              <div ng-message="server">{{errorMessage.email}}</div>
            </div>
          </div>

          <div class="form-group has-feedback" ng-class="{ 'has-error': loginForm.password.$invalid && loginForm.password.$dirty }">
            <input server-error class="form-control input-lg" type="password" name="password" ng-model="password" placeholder="Password" required>
            <span class="ion-key form-control-feedback"></span>
            <div class="help-block" ng-if="loginForm.password.$dirty" ng-messages="loginForm.password.$error">
              <div ng-message="required">Please enter your password</div>
              <div ng-message="server">{{errorMessage.password}}</div>
            </div>
          </div>

          <button type="submit" class="btn btn-block btn-success" ng-disabled="loginForm.$invalid">Log in</button>

          <br/>

          <p class="text-center text-muted">
            <small>Don't have an account yet? <a href="#/signup">Sign up</a></small>
          </p>

          <div class="signup-or-separator">
            <h6 class="text">or</h6>
            <hr>
          </div>
        </form>
        <button class="btn btn-block btn-instagram" ng-click="instagramLogin()">
          <i class="ion-social-instagram"></i> Sign in with Instagram
        </button>
      </div>
    </div>

</div>
Refresh the Browser and you should now see the following login page.

This code
ng-submit="emailLogin() on line 7 will execute specified function in our
LoginCtrl controller that we are going to create next. It is very similar to
$('form').submit() in jQuery.
On line 8 we conditionally apply Bootstrap's has-error class based on the following two form states:
- Email field is invalid, e.g. does not have the @ symbol or is empty. (empty input validation is enforced by the required attribute)
- In addition to the above, the form must be "dirty", in other words a user has interacted with the form by typing something into it.
Note: To learn more about different form states such as dirty, pristine, error, valid, invalid check out
The concepts of AngularJS Forms by Muhammad Azamuddin. Also, if you are not familiar with Bootstrap's form validation or feedback icons take a look at the
validation states section in the docs.
For displaying error messages under the form fields we are going to use
ng-messages directive introduced in AngularJS 1.3. If you have never used
ng-messages directive before then be sure to take a look at the following awesome resources:
Egghead.io Screencast and
Year of Moo blog post.
The only thing about
ng-messages that may not obvious here is
ng-message="server" and
server-errorattributes. The latter is a directive that we will implement shortly, while the former is a
custom validator for ngMessages which will be used to display server-side input validation errors such as
"The email or password you entered was incorrect".
Why do we need the server-error directive? We need it to clear the error message by setting$setValidity('server', true) on keyDown event, i.e. when a user starts typing in the form. Since I chose to disable the Login button unless the form is valid, when we set $setValidity('server', false) the form will stay invalid because the server custom validator is now false and there would be no way to re-submit the form again.
That's why we somehow need to reset the validity of the server validator. A directive is the only place where it makes sense to do this. Anyhow, it's just an implementation detail. Designing the best user experience for login and signup forms is not the main objective of this tutorial. We could have even used a401 status code as an indicator that email or password is invalid and then just hard-code _"The email or password you entered was incorrect" _message in Angular.
Below is the finished project's screenshot of what it looks like after we submit a form using an email address that does exist in a database. That message
"Incorrect email" is sent from the server, defined in the
/auth/login route that we will implement in
Step #13.
Next, open login.js and enter the following code:
angular.module('Instagram')
  .controller('LoginCtrl', function($scope, $window, $location, $rootScope, $auth) {

    $scope.instagramLogin = function() {
      $auth.authenticate('instagram')
        .then(function(response) {
          $window.localStorage.currentUser = JSON.stringify(response.data.user);
          $rootScope.currentUser = JSON.parse($window.localStorage.currentUser);
        })
        .catch(function(response) {
          console.log(response.data);
        });
    };

    $scope.emailLogin = function() {
      $auth.login({ email: $scope.email, password: $scope.password })
        .then(function(response) {
          $window.localStorage.currentUser = JSON.stringify(response.data.user);
          $rootScope.currentUser = JSON.parse($window.localStorage.currentUser);
        })
        .catch(function(response) {
          $scope.errorMessage = {};
          angular.forEach(response.data.message, function(message, field) {
            $scope.loginForm[field].$setValidity('server', false);
            $scope.errorMessage[field] = response.data.message[field];
          });
        });
    };

  });
As both method names imply, instagramLogin() is a method handler for Sign in with Instagram button andemailLogin() is a method handler for email and password form submission.
Satellizer has two sign-in methods: authenticate and login. The former is for the OAuth 1.0 and OAuth 2.0 sign-in and the latter is for the email (or username) and password sign-in. This naming convention of login and authenticate is just my personal preference to separate two distinct auth flows.
Both functions return a promise, that's why we use
.then and
.catch to handle success and errors responses. Under the hood
$auth.authenticate() opens a popup window pointing to
authorizationEndpoint, for example
https://accounts.google.com/o/oauth2/auth with dynamically constructed query parameters based on the default configuration object below.
google: {
  url: '/auth/google',
  authorizationEndpoint: 'https://accounts.google.com/o/oauth2/auth',
  redirectUri: window.location.origin || window.location.protocol + '//' + window.location.host,
  scope: ['profile', 'email'],
  scopePrefix: 'openid',
  scopeDelimiter: ' ',
  requiredUrlParams: ['scope'],
  optionalUrlParams: ['display'],
  display: 'popup',
  type: '2.0',
  popupOptions: { width: 452, height: 633 }
}
In the case of Facebook login, calling $auth.authenticate('facebook') will open a popup window with something like the following URL:
https://www.facebook.com/dialog/oauth?response_type=code&client_id=657854390977827&redirect_uri=https://satellizer.herokuapp.com/&display=popup&scope=email
The
url property on
line 2 is a server endpoint that handles most of the authentication flow that we will implement soon. Remember, since Satellizer uses
explicit grant type we need to have a back-end for authentication as well. Although Satellizer does support pure client-side authentication using
implicit grant type as of
pull request 157 I am not going to cover it in this tutorial. The main difference between two grant types that actually matters to us is that one grant can be done purely on the client and another grant cannot.

With explicit grant type when you authorize your app on the screen above, Instagram will issue you a short-lived
authorization code that you must exchange for an
access_token on the server. This cannot be done just on the client-side alone. You can then use that
access_token to query for user's profile information or perform certain actions on behalf of that user. If you have ever used a library like
Passport.js, that's what it is essentially doing
under the hood. For this tutorial, however, we will write it ourselves so you can see and understand the entire OAuth 2.0 flow from start to finish.

With implicit grant type, Instagram will issue you an access_token right away, instead of an authorization code. That means you can do user authentication entirely on the client-side similar to Facebook and Google JavaScript SDKs. The down-side to this approach is that when you obtain user's profile and decide to save that user in your database how can you be sure that the profile information and access token they are sending to you is valid?
You cannot, not without verifying it first. These verification checks range from being very straightforward (Facebook) to rather difficult (LinkedIn). If you have to go through the trouble of doing all that on the server, you might as well just use explicit grant type and fetch an access token from the server in the first place. For a single provider it may be okay, but when you have 3 or 4 providers it is not fun at all. I learned that lesson the hard way during the early stage development of Satellizer.
Note: Dear LinkedIn, if you are listening, please remove your annoying
https requirement from
credentials_cookie: true. I don't want to create self-signed SSL certificates when developing apps on my local machine just to validate the signature. Let us, developers, worry about when to use or not to use SSL. Better yet, ditch the cookie and use another mechanism similar to what Facebook and Google are doing for identity verification. Your security reasons are irrelevant if it makes for a painful developer experience to the point of not wanting to use your API at all.
As you saw in the screenshot above, after authorizing the app, the popup window redirects back to initial page. This was a design choice to keep everything self-contained in
satellizer.js without requiring users to setup additional routes and templates specifically for
redirectUrl similar to how I have it in
Hackathon Starter. Typically, a popup window will close fast enough that you won't even see your loaded page in there. But if you do have a nicer solution please open an issue or submit a pull request on GitHub.
The
scopePrefix on
line 6 is a special case for Google . Take note of the Tip below. It basically requires you to prepend
openid to the scopes string.

There are two types of OAuth in Satellizer: "1.0" and "2.0". When you add a new provider via$authProvider.oauth2() or $authProvider.oauth1() a proper type is added automatically. That's pretty much the only thing these methods do. I could have also created a single $authProvider.oauth() method and force users to specify the type as part of the object. In the end it came down to personal preference.
Finally, the popupOptions on the very last line is where you could potentially specify custom size dimensions for your provider's popup window. Every single provider has a different "ideal" window size where the entire page fits perfectly without vertical or horizontal scrollbars. Those width and height numbers you see for built-in providers is something I had to find manually via window.innerWidth andwindow.innerHeight in the JavaScript Console. If popupOptions is not specified, width and height defaults to 500 by 500 pixels.
Ok, hopefully that gave you a better idea of how Satellizer works under the hood. So, once the$auth.authenticate() returns, it will have a response object from the server which contains JSON Web Token (JWT) and a user object. This unique JWT token is generated on the server specifically for this user. It's a special string that looks something like the following.
eyJhbGciOiJIUzI1NiIsInR5cCI6IkpXVCJ9.eyJzdWIiOjEyMzQ1Njc4OTAsIm5hbWUiOiJTYWhhdCJ9.WJs3pD-1m-at8fXSbaCfCwXal93_TLT5fF57lnRjYpQ
Note: You can play around with JWT using an interactive debugger at
jwt.io. Also, from here on I will refer to JSON Web Token as JWT token as it has a better sound to it, despite the fact that the word token is repeated twice.
The reason for passing a user object from the server is that typically JWT token only includes a unique user id or some other unique identifier. This would require us to hit the server endpoints whenever we need to display user information on a page. For example, if you need to display user's first name and last name in the Navbar you would need to make an additional request to the server since JWT containly only a user id, not an entire user object.
Now, let me make something clear. You do not really
have to store user id in JWT token. You could put a user object into JWT token as well. If it works for you then use that. Just keep in mind that you will be sending this token back and forth on every request and as your user object grows so will the token size. Let me give you an idea of how big your token can get using a simple user object from the
Hackathon Starterproject:
eyJhbGciOiJIUzI1NiIsInR5cCI6IkpXVCJ9.eyJfX3YiOjEsIl9pZCI6eyIkb2lkIjoiNTM1YWIwNjcxZjJjMmJlYzAzODRlZjg
zIn0sImVtYWlsIjoic2FraGF0QGdtYWlsLmNvbSIsImdvb2dsZSI6IjEwMDQ3Mzc4MDc2NTEyMjc3NTMzMCIsImxpb
mtlZGluIjoiTlJxdUduVUpaRCIsInByb2ZpbGUiOnsibG9jYXRpb24iOiJHcmVhdGVyIE5ldyBZb3JrIENpdHkgQXJlYSI
sIm5hbWUiOiJTYWhhdCBZYWxrYWJvdiIsInBpY3R1cmUiOiJodHRwOi8vbS5jLmxua2QubGljZG4uY29tL21wci9tc
HJ4LzBfZ3hrRk9yYndmOTMyYU1UaGpnYjRPdDVJaXp2btJWVGgwbktaT1BGSnBQVFkxWW44QU1OSUsxUGNEN
HpsN2o4Mnl5UUpBcU1xTDdPVSIsIndlYnNpdGUiOiJodHRwOi8vd3d3LmxpbmtlZGluLmNvbS9pbi9zYWhhdHlhbG
thYm92In0sInJlc2V0UGFzc3dvcmRFeHBpcmVzIjp7IiRkYXRlIjoiMjAxNC0wNC0yNVQyMDozMjoxMi44MDdaIn0s
InJlc2V0UGFzc3dvcmRUb2tlbiI6ImY2NWJiN2IwNzAyYmZkZTY0ZTQyNDA0M2I4YWE1MDk1OWQ4M2NlMjAiLC
J0b2tlbnMiOlt7ImFjY2Vzc1Rva2VuIjoiQVFWWGdDNWlMTEdkUTl6eXJwUm1yT1NlTFJjQUFNQjllbjA4T0h1N2FVN
UdvMDN4VDJOdG1XeFVMS0Nod1RGWk9iaDN2ay11NkJxNnQwc1NzNnU2bS1TaDBHTzJ5ajJxaUJPdGk2aWFYdW
tnVnVscy1hcEIyTHVuTWhjc1BIbi0xWjZob3hGcmZkclNpVkFoak12Wm80enpXa21TZUktU2FTLXNydk40UVduTFp
pWklnbVEiLCJraW5kIjoibGlua2VkaW4ifSx7ImtpbmQiOiJnb29nbGUiLCJhY2Nlc3NUb2tlbiI6InlhMjkuMS5BQUR0
Tl9Xb0Q2Z0J5cmIwaG42S1dDVHZqYV92a2FKb2NXWEdrRnFvc0ZiQmYxUlRnaDZBVDZQVkxXdnF1RGtRQjdxX2
tYUnMifV19.RTbUuUcSlor15Sh-ZBYlRrGjZEFx5_H-hKWNMqP-eGM
That is why I think it would be better to send a user object alongside JWT token, not inside it, and then store it in Local Storage for later use. That way you don't have to send a fat JWT token back and forth between client and server.
Satellizer will pass along the original response object from the server. In other words, if you send a JSON object with token and user from the server, we could get user back via response.data.user inside .then()of authenticate() and login() methods.
You will hear a lot of people say that using $rootScope is a bad practice. Pesonally, I never ran into issues with it, which is probably due to the fact I have not built anything big in AngularJS yet. But anyway, it fits nicely with what we are trying to do here.
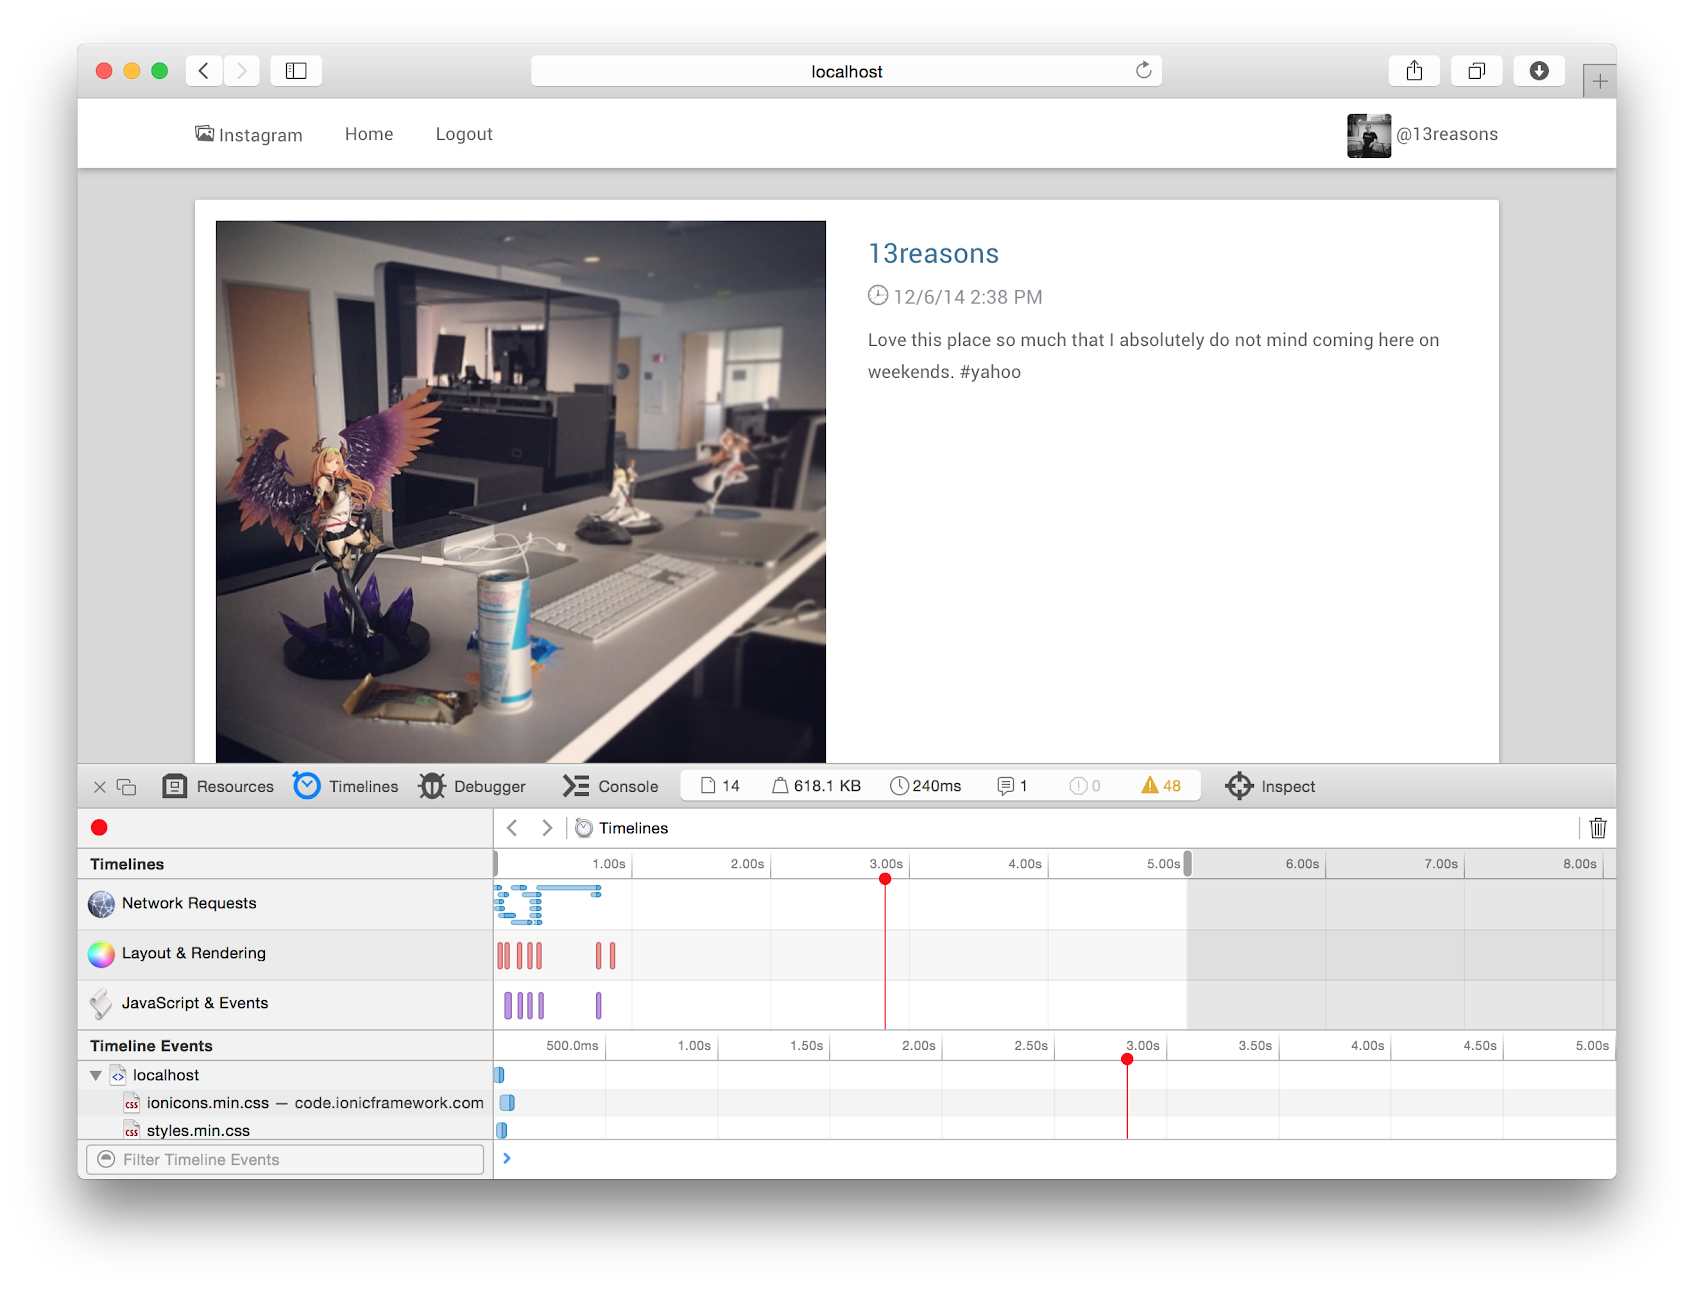
The currentUser object will contain user's information such as Instagram id, username, email and display name. Because we defined it on $rootScope we can use {{currentUser.username}} in the Navbar and detail page. Otherwise we would have to create currentUser per each $scope in NavbarCtrl and DetailCtrland any other controller that may need to display user information in the future. But if you prefer the second approach, then by all means do it that way.
The big difference between instagramLogin() and emailLogin() lies in the error handling. We are actually not even doing any error handling for Instagram authentication in this tutorial. Let me show you the error handling code again:
$scope.errorMessage = {};
angular.forEach(response.data.message, function(message, field) {
  $scope.loginForm[field].$setValidity('server', false);
  $scope.errorMessage[field] = response.data.message[field];
});
We are using Angular's
forEach method to iterate over the
message object keys. To better visualize it here is the JSON response from the server:
{ message: { email: 'Incorrect email' } }
In this case there is only one invalid field, namely email. So, on line 3 it basically sets the email validity of our custom validator to false. You know how there are some basic HTML validators like text, number, url, email, regex? Well, our server validator is our own validator for email and password fields. It is false when there are no server errors and resolves to true when we do get server errors like invalid email or invalid password.
On line 4 we set that error message "Incorrect email" on the $scope object so that we could then access it from login.html:
<div ng-message="server">{{errorMessage.email}}</div>
I think that covers just about everything for Login page. But before we move to the Signup page, let's implement the serverError directive.
Create a new folder called directives inside the client directory, then inside it create a file calledserverError.js.
It's a very simple Angular directive - its primary purpose is to clear error messages such as
Invalid Username or Password and reset form validity whenever user starts typing again. Otherwise, after you get an error message back from the server you will not be able to re-submit the form with our current implementation. Once again, please refer to
Todd Motto's AngularJS guide to learn more about directives or see my
Introduction to AngularJS slides.
angular.module('Instagram')
  .directive('serverError', function() {
    return {
        restrict: 'A',
        require: 'ngModel',
        link: function(scope, element, attrs, ctrl) {
          element.on('keydown', function() {
            ctrl.$setValidity('server', true)
          });
        }
    }
  });
And finally, add the following line to index.html in order to load this directive:
<script src="directives/serverError.js"></script>
Next up is the Signup page.
9. Signup Page
Open signup.html template and paste the following markup:
<div class="container">

  <div class="center-form panel">
    <div class="panel-body">
      <h4 class="text-center"><i class="ion-person-add"></i> Sign up</h4>
      <form method="post" ng-submit="signup()" name="signupForm">
        <div class="form-group has-feedback" ng-class="{ 'has-error' : signupForm.email.$invalid && signupForm.email.$dirty }">
          <input class="form-control input-lg" type="text" id="email" name="email" ng-model="email" placeholder="Email" required>
          <span class="ion-at form-control-feedback"></span>
        </div>

        <div class="form-group has-feedback" ng-class="{ 'has-error' : signupForm.password.$invalid && signupForm.password.$dirty }">
          <input class="form-control input-lg" type="password" name="password" ng-model="password" placeholder="Password" required>
          <span class="ion-key form-control-feedback"></span>
        </div>

        <p class="text-center text-muted"><small>By clicking on Sign up, you agree to <a href="#">terms & conditions</a> and <a href="#">privacy policy</a></small></p>

        <button type="submit" class="btn btn-block btn-primary">Sign up</button>
        <br/>

        <p class="text-center text-muted"><small>Already have an account? <a href="#/login">Log in now</a></small></p>
      </form>
    </div>
  </div>

</div>
This template is not all that different from the Login page. On form submission we call the signup()method which is going to grab email and password values and send it to the server.
Type or paste the following code into controllers/signup.js:
angular.module('Instagram')
.controller('SignupCtrl', function($scope, $auth) {
$scope.signup = function() {
var user = {
email: $scope.email,
password: $scope.password
};
$auth.signup(user)
.catch(function(response) {
console.log(response.data);
});
};
});
Satellizer's $auth.signup() method just takes an object and sends it to the server without doing anything to it. What you pass here is what you will get at /auth/signup route (Default URL) on the server.
Note: If you wish to use /register endpoint instead of /auth/signup you can easily override the signup URL:
$authProvider.signupUrl = '/register';
I should also point out that by default Satellizer will automatically sign you in after a successful registration. If you do not like this behavior you can turn it off like so:
$authProvider.loginOnSignup = false;
If you disable automatic sign in, Satellizer will simply redirect a user to the /login route specified in$authProvider.loginRoute. If for some reason you have to do something else before redirect to login page you can disable this behavior by setting$authProvider.loginRoute to null.
When you reload the browser and click on Signup in the Navbar you should see something like the screenshot below:

Let's shift gears for a moment and switch over to our back-end code. We will be using Node.js and Express because that's what I am most comfortable with but hopefully you already knew that. The code should be simple enough for you to port it to other web frameworks and languages of your choice. For example, I have written
PHP and Python examples for Satellizer with minimal knowledge of both languages.
10. Express Skeleton
In the instagram directory create a new folder called server, it should be a sibling of client.
In the server directory create two new files: package.json and server.js. Open package.json and paste the following code with all package dependencies for our app:
{
  "name": "instagram-server",
  "version": "0.0.0",
  "scripts": {
    "start": "node server.js"
  },
  "dependencies": {
    "bcryptjs": "^2.0.2",
    "body-parser": "^1.8.1",
    "cors": "^2.4.2",
    "express": "^4.9.0",
    "jwt-simple": "^0.2.0",
    "moment": "^2.8.3",
    "mongoose": "^3.8.17",
    "request": "^2.44.0"
  }
}
After that paste the following code into server.js:
var bcrypt = require('bcryptjs');
var bodyParser = require('body-parser');
var cors = require('cors');
var express = require('express');
var jwt = require('jwt-simple');
var moment = require('moment');
var mongoose = require('mongoose');
var path = require('path');
var request = require('request');

var app = express();

app.set('port', process.env.PORT || 3000);
app.use(cors());
app.use(bodyParser.json());
app.use(bodyParser.urlencoded({ extended: false }));
app.use(express.static(path.join(__dirname, 'public')));

app.listen(app.get('port'), function() {
  console.log('Express server listening on port ' + app.get('port'));
});
Note: All of our back-end code from here on will be go into app.js unless otherwise stated. In other words I am not going to break our Express app into separate models, controllers, routes, etc. just for the sake of simplicity.
Let's install package dependencies and see if our server is working without any issues. Open the Terminal and navigate to the instagram/server directory, then type npm install:
By the way, I am using the fish shell with
oh-my-fish project. I really like that auto-complete feature. What's even more awesome is that it remembers the last command you have typed. If I were to start typing
py it will suggest me
python -m SimpleHTTPServer which is exactly what I wanted.
After you install all of the app dependencies we can now start the server.
You can either run npm start or node server.js to start this Express application. If you did everything correctly you should see the following message:
Express server listening on port 3000
If you have built Express apps in the past this code should be very familiar to you. One thing to note here is the use of
cors() middleware. Since we are running AngularJS app on a separate port we need to have cross-origin requests support as I have briefly mentioned in the first section. The great thing about this web service oriented architecture is isolation. You can have some developers working on a front-end side of your project which could be maintained in its own Git repository and running on Heroku for example, while other developers could be working on the back-end portion of the project that could potentially be running on Azure or OpenShift. This would be a great advantage to have at hackathons, where you could have multiple developers working on the project independently in parallel.
11. Database and User Model
As you will see shortly, we will use
Mongoose package to connect to MongoDB. Instead of hard coding
Mongo URI inside
app.js let's put into
config.js instead. So, create a new file
config.js in the
server directory and paste the following code:
module.exports = {
  db: process.env.db || 'localhost',
  tokenSecret: process.env.tokenSecret || 'pick a hard to guess string'

};
The tokenSecret will come in handy in the next chapter when we get to the JSON Web Token authentication.
Note: If you are not familiar with
exports and
module.exports in Node.js then refer to
this article.
Back in app.js let's import this config file by adding the following line with the rest of "requires":
var config = require('./config');
Next, let's create a new User model and connect to MongoDB database. Add the following code after the previous line:
var User = mongoose.model('User', new mongoose.Schema({
  instagramId: { type: String, index: true },
  email: { type: String, unique: true, lowercase: true },
  password: { type: String, select: false },
  username: String,
  fullName: String,
  picture: String,
  accessToken: String
}));

mongoose.connect(config.db);
One thing I will mention is the select property on the password field. This tells Mongoose not to retrieve the password field unless explicitly stated otherwise via "+password" option as we will see shortly. Otherwise we would need to manually remove password field from a user instance before sending it off to Angular.
Start MongoDB if you haven't already done so then restart the Express server. You will see the following error if your MongoDB process is not running:
Note: If you have installed MongoDB via a package manager on Mac or Linux you may have to run mongod command. On Windows you will need to open mongod.exe after downloading and installing MongoDB.
That's all for this section. Next we will implement two helper functions in Express: isAuthenticated()middleware for checking if user is authenticated before accessing priveleged routes and createToken() for generating a JSON Web Token.
12. Authentication Middleware and JWT
Add the following function after the last app.use() middleware. It doesn't actually matter where you place the function in server.js but it would certainly make it easier to follow this tutorial. It is just a plain JavaScript function that takes a user object as an argument and returns a token string.
function createToken(user) {
  var payload = {
    exp: moment().add(14, 'days').unix(),
    iat: moment().unix(),
    sub: user._id
  };

  return jwt.encode(payload, config.tokenSecret);
}
I am using
Moment.js to generate
current time and
two weeks from now dates. You can certainly use built-in
Date object in JavaScript but it will not be nearly as nice and concise as above.
The JWT library that we are using (
jwt-simple) has two methods that are of interest to us:
encode() and
decode(). An object that gets encoded and decoded is called JWT Claims, others may also refer to it as payload. You can read the entire JSON Web Token draft specification
here. None of these reserved claims above -
exp (expiration time),
iat (issued at),
sub (subject) are required at all. It's up to you, as a developer, to decide which JWT claims you need to use for your particular use case. As I have mentioned earlier, you could even include the entire
user object as part of JWT Claims, but typically
email or
user_idare used instead.
The reserved
sub claim on
line 5 is used to store user's unique ID (
MongoDB ObjectId) for that particular user. Why did I use
sub instead of
id or
user_id? It came down to a personal preference, but also because Google happens to be using it as unique identifier for the user in OAuth 2.0 OpenID Connect:
The next function is responsible for preventing unauthorized users from accessing protected routes. For instance, we don't want to allows users to access /api/feed route (Instagram feed) unless they are authenticated.
function isAuthenticated(req, res, next) {
if (!(req.headers &amp;&amp; req.headers.authorization)) {
return res.status(400).send({ message: 'You did not provide a JSON Web Token in the Authorization header.' });
}
var header = req.headers.authorization.split(' ');
var token = header[1];
var payload = jwt.decode(token, config.tokenSecret);
var now = moment().unix();
if (now &gt; payload.exp) {
return res.status(401).send({ message: 'Token has expired.' });
}
User.findById(payload.sub, function(err, user) {
if (!user) {
return res.status(400).send({ message: 'User no longer exists.' });
}
req.user = user;
next();
})
}
On lines 2-4 we first check if an HTTP request has the Authorization header. Why? Because Satellizer will intercept all outgoing requests and append JSON Web Token to headers. If you look at the Satellizer's source code here is the block that is responsible for this:
$httpProvider.interceptors.push(['$q', function($q) {
  var tokenName = config.tokenPrefix ? config.tokenPrefix + '_' + config.tokenName : config.tokenName;
  return {
    request: function(httpConfig) {
      var token = localStorage.getItem(tokenName);
      if (token) {
        token = config.authHeader === 'Authorization' ? 'Bearer ' + token : token;
        httpConfig.headers[config.authHeader] = token;
      }
      return httpConfig;
    },
    responseError: function(response) {
      return $q.reject(response);
    }
  };
}]);
You do not have to understand everything in the code above, I only wanted to show you why we are checking for the Authorization header in Express. By the way, you can inspect requests from Google Chrome's Developer Tools under the Network tab:
Ok, back to isAuthenticated() middleware function. After checking for presence of the Authorization header, we then need to decode that token using the same secret stringwe used to generate the token. Decoding the token will give us back its original claims object, for example:
{ exp: 1416796466,
  iat: 1415586866,
  sub: '546024329ac4d00000db0e09' }
Note: It is a good idea to check for the validity of JSON Web Token before doing anything else. This middleware assumes that we will get a valid token in the following format:
Authorization: Bearer [token]. Take a look at the
auth0/node-jsonwebtoken source code (line 34 through 84) for more information.
First, check for expiration date. I have set 14 days for token expiration, however, everyone's use case will be different. If you are building an app that deals with a lot of sensitive information you might want to set expiration time to 1 hour or even less.
If token is not expired, we can then and retrieve the user document from database. On line 20, we temporarily "save" the user object inside the request object. This allows us to obtain user's information in the protected route by calling req.user. For example:
app.get('/protected', isAuthenticated, function(req, res) {
console.log(req.user);
});
We end this middleware function by calling next(), which signals Express to proceed executing the route handler.
13. Login and Signup Express Routes
Our login route is extremely simple. All it does is validates email and password. If both entries are correct, it returns a new token and a user object.
Add the following route right where we left off, after the isAuthenticated() middleware.
app.post('/auth/login', function(req, res) {
  User.findOne({ email: req.body.email }, '+password', function(err, user) {
    if (!user) {
      return res.status(401).send({ message: { email: 'Incorrect email' } });
    }

    bcrypt.compare(req.body.password, user.password, function(err, isMatch) {
      if (!isMatch) {
        return res.status(401).send({ message: { password: 'Incorrect password' } });
      }

      user = user.toObject();
      delete user.password;

      var token = createToken(user);
      res.send({ token: token, user: user });
    });
  });
});
The +password parameter in the query tells Mongoose to include the password field. We have to do this because we explicitly told Mongoose to exclude the password field from all User model queries by settingpassword: { type: String, select: false }.
Remember how we used
bcrypt to hash the password field in
Step 9 when we created the
User model? Well, we cannot just check if two passwords match using normal comparison. That's where
bcrypt.compare() comes in. To better illustrate this point consider the following simple example from
bcrypt's documentation:
var hash = bcrypt.hashSync("bacon");
bcrypt.compareSync("bacon", hash);
bcrypt.compareSync("veggies", hash);
If user with the given email is found and password is correct, on line 12-13 we convert Mongoose Document object to plain JavaScript object then delete the password property. You may be wondering why not just delete the password property directly without converting it to plain object.
As it turns out, document objects returned by Mongoose are immutable, so deleting the password property won't do anything. You could, however, get around this problem by passing
lean option to a Mongoose query. Either way works just as well for our purposes.
The reason for structuring Incorrect email and Incorrect password error messages in such a way has more to do with the way we display validation errors on the login form. Instead of displaying all errors above the form as it is typically done, an error message is displayed right under each individual form field.
Next up is the signup route. It starts by checking if email address is already taken (cannot have multiple users with the same email). It then hashes the password using bcrypt and saves the user to database.
Here is the code for the signup route:
app.post('/auth/signup', function(req, res) {
  User.findOne({ email: req.body.email }, function(err, existingUser) {
    if (existingUser) {
      return res.status(409).send({ message: 'Email is already taken.' });
    }

    var user = new User({
      email: req.body.email,
      password: req.body.password
    });

    bcrypt.genSalt(10, function(err, salt) {
      bcrypt.hash(user.password, salt, function(err, hash) {
        user.password = hash;

        user.save(function() {
          var token = createToken(user);
          res.send({ token: token, user: user });
        });
      });
    });
  });
});
Note: This route is only responsible for email and password signup process. We will have a different route for creating a new account using Instagram authentication.
14. Instagram Authentication Express Route
This section is going to be a little more difficult than any other simply because of the large scope it encompasses. I will break it apart into multiple code snippets and then show you the entire code at the end.
app.post('/auth/instagram', function(req, res) {

});
The request to /auth/instagram will be made by Satellizer after authorization code has been obtained from the popup. This all happens really fast and the popup will be closed before you can see the code query parameter.
oauth2.exchangeForToken = function(oauthData, userData) {
  var data = angular.extend({}, userData, {
    code: oauthData.code,
    clientId: defaults.clientId,
    redirectUri: defaults.redirectUri
  });

  return $http.post(defaults.url, data);
};
So, now you know where code, clientId and redirectUri are coming from that you are about to see inside this route:
app.post('/auth/instagram', function(req, res) {
  var accessTokenUrl = 'https://api.instagram.com/oauth/access_token';

  var params = {
    client_id: req.body.clientId,
    redirect_uri: req.body.redirectUri,
    client_secret: config.clientSecret,
    code: req.body.code,
    grant_type: 'authorization_code'
  };

});
After obtaining an authorization code the next step is to exchange it for an access token, with which we will be able to fetch user's photos or like a photo on the user's behalf.
app.post('/auth/instagram', function(req, res) {
var accessTokenUrl = 'https://api.instagram.com/oauth/access_token';
var params = {
client_id: req.body.clientId,
redirect_uri: req.body.redirectUri,
client_secret: config.clientSecret,
code: req.body.code,
grant_type: 'authorization_code'
};
request.post({ url: accessTokenUrl, form: params, json: true }, function(e, r, body) {
if (req.headers.authorization) {
} else {
}
});
});
Note: For production use, It may be better to create a function similar to isAuthenticated but it returns true or false instead of sending a response. The code above simply checks ifreq.headers.authorization is present. It does not check if the token is valid or whether it is properly formatted.
Before proceeding further let us briefly go over some possible scenarios that may occur when this endpoint is requested, excluding extreme edge cases for the purposes of this tutorial:
- User is not logged in.
- Is this a returning user?
- YES: Immediately return a token and a user object.
- NO: Create a new user with the Instagram profile information.
- User is logged in via email account.
- Is there already an account with the given Instagram ID?
- YES: Merge two accounts. Instagram account takes precedence. Email account is deleted.
- NO: Link current email account with the Instagram profile information.
Let's do the second case first, when user is not logged in:
app.post('/auth/instagram', function(req, res) {
var accessTokenUrl = 'https://api.instagram.com/oauth/access_token';
var params = {
client_id: req.body.clientId,
redirect_uri: req.body.redirectUri,
client_secret: config.clientSecret,
code: req.body.code,
grant_type: 'authorization_code'
};
request.post({ url: accessTokenUrl, form: params, json: true }, function(e, r, body) {
if (req.headers.authorization) {
} else {
User.findOne({ instagramId: body.user.id }, function(err, existingUser) {
if (existingUser) {
var token = createToken(existingUser);
return res.send({ token: token, user: existingUser });
}
var user = new User({
instagramId: body.user.id,
username: body.user.username,
fullName: body.user.full_name,
picture: body.user.profile_picture,
accessToken: body.access_token
});
user.save(function() {
var token = createToken(user);
res.send({ token: token, user: user });
});
});
}
});
});
As I have explained above, it first checks if the user has alraedy signed-in before. We obviously don't want to create a new account every time they try to sign-in.
The next code snippet for the scenario when user is logged in, goes inside if (req.headers.authorization)block. I had to split it because it would be very hard to follow along.
User.findOne({ instagramId: body.user.id }, function(err, existingUser) {
var token = req.headers.authorization.split(' ')[1];
var payload = jwt.decode(token, config.tokenSecret);
User.findById(payload.sub, '+password', function(err, localUser) {
if (!localUser) {
return res.status(400).send({ message: 'User not found.' });
}
if (existingUser) {
existingUser.email = localUser.email;
existingUser.password = localUser.password;
localUser.remove();
existingUser.save(function() {
var token = createToken(existingUser);
return res.send({ token: token, user: existingUser });
});
} else {
localUser.instagramId = body.user.id;
localUser.username = body.user.username;
localUser.fullName = body.user.full_name;
localUser.picture = body.user.profile_picture;
localUser.accessToken = body.access_token;
localUser.save(function() {
var token = createToken(localUser);
res.send({ token: token, user: localUser });
});
}
});
});
This is not the prettiest code that I have written, but even if I had used something like
async.js waterfall to deal with those callbacks it wouldn't have made this code that much simpler. Ideally, this route should be broken up into multiple functions if only to reduce the lines of code in the route and make it more readable. If testing is your number one concern then you will definitely want to break apart this route.
We first check if there is an existing account with the given Instagram ID, however, we don't do anything about it until
line 12. After token is decoded and user id is obtained we fetch that user document, called
localUser for convinience. If you have ever used Passport with
LocalStrategy you may understand why I called it
localUser. Ultimatelly, we need to differentiate two users somehow since we have two nested Mongoose queries on the same User model.
Next, if there is an existing account with the given Instagram ID, both email and password fields are added to it, effectively merging two accounts. Email account is deleted to avoid having multiple accounts for the same user. Remember, email field has the unique: true constraint, so we cannot have two MongoDB documents with the exact same email.
This merging part right here highly varies on case by case basis. If you have more than just email and password fields that need to be merged you will have to add them yourself. Or perhaps you wish to merge accounts in the opposite direction, merging the old account with the new one, then deleting an old account. Visually, they may look exactly the same, but they will have different ObjectIDs in database. There are many ways to merge accounts, this is one way to do it.
Note: Many OAuth providers will require you to access a separate endpoint in order to obtain user's profile information, as it is the case with Facebook, GitHub, Google and many other providers. That is not the case with Instagram; which is nice because if I had to nest the entire route within another callback, even I would not be able to read that code anymore.
Here is the entire code snippet for the Instagram authentication route:
app.post('/auth/instagram', function(req, res) {
var accessTokenUrl = 'https://api.instagram.com/oauth/access_token';
var params = {
client_id: req.body.clientId,
redirect_uri: req.body.redirectUri,
client_secret: config.clientSecret,
code: req.body.code,
grant_type: 'authorization_code'
};
request.post({ url: accessTokenUrl, form: params, json: true }, function(error, response, body) {
if (req.headers.authorization) {
User.findOne({ instagramId: body.user.id }, function(err, existingUser) {
var token = req.headers.authorization.split(' ')[1];
var payload = jwt.decode(token, config.tokenSecret);
User.findById(payload.sub, '+password', function(err, localUser) {
if (!localUser) {
return res.status(400).send({ message: 'User not found.' });
}
if (existingUser) {
existingUser.email = localUser.email;
existingUser.password = localUser.password;
localUser.remove();
existingUser.save(function() {
var token = createToken(existingUser);
return res.send({ token: token, user: existingUser });
});
} else {
localUser.instagramId = body.user.id;
localUser.username = body.user.username;
localUser.fullName = body.user.full_name;
localUser.picture = body.user.profile_picture;
localUser.accessToken = body.access_token;
localUser.save(function() {
var token = createToken(localUser);
res.send({ token: token, user: localUser });
});
}
});
});
} else {
User.findOne({ instagramId: body.user.id }, function(err, existingUser) {
if (existingUser) {
var token = createToken(existingUser);
return res.send({ token: token, user: existingUser });
}
var user = new User({
instagramId: body.user.id,
username: body.user.username,
fullName: body.user.full_name,
picture: body.user.profile_picture,
accessToken: body.access_token
});
user.save(function() {
var token = createToken(user);
res.send({ token: token, user: user });
});
});
}
});
});
Below is the collapsed overview of all the code we have in server.js so far:

We are almost done on the back-end. Only three more routes to go and they are significantly smaller and simpler than the one above.
15. Instagram API Endpoints
In this section we will implement three new routes for:
- Get authenticated user's feed.
- Get Instagram media by id.
- Set a like on a media by the currently authenticated user
Before writing a single line of code we must first find out which endpoints do we need to access. Go to the
Instagram API endpoints to see a list of all API endpoints. In addition to showing you the parameters for a particular endpoint, you could also preview the entire response object, which I think that every API provider should have by default because. I find that having a sample API response is very helpful especially when working with the front-end. For example, I wouldn't have known about this object structure of image url until after I have made a request to Instagram with a valid access token.
<img ng-src="{{photo.images.standard_resolution.url}}" class="thumbnail img-responsive">
app.get('/api/feed', isAuthenticated, function(req, res) {
  var feedUrl = 'https://api.instagram.com/v1/users/self/feed';
  var params = { access_token: req.user.accessToken };

  request.get({ url: feedUrl, qs: params, json: true }, function(error, response, body) {
    if (!error && response.statusCode == 200) {
      res.send(body.data);
    }
  });
});
Notice the
isAuthenticated middleware in the code above. It prevents unauthorized access to this route. If you are not signed-in and try to go to
http://localhost:3000/api/feed you will get the following error message as expected:
Our second route will retrieve information about a media object with a given media ID:
app.get('/api/media/:id', isAuthenticated, function(req, res, next) {
var mediaUrl = 'https://api.instagram.com/v1/media/' + req.params.id;
var params = { access_token: req.user.accessToken };
request.get({ url: mediaUrl, qs: params, json: true }, function(error, response, body) {
if (!error &amp;&amp; response.statusCode == 200) {
res.send(body.data);
}
});
});
You may have realized by now that there is virtually zero input validation and error handling throughout the project. That is intentional to keep the focus of this tutorial primarily on user authentication. If you were to deploy this code to production, you may want to return a 404 response, then catch it in Angular and display a 404 Media not found page or something like that.
Our last API route will allow to set a like on a media by the currently authenticated user:
app.post('/api/like', isAuthenticated, function(req, res, next) {
  var mediaId = req.body.mediaId;
  var accessToken = { access_token: req.user.accessToken };
  var likeUrl = 'https://api.instagram.com/v1/media/' + mediaId + '/likes';

  request.post({ url: likeUrl, form: accessToken, json: true }, function(error, response, body) {
    if (response.statusCode !== 200) {
      return res.status(response.statusCode).send({
        code: response.statusCode,
        message: body.meta.error_message
      });
    }
    res.status(200).end();
  });
});
Instagram allows you to make
5,000 requests per hour per token to their API endpoints. If you exceed that limit you will get a Rate Limit Exceeded error. We will use
SweetAlert.js on the client-side to display this error message when a user tries to like a media after API limit has been exceeded.
16. Back to the client-side
Let's go ahead and create a new user then try logging in to verify that our back-end implementation is working as expected.
Reload the browser, click on the
Sign up link in the top Navbar, fill out the fields click on the
Sign up button.

If all goes well you should be redirected to this page:
What just happened? Well, by default, Satellizer will automatically sign in the user after successful user registration. This behavior can be turned off in app.js if you wish:
$authProvider.loginOnSignup = false;
Right now you are looking at the home.html template. If you remember we had three possible states there:
- User is authenticated (email & password or Instagram OAuth 2.0) and has Instagram username. This means that a user has signed-in with Instagram or created an email account and then connected it with his or her Instagram account.
- User is not authenticated.
- User is authenticated but does not have Instagram username. An account must be linked with Instagram before proceeding.
Before we can link the Instagram account we need to make a few modifications to the HomeCtrl controller. Open controllers/home.js and replace $scope.linkInstagram function code with the following:
$scope.linkInstagram = function() {
  $auth.link('instagram')
    .then(function(response) {
      $window.localStorage.currentUser = JSON.stringify(response.data.user);
      $rootScope.currentUser = JSON.parse($window.localStorage.currentUser);
      API.getFeed().success(function(data) {
        $scope.photos = data;
      });
    });
};
The only difference here is that we are calling API.getFeed() (which we are about to implement) after successfully linking the Instagram account. Once we get the data from the server and set it to $scope.photos, Angular's two-way binding will take care of the rest for us by displaying those photos in theHome template.
Before we move to implementing the API service, add the following code somewhere in the HomeCtrlcontroller as well:
if ($auth.isAuthenticated() && ($rootScope.currentUser && $rootScope.currentUser.username)) {
  API.getFeed().success(function(data) {
    $scope.photos = data;
  });
}
It is essentially the same code we have just added above. On page load, if user is authenticated, it will callAPI.getFeed() to fetch the latest photos from the user's Instagram feed.
Note: Do not forget to inject the API service into HomeCtrl controller as shown above.
The only thing that is missing now is the API service itself. In the client directory create a new folder calledservices. That's where we will put our custom AngularJS services, factories, providers. In this tutorial we will only a single service.
In this new services folder create a file called api.js with the following contents:
angular.module('Instagram')
  .factory('API', function($http) {

    return {
      getFeed: function() {
        return $http.get('http://localhost:3000/api/feed');
      },
      getMediaById: function(id) {
        return $http.get('http://localhost:3000/api/media/' + id);
      },
      likeMedia: function(id) {
        return $http.post('http://localhost:3000/api/like', { mediaId: id });
      }
    }

  });
The main purpose of this particular service is to abstract away HTTP requests to our server. The benefits of separating concerns will become more obvious once your app grows to be a little more complex than what we have here.
Finally, do not forget to include this service in index.html:
<script src="services/api.js"></script>
Reload the browser then click on the Sign in with Instagram button. After you log in to Instagram and successfuly authorize this app to use your Instagram profile information you should see a grid of photos displayed on the home page.
However, if you refresh the browser one more time you will be stuck on Sign in with Instagram screen once again. Let's fix that. Open app.js and add append the following .run block:
.run(function($rootScope, $window, $auth) {
  if ($auth.isAuthenticated()) {
    $rootScope.currentUser = JSON.parse($window.localStorage.currentUser);
  }
});
Note: You must remove the semicolon after the .config block above in order to chain the .runcode block, otherwise you will have an invalid JavaScript syntax.
Here is the whole thing:
angular.module('Instagram', ['ngRoute', 'ngMessages', 'chieffancypants.loadingBar', 'satellizer'])
  .config(function($routeProvider, $authProvider) {
    $routeProvider
      .when('/', {
        templateUrl: 'views/home.html',
        controller: 'HomeCtrl'
      })
      .when('/login', {
        templateUrl: 'views/login.html',
        controller: 'LoginCtrl'
      })
      .when('/signup', {
        templateUrl: 'views/signup.html',
        controller: 'SignupCtrl'
      })
      .when('/photo/:id', {
        templateUrl: 'views/detail.html',
        controller: 'DetailCtrl'
      })
      .otherwise('/');

    $authProvider.loginUrl = 'http://localhost:3000/auth/login';
    $authProvider.signupUrl = 'http://localhost:3000/auth/signup';
    $authProvider.oauth2({
      name: 'instagram',
      url: 'http://localhost:3000/auth/instagram',
      redirectUri: 'http://localhost:8000',
      clientId: '799d1f8ea0e44ac8b70e7f18fcacedd1',
      requiredUrlParams: ['scope'],
      scope: ['likes'],
      scopeDelimiter: '+',
      authorizationEndpoint: 'https://api.instagram.com/oauth/authorize'
    });
  })
  .run(function($rootScope, $window, $auth) {
    if ($auth.isAuthenticated()) {
      $rootScope.currentUser = JSON.parse($window.localStorage.currentUser);
    }
  });
What this allows us to do is to grab the user object stored in the browser's local storage and assign it onto$rootScope.currentUser that is then globally available in the Angular application.
Remember, with single page applications when you reload the browser, all your changes will be lost and the app is restored back to the original state. That is why we store the user object in browser's local storage after successful sign in, and then retrieve it when app is loaded. Consequently, it is our responsibility to clean up this local storage object during the user log out process.
Refresh the page and you should now see that everything works as expected:
If you are still experiencing problems then try clearing the local storage by running localStorage.clear() in the JavaScript Console and creating a new user account.
17. Detail Page
One major piece that still remains is the detail page for a photo - individual page for each photo that contains a larger photo, descriptions, comments, number of likes.
Create a new template views/detail.html with the following markup:
<div class="container">

  <div class="panel panel-default">
    <div class="panel-body">
      <div class="row">

        <div class="col-xs-6">
          <img ng-src="{{photo.images.standard_resolution.url}}" class="img-responsive">
        </div>

        <div class="col-xs-6">
          <div class="caption">
            <h5><a href="http://instagram.com/{{photo.user.username}}">{{photo.user.username}}</a></h5>
            <h6 class="text-muted"><i class="ion-clock"></i> {{photo.created_time * 1000 | date:'short'}}</h6>

            <p>{{photo.caption.text}}</p>

          </div>
        </div>

      </div>

      <div class="row">

        <div class="col-xs-12">
          <h5><i class="ion-heart text-danger"></i> {{photo.likes.count}} likes</h5>

          <hr class="soften">
          <h5 class="text-center"><i class="ion-chatbox-working text-primary"></i> Comments</h5>

          <ul class="media-list">
            <li ng-repeat="comment in photo.comments.data" class="media">
              <a class="pull-left" href="http://instagram.com/{{comment.from.username}}">
                <img class="media-object img-rounded" ng-src="{{comment.from.profile_picture}}">
              </a>
              <div class="media-body">
                <a class="media-heading" href="http://instagram.com/{{comment.from.username}}">@{{comment.from.username}}</a>
                {{comment.text}}
              </div>
            </li>
            <li ng-if="!photo.comments.data.length">No comments</li>
          </ul>

          <hr class="soften">

          <div class="btn-group">
            <button class="btn" ng-class="{ 'btn-danger': hasLiked, 'btn-default': !hasLiked }" ng-click="like()">
              <i class="ion-heart" ng-class="{ 'text-danger': !hasLiked}"></i>
              <span ng-if="hasLiked">Liked</span>
              <span ng-if="!hasLiked">Like</span>
            </button>
          </div>

        </div>
      </div>

    </div>
  </div>

</div>
There is no point in going over this template as there no new concepts here that are worth mentioning. It has a lot of Bootstrap classes to make the page look pretty, but that's about it.
If you reload the browser and click on one of the thumbnails you should see this newly created template. However, since we have not created a controller for this page yet to fetch the data, nothing will be displayed here.

In the
controllers directory, create a new file called
detail.js. Its main responsibilities are to handle
Likeaction and fetch media data.
angular.module('Instagram')
.controller('DetailCtrl', function($scope, $rootScope, $location, API) {

  var mediaId = $location.path().split('/').pop();

  API.getMediaById(mediaId).success(function(media) {
    $scope.hasLiked = media.user_has_liked;
    $scope.photo = media;
  });

  $scope.like = function() {
    $scope.hasLiked = true;
    API.likeMedia(mediaId).error(function(data) {
      sweetAlert('Error', data.message, 'error');
    });
  };
});
Notice how I am stripping the Instagram media id from URL path and pass it toAPI.getMediaById(mediaId). When we are navigating to the detail page by clicking on a thumbnail, at that point we do know what is the media id, hence this anchor tag:
<a href="#/photo/{{photo.id}}">
But when we are visiting, say,
http://localhost:8000/#/photo/861959103308715759_787132 directly or simply refresh that page we no longer have access to the
$scope.photos, because it is part of the
HomeCtrl controller that gets executed when we visit the home page ("/" route).
For the second method,
$scope.like(), there is a temporary variable called
hasLiked, if set to
true will set the color of heart icon to red
♥ and update text from
Like to
Liked. See
detail.html template above. In case there is an error, e.g. exceeded API requests limit per hour, a beautiful dialog message will be displayed with the error message.
Note that the like button will reset back to normal state if you refresh the page. Unfortunatelly, without making an additional Instagram API request, there is no way to get a list of all people that have liked a particular photo from the current API endpoint. That makes sense because some people have photos with well over a million of likes per photo, e.g. Ariana Grande. As
@kukac7 pointed out, there is a way to check if a particular user has
liked one of the photos.

Up next we will implement the NavbarCtrl controller for handling Logout action, as well as hiding Log in/Sign up links if user is already authenticated and hiding Logout if user is not authenticated.
18. Navbar Enhancements
Create a new file controllers/navbar.js and paste the following code:
angular.module('Instagram')
  .controller('NavbarCtrl', function($scope, $rootScope, $window, $auth) {
    $scope.isAuthenticated = function() {
      return $auth.isAuthenticated();
    };

    $scope.logout = function() {
      $auth.logout();
      delete $window.localStorage.currentUser;
    };
  });
This code should be fairly straightforward. There are only two methods here, both of which rely on the Satellizer module to check if user is authenticated and to perform a log out.
Log out is actually simpler than you might think at first. All it does is clear the JSON Web Token from local storage. There are no external HTTP requests to the server. Notice that as I mentioned earlier we need to delete currentUser from the local storage, otherwise it will be as if user is still signed in, while JSON Web Token is no longer present. No JWT token = Not Authenticated.
Satellizer's $auth.isAuthenticated() does a little more. In addition to checking if token is present in local storage, it also checks if token has not expired yet.
Open index.html and replace the entire Navbar block with the following markup. Lots of ng-if statements to condtionally display certain links based on whether user is authenticated or not, nothing more.
<div ng-controller="NavbarCtrl" class="navbar navbar-default navbar-static-top">
  <div class="container">
    <ul class="nav navbar-nav">
      <a href="/" class="navbar-brand"><i class="ion-images"></i> Instagram</a>
      <li><a href="#/">Home</a></li>
      <li ng-if="!isAuthenticated()"><a href="#/login">Log in</a></li>
      <li ng-if="!isAuthenticated()"><a href="#/signup">Sign up</a></li>
      <li ng-if="isAuthenticated()"><a ng-click="logout()" href="">Logout</a></li>
    </ul>
    <ul class="nav navbar-nav navbar-right">
      <li ng-if="isAuthenticated() && currentUser.username">
        <a href="http://instagram.com/{{currentUser.username}}">
          <img class="media-object img-rounded" ng-src="{{currentUser.picture}}">
          @{{currentUser.username}}
        </a>
      </li>
    </ul>
  </div>
</div>
Refresh the page and assuming that you are still signed-in, both Log in / Sign up links should no longer be visible. Additionally, you should see your Instagram profile picture and username in the top right corner.
19. Optimizations
In this section we will cover some of the most common optimizations techniques to speed up our application. First, let's take a look at how long it takes to load a page before making any changes.
There are currently
25 requests with a total size of
1.40 MB and it takes
442ms (+/- 100ms) to load this page. Build tool to the rescue. If you have read my previous tutorials then you already know how much I love
gulp.js.
There a few easy optimizations we could do to speed up the performance of our web app:
- Minify and concatenate all JavaScript files.
- Minify CSS.
- Enable gzip compression on the server.
- Cache AngularJS templates.
- Cache static files on the server which includes all of our scripts and styles.
But first, Let's make a small adjustment to our file structure. Move package.json from instagram/serverone level up to instagram directory.
Then, update the "start" path to "node server/server.js" in order reflect the new structure. This way you could still type npm start to automatically start the Express app. Your package.json should look something like below:
{
  "name": "instagram-server",
  "version": "0.0.0",
  "scripts": {
    "start": "node server/server.js"
  },
  "dependencies": {
    "bcryptjs": "^2.0.2",
    "body-parser": "^1.8.1",
    "cors": "^2.4.2",
    "express": "^4.9.0",
    "jwt-simple": "^0.2.0",
    "moment": "^2.8.3",
    "mongoose": "^3.8.17",
    "request": "^2.44.0"
  }
}
Open a terminal window and navigate to instagram project directory, then type the following:
npm install --save-dev gulp gulp-csso gulp-recess gulp-ng-annotate gulp-uglify gulp-concat gulp-angular-templatecache gulp-complexity gulp-header
Note: The --save-dev flag will install specified packages and automatically add them to thedevDependencies object in package.json as shown in the screenshot below.
Create a new file gulpfile.js in the instagram directory and the following dependencies:
var gulp = require('gulp');
var csso = require('gulp-csso');
var uglify = require('gulp-uglify');
var concat = require('gulp-concat');
var recess = require('gulp-recess');
var header = require('gulp-header');
var gulpFilter = require('gulp-filter');
var complexity = require('gulp-complexity');
var ngAnnotate = require('gulp-ng-annotate');
var templateCache = require('gulp-angular-templatecache');
The first task that we create will handle JavaScript minification, concatenation, AngularJS inline annotations and AngularJS template caching. Furthermore, we will use
gulp-header to add a comment block to the minified file containing
project name,
author name,
license and
last updated date. While it may not be strictly necessary for our purposes here I thought it would be nice to show it here anyway since we are covering
Gulp. Paste the following code right after module dependencies:
var banner = ['/**',
    ' * Instagram Demo',
    ' * (c) 2014 Author Name',
    ' * License: MIT',
    ' * Last Updated: <%= new Date().toUTCString() %>',
    ' */',
    ''].join('\n');

gulp.task('minify', function() {
    var templatesFilter = gulpFilter('clients/views/*.html');

    return gulp.src([
        'client/vendor/angular.js',
        'client/vendor/*.js',
        'client/app.js',
        'client/templates.js',
        'client/controllers/*.js',
        'client/services/*.js',
        'client/directives/*.js'
    ])
        .pipe(templatesFilter)
        .pipe(templateCache({ root: 'views', module: 'Instagram' }))
        .pipe(templatesFilter.restore())
        .pipe(concat('app.min.js'))
        .pipe(ngAnnotate())
        .pipe(uglify())
        .pipe(header(banner))
        .pipe(gulp.dest('client'));
});
In Gulp everything flows from top to bottom, where each .pipe() method modifies the output in some shape or form, all the way until gulp.dest() is reached and output is saved to file.
The reason for passing such a long array of source files is because the order matters here for concatenation purposes. For example, we have to load angular.js before loading any Angular modules/libraries, likewise we have to load Angular modules before loading app.js and so on. The same reason we have defined <script> tags in this particular order in the index.html:
<script src="vendor/angular.js"></script>
<script src="vendor/angular-route.js"></script>
<script src="vendor/angular-messages.js"></script>
<script src="vendor/satellizer.js"></script>
<script src="app.js"></script>
<script src="controllers/home.js"></script>
<script src="controllers/navbar.js"></script>
<script src="controllers/login.js"></script>
<script src="controllers/signup.js"></script>
<script src="controllers/detail.js"></script>
<script src="services/api.js"></script>
<script src="directives/serverError.js"></script>
Next, using
gulp-filter we "take a detour" to another
gulp.src() path to convert HTML templates into JavaScript by taking advantage of Angular's
$templateCache feature. We have do this because Gulp does not allow you to specify multiple sources per task. After we finish with
angularTemplateCache calling
restore() method on a filter will take us back to the original
gulp.src().
Note: As an alternative we could have created a separate task called templates that gets run before minify task and then include the file generated by templates task (e.g. templates.js) in theminify task, and finally, remove templates.js after we are done. It is more work, but I thought I would point it out if you do not wish to use gulp-filter.
The rest of the flow in minify task should be self-explanatory. Here is the preview of the minified app.min.jsfile:

Open
index.html and comment out or remove previous
<script> tags, we can now just include the single minified file:
<script src="app.min.js"></script>
Moving on to the next Gulp task -
gulp-complexity. It is a JavaScript complexity analysis tool. Again, not necessary for the optimizations we are doing but worth sharing nonetheless. Add the following task:
gulp.task('complexity', function() {
    return gulp.src([
        '!client/vendor/*.*',
        '!client/app.min.js',
        'client/**/*.js'
    ])
        .pipe(complexity());
});
Here, we use the exclamation sign (!) to tell Gulp which files and directories to ignore. Now, if you run gulp complexity in the Terminal you should see something like the following:
The last two tasks that we are going to add will be responsible for minifying and performing code quality analysis on CSS.
gulp.task('styles', function() {
  gulp.src([
    'client/css/sweet-alert.css',
    'client/css/styles.css'
  ])
    .pipe(concat('styles.min.css'))
    .pipe(csso())
    .pipe(gulp.dest('client/css'));
});

gulp.task('recess', function() {
 gulp.src('client/css/styles.css')
 .pipe(recess())
 .pipe(recess.reporter())
 .pipe(gulp.dest('client/css'));
});
Open index.html and update the stylesheet references from this:
<link rel="stylesheet" href="css/sweet-alert.css">
<link rel="stylesheet" href="css/styles.css">
To the following:
<link rel="stylesheet" href="css/styles.min.css">
Now, instead of serving 3 full size CSS files we are only serving 1 minified CSS file. I have intentionally moved
recess into a separate task because if it fails, it will stop the entire Gulp process, which can be quite annoying, especially when you start the Gulp watcher "set it and forget it" in the background. However, you could use
gulp-plumber or manually catch Gulp error events if you wish to do so. Let's run
gulp recessand see what it looks like:

The last thing we are going to do is add task watchers and a default task:
gulp.task('watch', function() {
  gulp.watch(['client/css/*.css', '!client/css/styles.min.css'], ['styles']);
  gulp.watch([
    'client/app.js',
    'client/services/*.js',
    'client/directives/*.js',
    'client/controllers/*.js',
    'client/views/*.html'
  ], ['minify']);
});
gulp.task('default', ['watch', 'styles', 'minify']);
Note: If you structure your client-side code reasonably well, you would not need to use these unwieldy path names above. I just haven't thought this through when I started writing this project and tutorial. If you had your Angular app in src or app directory and have you stylesheets, vendor files and minified app.min.js one or two directory levels above, then you could simply use gulp.watch('src//.{html, js}', ['minify'])*. to do the same thing we are doing above.
So, now if you run gulp it will automatically run styles and minify tasks and start monitoring for file changes. In other words, if you make any changes to your CSS files, Gulp will automatically re-run thestyles task, similarly, if you make any changes in your AngularJS app, Gulp will automatically re-run theminify task.
That is what I meant by "set it and forget it". I typically start the Gulp process in the Terminal, then minimize the window to get it out of the way.
Ok, we are done with Gulp for the moment. Next, we will add gzip compression and static assets caching in Express. Install the following NPM module:
npm install --save compression
Then add it to the list of module dependencies in server/server.js:
var compress = require('compression');
And finally add the compress() middleware before all other Express middlewares:
app.set('port', process.env.PORT || 3000);
app.use(compress());
app.use(cors());
app.use(bodyParser.json());
app.use(bodyParser.urlencoded({ extended: false }));
app.use(express.static(path.join(__dirname, 'public')));
To enable static assets caching update the static middleware as following:
app.use(express.static(path.join(__dirname, 'public'), { maxAge: 2628000000 }));
Note: One month is equivalent to 2628000000 milliseconds. You may want to create a separate variable such as oneDay, oneWeek, oneMonth, or oneYear instead of defining milliseconds directly in the middleware.
And that is it, we are doing with optimizations. Let's check the Network tab in a Browser again. We should see a smaller number of requests and a smaller payload size.
Here is the quick summary of results:
- We went from 25 requests to only 14 requests.
- The payload size decreased from 1.40 MB to 618 KB.
- Page load time decreased from 442ms (+/- 100ms) to roughly 240ms.
This is what I call a low-hanging fruit of web optimization_: w_e were able to obtain quite impressive results without a single change to the application business logic.
At the very least I hope you could take away some of these techniques found in this tutorial and apply them to your current and future projects.
Let's deploy this app to the cloud, shall we?
20. Deployment
Create a new file .gitignore in the instagram directory with the node_modules entry inside it. You can do this directly from the command line:
$ touch .gitignore
$ echo node_modules > .gitignore
This allows us to ignore node_modules directory when we commit files to Git. You will run into all sorts of issues if you try to deploy your Node.js apps to Heroku with node_modules commited to Git. Heroku will automatically download and install packages specified in package.json.
We will use
Heroku to host the back-end piece and
Dropbox to host the front-end piece of our web application. Both services are free to use.
Let's start with the back-end component. First, sign up and create a new application on Heroku.
Heroku's new clean Dashboard UI is very intuitive to use. (Great job Heroku engineers and designers)
On the next screen you will see the instructions to get started. After you successfully run heroku login you can proceed to creating a new Git repository. Heroku, like many other cloud platforms, uses Git for the deployment process.
Open a terminal and navigate to the instagram directory, then type:
$ git init
$ heroku git:remote -a <your heroku app name>
$ git add .
$ git commit -am "initial commit"
$ git push heroku master
I already expected that, but let's take a look what exactly caused it. Inside the instagram directory runheroku logs command:
This error message basically says that our app was unable to connect to MongoDB on port 27017. We had to download, install and start MongoDB locally in order for our app to work, however, when we deployed our app to Heroku unfortunately our database was not able to magically teleport to Heroku as well.
Both
Compose (previously MongoHQ) and
MongoLab provide free MongoBD hosting. Alternatively, you could use one of my MongoDB databases that I created for the purposes of this tutorial:
mongodb:
Go back to Heroku dashboard and click on the Settings tab. You should see a button there called Reveal Config Vars. Click on it and then click on the Edit button in the same view. This is where you can set those configuration values from config.js. If you specify an envrionment variable here it will use that value, otherwise it will fallback to the string value.
Once you are ready to proceed click Save.
Now that is done, all that is left to do is restart our Heroku app by running heroku restart -a my-app-name:

If all goes well you should not see the
Application Error page any longer. Keep in mind, since we have not created a
GET / route you will not see anything if you just visit
http://your-app-name.herokuapp.com. But we could check
GET /api/feed routeto make sure it is working correctly:

We are done with the back-end piece. Next, let's move to the front-end component. Copy all files from the
client directory into Dropbox's
Public Folder, preferably into a sub-directory, e.g.
instagram to keep it separate from other files that you might have in there.
Right-click on index.html and select Copy public link... from the dropdown menu. Copy that URL to clipboard.
Open the app.js file from the original instagram/client directory and update Satellizer's Instagram provider with the new URLs. You will need to update: loginUrl, signupUrl,as well as OAuth 2.0 url and redirectUriwith your own Heroku and Dropbox URLs.
You will also need to update URLs in the client/services/api.js:
Next, run gulp (if it is not already running) to update the app.min.js file. Then copy app.min.js and paste it into the instagram directory inside Dropbox's Public Folder, overwriting the old file.
Note: If you like this setup consider getting a custom domain and pointing it to your Dropbox Public Folder. Alternatively, consider using
GitHub Pages for hosting static sites, honestly I think it is much easier approach than using Dropbox because it was never intended to be used for the purposes we are using Dropbox here. My personal website
http://sahatyalkabov.com [
source code], for instance, has been running on GitHub Pages for over 2 years without any problems. And it's free.
If you followed all the steps correctly all requests between Heroku (back-end) and Dropbox (front-end) should be working successfully now.
But seriously, if you must have a front-end and a back-end pieces running on separate servers, at least consider using GitHub Pages, Amazon S3 or
Digital Ocean with Nginx to serve your static content. Also, cross origin requests are sometimes more trouble than it's worth, that is why I always prefer to have a server and a client running on the same host.
21. Conclusion
Congratulations on making it this far! It is now the longest blog post I have published to date. Funny, I said the exact same thing in my
TV Show Tracker blog post. Well, next thing you know I may be writing a book or something.
I originally planned to write a quick blog post on how to use the
Satellizer module but it turned into this massive full-stack tutorial with well over 14 thousand words. Just to put things in perspective, I was asked to write this post 3 months ago, and so I have been writing it little by little.
This may seem like an extremely long hands-on blog post at first glance, but I hope you could take away something else from it. I started this post by saying that I created Satellizer because I was unsatisfied with existing authentication solutions at a time. So, I did something about that, despite not knowing anything about building AngularJS modules, JavaScript libraries or OAuth 1.0 & OAuth 2.0 authentication flows. If there is a desire to do something you can almost certainly do it, provided that you are willing to put effort and time into it. So, if there is a a website, a library or a framework that you wish existed, use this as an opportunity to build it yourself. And if you ever get stuck on something along the way, take a break and come back to it later, but don't quit when things get difficult.
I hope you enjoyed this tutorial and learned something new after reading it There will be more blog posts by me in the near future either on my personal website or the
YDN blog. Possible topics are OAuth 2.0, React, Flux and Swift.