Tuesday 21 June 2016

Angular 2 Components and Providers: Classes, Factories & Values

This article is part of a web development series from Microsoft. Thank you for supporting the partners who make SitePoint possible.
This is the fourth part in the Angular 2 series. You can read part three here.
In a previous article, we looked at how to get data into and out of components using the @Input and@Output annotations. In this article, we’ll look at another fundamental aspect of Angular 2 components – their ability to use “providers.” You may have seen “providers” in a list of properties you can use to configure components and you might have realized that it allows you to define a set of injectable objects that will be available to the component. That’s nice, but it of course begs the question, “what is a provider?”
Answering that question involves a bit and gets us into a discussion of Angular 2’s Dependency Injection (DI) system. We may specifically cover DI in a future blog post, but it is well covered in a series of articles by Pascal Precht beginning with: http://blog.thoughtram.io/angular/2015/05/18/dependency-injection-in-angular-2.html. We’ll assume you are familiar with DI and Angular 2’s DI’s system in general as covered in Pascal’s article, but in brief the DI system is responsible for:
  • Registering a class, function or value. These items, in the context of dependency injection, are called “providers” because they result in something. For example, a class is used to provide or result in an instance – see below for more details on provider types.
  • Resolving dependencies between providers – for example, if one provider requires another provider.
  • Making the provider’s result available in code when we ask for it. This process of making the provider result available to a block of code is called “injecting it.” The code that injects the provider results is, logically enough, called an “injector.”
  • Maintaining a hierarchy of injectors so that if a component asks for a provider result from a provider not available in its injector, DI searches up the hierarchy of injectors.
In the previous article, we included a diagram showing that components form a hierarchy beginning with a root component. Let’s add to that diagram to include the injectors and the resources (providers) they register:
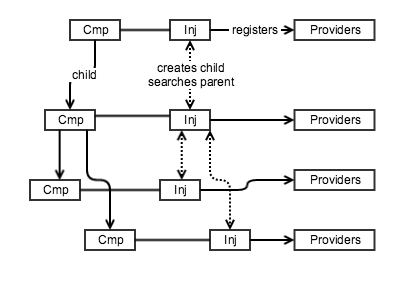
Component hierarchy with injectors and resources
Figure 1Each component has its own injector that registers providers. Injectors create child injectors and a request for a provider starts with the local injector and searches up the injector hierarchy.

We can see from the above that while components form a downwards directed graph, their associated injectors have a two-way relationship: parent injectors create children (downwards) and when a provider is requested, Angular 2 searches the parent injector (upwards) if it can’t find the requested provider in the component’s own injector. This means that a provider with the same identifier at a lower level will shadow (hide) the same-named provider at a higher level.

What are Providers?

So, what are these “providers” that the injectors are registering at each level? Actually, it is simple: a provider is a resource or JavaScript “thing” that Angular uses to provide (result in, generate) something we want to use:
  • A class provider generates/provides an instance of the class.
  • A factory provider generates/provides whatever returns when you run a specified function.
  • A value provider doesn’t need to take an action to provide the result like the previous two, it just returns its value.
Unfortunately, the term “provider” is sometimes used to mean both the class, function or value and the thing that results from the provider – a class instance, the function’s return value or the returned value.
Let’s see how we can add a provider to a component by creating a class provider using MyClass, a simple class that will generate the instance we want to use in our application.
A simple class with four properties
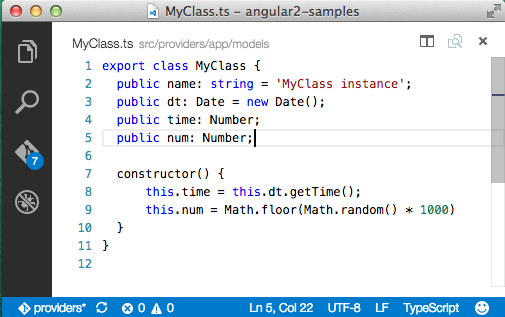
Code screenshots are from Visual Studio Code
Figure 2A simple class with four properties.
Okay, that’s the class; now let’s instruct Angular to use it to register a class provider so we can ask the dependency injection system to give us an instance to use in our code. We’ll create a component, ProvDemo_01.ts that will serve as the root component for our application. We load this component and kick-off our application in the bootstrap.ts:
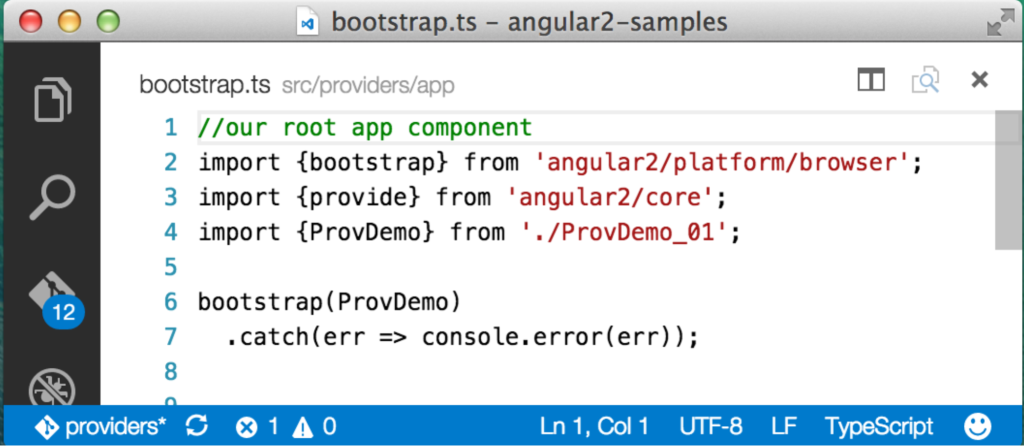
Our application’s bootstrap.ts file that instantiates the root component
Figure 3Our application’s bootstrap.ts file that instantiates the root component.
If the above doesn’t make sense, then take a look at our earlier post that walks through building a simple Angular 2 application. Our root component is called ProvDemo and the repository contains several numbers versions of it. You can change the version that is displayed by updating the line that imports ProvDemo above. Our first version of the root component looks like:
CompDemo with MyClass imported
Figure 4CompDemo with MyClass imported, added to the providers array and used as a Type in the constructor arguments.
Adding the MyClass provider to this component is straightforward:
  • Import MyClass
  • Add it to the @Component providers property
  • Add an argument of type “MyClass” to the constructor
Under the covers, when Angular instantiates the component, the DI system creates an injector for the component which registers the MyClass provider. Angular then sees the MyClass type specified in the constructor’s argument list and looks up the newly registered MyClass provider and uses it to generate an instance which it assigns to “myClass” (initial small “m”).
The process of looking up the MyClass provider and generating an instance to assign to “myClass” is all Angular. It takes advantage of the TypeScript syntax to know what type to search for but Angular’s injector does the work of looking up and returning the MyClass instance.
Given the above, you might conclude that Angular takes the list of classes in the “providers” array and creates a simple registry used to retrieve the class. But, there is a slight twist to make things more flexible. A key reason why a “twist” is needed is to help us write unit tests for our components that have providers we don’t want to use in the testing environment. In the case of MyClass, there isn’t much reason not to use the real thing but if MyClass made a call to a server to retrieve data, we might not want to or be able to do that in the test environment. To get around this, we need to be able to substitute within ProvDemo a mock MyClass that doesn’t make the server call.
How do we make the substitution? Do we go through all our code and change every MyClass reference to MyClassMock? That’s not efficient and is a poor pattern for writing tests.
We need to swap out the provider implementation without changing our ProvDemo component code. To make this possible, when Angular registers a provider it sets up a map to associate a key (called a “token”) with the actual provider. In our example above, the token and the provider are the same thing: MyClass. Adding MyClass to the providers property in the @Component decorator is shorthand for:
providers: [ provide(MyClass, {useClass: MyClass} ]
which says “register a provider using ‘MyClass’ as the token (key) to find the provider and set the provider to MyClass so when we request the provider, the dependency injection system returns a MyClass instance.” Most of us are used to thinking of keys as being either numbers or strings. But in this case the token (key) is the class itself. We could have also registered the provider using a string for the token as follows:
providers: [ provide(“aStringNameForMyClass”, {useClass: MyClass} ]
So, how does this help us with testing? It means in the test environment we can override the provider registration, effectively doing:
provide(MyClass, {useClass: MyClassMock})
This associates the token (key) MyClass with the class provider MyClassMock. When our code asked the DI system to inject MyClass in testing, we get an instance of MyClassMock which can fake the data call. The net effect is that all our code remains the same and we don’t have to worry about whether the unit test will make a call to a server that might not exist in the test environment.

Injecting Non-Class Providers

In the above, we injected our class provider instance into the constructor by writing:
constructor( myClass: MyClass ) {...}
TypeScript lets us specify that the myClass argument needs to be of type MyClass and the DI system does the work to give us the MyClass instance.
But how do we tell Angular to inject our provider result if we use a string token instead of a class? Let’s edit our bootstrap.ts file to add a new value provider and register it using a string token. Remember value providers are a type of provider that returns the value associated with the token. In the example above we told Angular to register a provider by adding to the @Component providers property but we can also register providers by passing them into the bootstrap function as follows (the same thing could be added to the providers property):
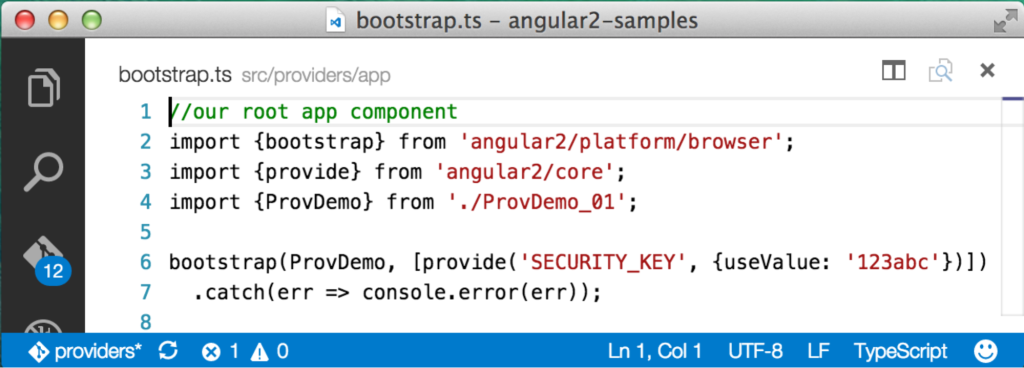
bootstrap.ts with a value provider added
Figure 5bootstrap.ts with a value provider added.
Here we’ve added a provider by invoking the provide function and passed in a string token ( “SECURITY_KEY”) and an object which specifies we want to create a value provider and the provider itself – in this case a simple value. Now, we’d like to inject the value generated by the value provider into our constructor, but this isn’t going to work …
constructor( SECKEY: “SECURITY_KEY”) {...}
…because “SECURITY_KEY” is not a type. To make it possible to inject providers with non-class tokens, Angular gives us the @Inject parameter decorator. As with all other decorators we need to import it and then we use it to tell Angular to inject a provider associated with our string token. To do this we adjust create ProvDemo_02.ts:
Importing the “Inject” decorator and using it to inject a value provider
Figure 6Importing the “Inject” decorator and using it to inject a value provider identified using a string token.
We could use the same syntax to inject the MyClass provider:
constructor( @Inject(MyClass) myClass, @Inject('SECURITY_KEY') SECKEY ) {...} 
Okay, we’ve seen how to register and use providers but let’s learn a little bit more about what providers return.

Providers and Singletons

As we saw above, providers are responsible for generating the thing that gets injected. A class provider generates an instance and the instance gets injected. But, it’s important to understand that you don’t get a new instance each time the class provider result is injected. Instead, the DI system generates the instance once, caches it and each subsequent injection receives the same instance as long as you use the same provider.
The last is important because each component gets its own injector with its own registered providers. MyClass has a time property set to the current time in milliseconds and a random number to help us see if we’re getting the same instance each time. We’re going to add a ChildComp component to our application.
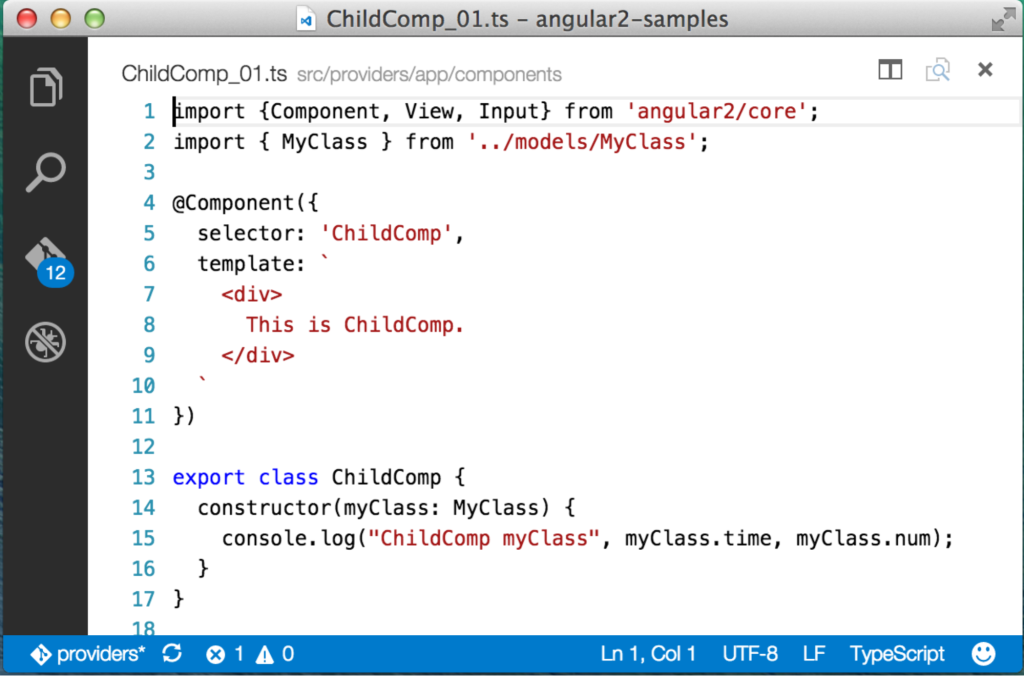
ChildComp with MyClass injected into the constructor
Figure 7ChildComp with MyClass injected into the constructor.
Notice we import MyClass and use it to set the type in the constructor’s argument list. Important: The only purpose the imported MyClass serves in ChildComp is as a token the DI system uses, to look for a registered provider. Because ChildComp does not have its own provider registered using that token, Angular looks up the injector hierarchy to find one. To make this work, we need to add ChildComp to the ProvDemo component:
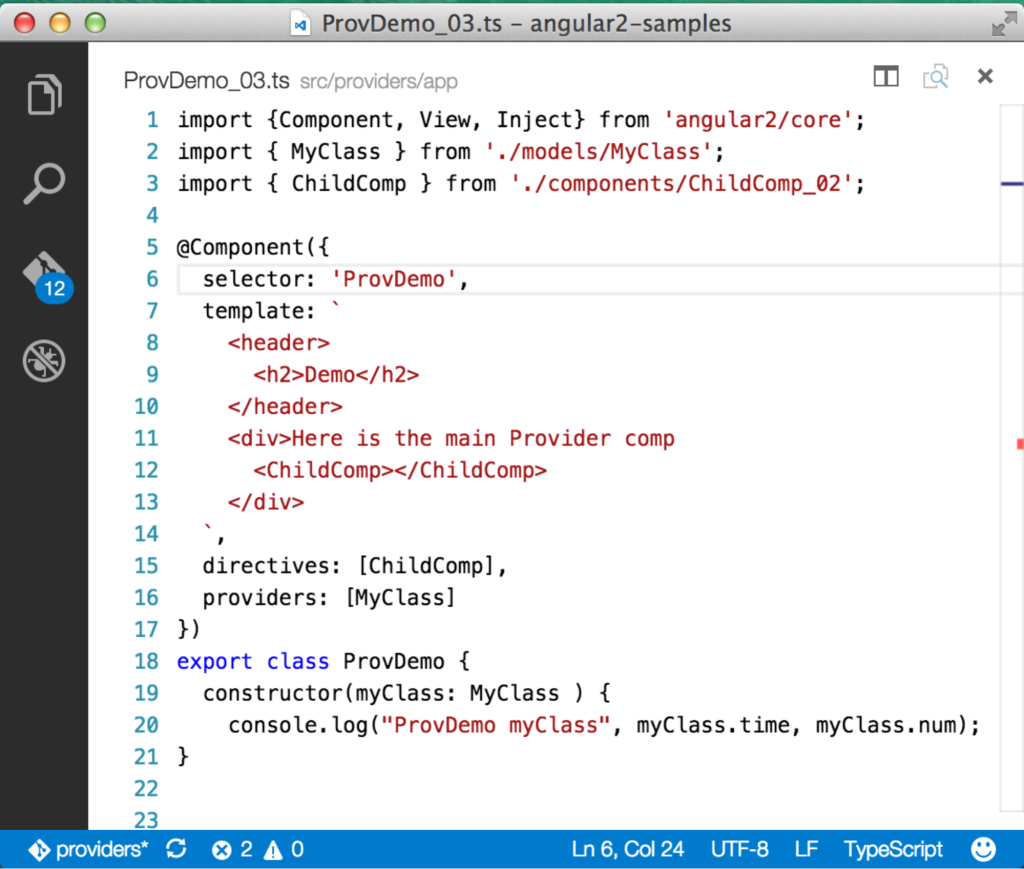
ProvDemo with ChildComp added to the template
Figure 8ProvDemo with ChildComp added to the template.
We import ChildComp, add a directives property to @Component to tell ProvDemo we’re going to use the ChildComp component and add the ChildComp element to the template. When the application runs, the console output shows that both ProvDemo and ChildComp receive the same instance of MyClass:

ProvDemomyClass 1453033148406 390
ChildCompmyClass 1453033148406 390
Now let’s change ChildComp to add a MyClass provider to its injector:
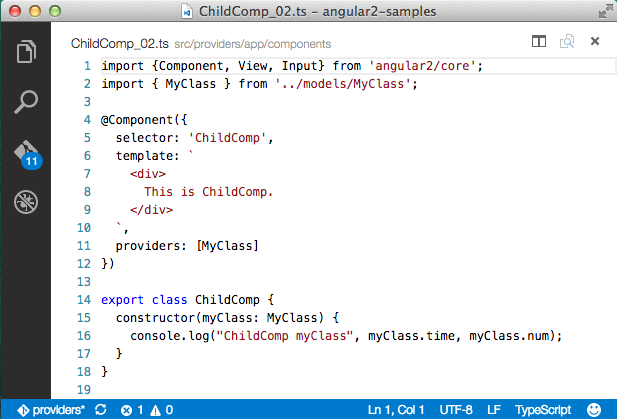
ParentComp with its own MyClass provider defined
Figure 9ParentComp with its own MyClass provider defined.
All we’ve changed is to add the providers property to the @Component annotation. And, sure enough, we can see that two different MyClass instances are created:

ProvDemomyClass 1453033681877 263
ChildCompmyClass 1453033681881 761
This feature of Angular gives a lot of flexibility over the results generated by any one provider and whether we are going to work with a single instance or multiple instances. For example, you might put a component inside a repeater so the component is generated multiple times. If this repeated component registers its own provider, each one gets unique providers. But, if you only register provider in the parent component, each repeated instance shares the parent’s provider.

Wrap-up

In this article, we defined what a provider is and covered the three different types of providers. We then looked at how you can register a provider for a component and inject the result generated by the provider into the component. We also took a look at how the hierarchy of injectors is used by Angular to find a requested provider. Angular gives you additional control over how the dependency injection system works and where it looks for providers but the above should get you started creating and working with providers in your Angular 2 applications.

More Hands-on with Web Development

This article is part of the web development series from Microsoft and DevelopIntelligence on practical JavaScript learning, open source projects, and interoperability best practices including Microsoft Edgebrowser and the new EdgeHTML rendering engine.
DevelopIntelligence offers instructor-led JavaScript TrainingAngularJS Training and other Web Development Training for technical teams and organizations.
We encourage you to test across browsers and devices including Microsoft Edge – the default browser for Windows 10 – with free tools on dev.microsoftedge.com:
More in-depth learning from our engineers and evangelists:
Our community open source projects:
  • vorlon.JS (cross-device remote JavaScript testing)
  • manifoldJS (deploy cross-platform hosted web apps)
  • babylonJS (3D graphics made easy)
More free tools and back-end web dev stuff:

A Practical Guide to AngularJS Directives (Part Two)

The first part of this tutorial provided a basic overview of AngularJS directives. In the end of the tutorial we also learned how to isolate the scope of a directive. This article will pick up exactly where part one ended. First, we will see how you can access parent scope’s properties inside your directive while maintaining an isolated scope. Next, we will discuss how to choose the correct scope for a directive by exploring concepts such as controller functions and transclusions. The article wraps up with a walkthrough of a note taking application.

Binding Between Isolated and Parent Scope Properties

Often, it’s convenient to isolate a directive’s scope, especially if you are manipulating many scope models. But, you may also need to access some parent scope properties inside the directive in order for the code to work. The good news is that Angular gives you enough flexibility to selectively pass parent scope properties to the directive through bindings. Let’s revisit our hello world directive, which changes its background color automatically when somebody types a color name into the text field. Recall that we isolated the scope of the directive and the code stopped working? Well, let’s make it work now!
Assume that the variable app is initialized and refers to the Angular module. The directive is shown below.
app.directive('helloWorld', function() {
  return {
    scope: {},
    restrict: 'AE',
    replace: true,
    template: '<p style="background-color:{{color}}">Hello World</p>',
    link: function(scope, elem, attrs) {
      elem.bind('click', function() {
        elem.css('background-color','white');
        scope.$apply(function() {
          scope.color = "white";
        });
      });
      elem.bind('mouseover', function() {
        elem.css('cursor', 'pointer');
      });
    }
  };
});
The markup, with utilizes the directive is shown in the following code sample.
<body ng-controller="MainCtrl">
  <input type="text" ng-model="color" placeholder="Enter a color"/>
  <hello-world/>
</body>
This code is not currently functional. Since we have an isolated scope, the expression {{color}} inside the directive template evaluates against this scope (not parent’s). But the ng-model directive on the input element refers to the parent scope property color. So, we need a way to bind these two isolated and parent scope properties. In Angular, this binding can be achieved by setting attributes on the directive element in HTML and configuring the scope property in the directive definition object. Let’s explore a few ways of setting up the binding.

Option 1: Use @ for One Way Text Binding

In the directive definition, shown below, we have specified that the isolated scope property color should be bound to the attribute colorAttr, which is applied to the directive in the HTML. If you look at the markup, you can see the expression {{color}} is assigned to color-attr. When the value of the expression changes, the attribute color-attr also changes. This in turn changes the isolated scope property, color.
app.directive('helloWorld', function() {
  return {
    scope: {
      color: '@colorAttr'
    },
    ....
    // the rest of the configurations
  };
});
The updated markup is shown below.
<body ng-controller="MainCtrl">
  <input type="text" ng-model="color" placeholder="Enter a color"/>
  <hello-world color-attr="{{color}}"/>
</body>
We call this one way binding because with this technique you can only pass strings to the attribute (using expressions, {{}}). When the parent scope property changes, your isolated scope model also changes. You can even watch this scope property inside the directive and trigger tasks when a change occurs. However, the reverse is not true! You can’t change the parent scope model by manipulating the isolated scope.
Note:
If the isolated scope property and the attribute name is same you can write the directive definition like this:
app.directive('helloWorld', function() {
  return {
    scope: {
      color: '@'
    },
    ....
    // the rest of the configurations
  };
});
The directive is invoked in HTML like this:
<hello-world color="{{color}}"/>

Option 2: Use = for Two Way Binding

Let’s change the directive definition as shown below.
app.directive('helloWorld', function() {
  return {
    scope: {
      color: '='
    },
    ....
    // the rest of the configurations
  };
});
And change the HTML like this:
<body ng-controller="MainCtrl">
  <input type="text" ng-model="color" placeholder="Enter a color"/>
  <hello-world color="color"/>
</body>
Unlike @, this technique lets you assign an actual scope model to the attribute rather than just plain strings. As a result you can pass values ranging from simple strings and arrays to complex objects to the isolated scope. Also, a two way binding exists. Whenever the parent scope property changes, the corresponding isolated scope property also changes, and vice versa. As usual, you can watch this scope property for changes.

Option 3: Use & to Execute Functions in the Parent Scope

It’s sometimes necessary to call functions defined in the parent scope from a directive with isolated scope. To refer to functions defined in outer scope we use &. Let’s say we want to call a functionsayHello() from the directive. The following code explains how it is achieved.
app.directive('sayHello', function() {
  return {
    scope: {
      sayHelloIsolated: '&amp;' 
    },
    ....
    // the rest of the configurations
  };
});
The directive is used in HTML like this:
<body ng-controller="MainCtrl">
  <input type="text" ng-model="color" placeholder="Enter a color"/>
  <say-hello sayHelloIsolated="sayHello()"/>
</body>
This Plunker example demonstrates this concepts.

Parent Scope vs. Child Scope vs. Isolated Scope

As an Angular beginner one might get confused while choosing the right scope for a directive. By default a directive does not create a new scope and uses the parent’s scope. But in many cases this is not what we want. If your directive manipulates the parent scope properties heavily and creates new ones, it might pollute the scope. Letting all the directives use the same parent scope is not a good idea because anybody can modify our scope properties. So, the following guidelines may help you choose the right scope for your directive.
  1. Parent Scope (scope: false) – This is the default case. If your directive does not manipulate the parent scope properties you might not need a new scope. In this case, using the parent scope is okay.
  2. Child Scope (scope:true) – This creates a new child scope for a directive which prototypically inherits from the parent scope. If the properties and functions you set on the scope are not relevant to other directives and the parent, you should probably create a new child scope. With this you also have all the scope properties and functions defined by the parent.
  3. Isolated Scope (scope:{}) – This is like a sandbox! You need this if the directive you are going to build is self contained and reusable. Your directive might be creating many scope properties and functions which are meant for internal use, and should never be seen by the outside world. If this is the case, it’s better to have an isolated scope. The isolated scope, as expected, does not inherit the parent scope.

Transclusion

Transclusion is a feature which lets us wrap a directive around arbitrary content. We can later extract and compile it against the correct scope, and finally place it at the specified position in the directive template. If you set transclude:true in the directive definition, a new transcluded scope will be created which prototypically inherits from the parent scope. If you want your directive with isolated scope to contain an arbitrary piece of content and execute it against the parent scope, transclusion can be used.
Let’s say we have a directive registered like this:
app.directive('outputText', function() {
  return {
    transclude: true,
    scope: {},
    template: '<div ng-transclude></div>'
  };
});
And it is used like this:
<div output-text>
  <p>Hello {{name}}</p>
</div>
ng-transclude says where to put the transcluded content. In this case the DOM content <p>Hello {{name}}</p> is extracted and put inside <div ng-transclude></div>. The important point to remember is that the expression {{name}} interpolates against the property defined in the parent scope rather than the isolated scope. A Plunker to experiment with is located here. If you want to learn more about scopes go though this document.

Differences Between transclude:'element' and transclude:true

Sometimes we need to transclude the element on which the directive is applied rather than just the contents. In those cases transclude:'element' is used. This, unlike transclude:true, includes the element itself in the directive template marked with ng-transclude. As a result of transclusion yourlink function gets a transclude linking function prebound to the correct directive scope. This linking function is also passed another function with a clone of the DOM element which is to be transcluded. You can perform tasks like modifying the clone and adding it to the DOM. Directives like ng-repeat use this technique to repeat the DOM elements. Have a look at the following Plunker which repeats a DOM element using this technique and changes the background color of the second instance.
Also note that by using transclude:'element', the element on which the directive is applied is converted into an HTML comment. So, if you combine transclude:'element' with replace:false, the directive template essentially gets innerHTMLed to the comment – which means nothing really happens! Instead, if you choose replace:true the directive template will replace the HTML comment and things will work as expected. Using replace:false with transclude:'element' is good for cases where you want to repeat the DOM element and don’t want to keep the first instance of the element (which is converted to a comment).

The controller Function and require

The controller function of a directive is used if you want to allow other directives to communicate with yours. In some cases you may need to create a particular UI component by combining two directives. For example you can attach a controller function to a directive as shown below.
app.directive('outerDirective', function() {
  return {
    scope: {},
    restrict: 'AE',
    controller: function($scope, $compile, $http) {
      // $scope is the appropriate scope for the directive
      this.addChild = function(nestedDirective) { // this refers to the controller
        console.log('Got the message from nested directive:' + nestedDirective.message);
      };
    }
  };
});
This code attaches a controller named outerDirective to the directive. When another directive wants to communicate, it needs to declare that it requires your directive’s controller instance. This is done as shown below.
app.directive('innerDirective', function() {
  return {
    scope: {},
    restrict: 'AE',
    require: '^outerDirective',
    link: function(scope, elem, attrs, controllerInstance) {
      //the fourth argument is the controller instance you require
      scope.message = "Hi, Parent directive";
      controllerInstance.addChild(scope);
    }
  };
});
The markup would look something like this:
<outer-directive>
  <inner-directive></inner-directive>
</outer-directive>
require: '^outerDirective' tells Angular to search for the controller on the element and its parent. In this case the found controller instance is passed as the fourth argument to the link function. In our case we are sending the scope of the nested directive to the parent. To try things out, open this Plunkerwith your browser console opened. The last section of the this Angular resource gives an excellent example of inter directive communication. It’s definitely a must read!

A Note Taking App

In this section we are going to build a simple note taking app using directives. We will make use of HTML5localStorage to store the notes. The end product is going to look like this. We will create a directive that will render a notepad. A user can view the list of notes he/she has made. When he clicks the button add new the notepad becomes editable and allows a note to be created. The note is automatically saved when the back button is clicked. The notes are saved using a factory called notesFactory, with help fromlocalStorage. The factory code is pretty straightforward and self explanatory. So, let’s concentrate on the directive code only.

Step 1

We start by registering the directive notepad.
app.directive('notepad', function(notesFactory) {
  return {
    restrict: 'AE',
    scope: {},
    link: function(scope, elem, attrs) {
    },
    templateUrl: 'templateurl.html'
  };
});
Please note a few things about the directive:
  • The scope is isolated, as we want the directive to be reusable. The directive will have many properties and functions that are not relevant outside.
  • The directive can be used as an attribute or element as specified by the restrict property.
  • The link function is empty initially.
  • The directive gets its template from templateurl.html.

Step 2

The following HTML forms the template for the directive.
<div class="note-area" ng-show="!editMode">
  <ul>
    <li ng-repeat="note in notes|orderBy:'id'">
      <a href="#" ng-click="openEditor(note.id)">{{note.title}}</a>
    </li>
  </ul>
</div>
<div id="editor" ng-show="editMode" class="note-area" contenteditable="true" ng-bind="noteText"></div>
<span><a href="#" ng-click="save()" ng-show="editMode">Back</a></span>
<span><a href="#" ng-click="openEditor()" ng-show="!editMode">Add Note</a></span>
The important points to note are:
  • The note object encapsulates titleid, and content.
  • ng-repeat is used to loop through the notes and sort them by ascending order of an autogeneratedid.
  • We will have a property editMode which wil indicate the mode we are in. In edit mode this property will be true and the editable div will be visible. The user writes the note here.
  • If editMode is false we are in viewing mode and display the notes.
  • The two buttons are also shown/hidden based on editMode.
  • The ng-click directive is used to react to button clicks. These methods, along with the properties likeeditMode, will be added to scope.
  • The editable div is bound to noteText, which holds the user entered text. If you want to edit an existing note, this model initializes this div with that note content.

Step 3

Let’s create a new function in our scope called restore() that will initialize various controls for our app. This will be called when the link function runs and each time the save button is clicked.
scope.restore = function() {
  scope.editMode = false;
  scope.index = -1;
  scope.noteText = '';
};
We create this function inside the link function. editMode and noteText have already been explained.index is used to track which note is being edited. If we are creating a new note, index is -1. If we are editing an existing note it contains that note object’s id.

Step 4

Now we need to create two scope functions that handle the edit and save actions.
scope.openEditor = function(index) {
  scope.editMode = true;

  if (index !== undefined) {
    scope.noteText = notesFactory.get(index).content;
    scope.index = index;
  } else {
    scope.noteText = undefined;
  }
};

scope.save = function() {
  if (scope.noteText !== '') {
    var note = {};

    note.title = scope.noteText.length > 10 ? scope.noteText.substring(0, 10) + '. . .' : scope.noteText;
    note.content = scope.noteText;
    note.id = scope.index != -1 ? scope.index : localStorage.length;
    scope.notes = notesFactory.put(note);
  }

  scope.restore();
};
The important points about these functions are:
  • openEditor prepares the editor. If we are editing a note, it gets the content of that note and updates the editable div thanks to ng-bind.
  • If we are creating a new note we need to set noteText to undefined in order for watchers to fire when we save the note.
  • If the function argument index is undefined, it means the user is going to create a new note.
  • The save function takes help from the notesFactory to save the note. After saving, it refreshes thenotes array so that the watchers can detect a change and the list of notes can be updated.
  • The save function calls restore() at the end to reset the controls so that we can get back to viewing mode from edit mode.

Step 5

When the link function runs we initialize the notes array and bind a keydown event to the editable divso that our noteText model stays in sync with the div content. We use this noteText to save note content.
var editor = elem.find('#editor');

scope.restore();  // initialize our app controls
scope.notes = notesFactory.getAll(); // load notes

editor.bind('keyup keydown', function() {
  scope.noteText = editor.text().trim();
});

Step 6

Finally, use the directive just like any other HTML element and start taking notes!
<h1 class="title">The Note Making App</h1>
<notepad/>

Conclusion

An important point to note is that whatever we do with jQuery can be done with Angular directives with much less code. So, before using jQuery try to figure out if the same thing can be done in a better way without any DOM manipulation. Try to minimize the use of jQuery with Angular.
With regards to the note taking demo, the delete note feature has been intentionally left out. The reader is encouraged to experiment and implement this feature. The source code for the demo is available for download from GitHub.

Angular Tutorial (Update to Angular 7)

As Angular 7 has just been released a few days ago. This tutorial is updated to show you how to create an Angular 7 project and the new fe...