Since the Keyhole .NET island is expanding rapidly, I was tasked with taking the Java web API and rewriting in .NET. In this blog, I will discuss the process of developing that Web API with .NET and Service Fabric, and show you some tips for avoiding the pitfalls.
Solving Problems
Let’s take it back a step. Here at Keyhole, we are beginning to observe and recommend our clients shift from building monolithic application into building microservices.
Microservice applications are composed of small, independently versioned, and scalable customer-focused services that communicate with each other over standard protocols with well-defined interfaces. – https://azure.microsoft.com
A Microservices approach goes a long way in solving problems that modern enterprises often face, particularly with scalability. It also aids in making development teams more agile in order to deliver functionality easier and quicker to the business, as well as allows for greater technology diversity. That said, there are still some hard problems to solve.
Some of the other hurdles that Microservices help to overcome include upgrading, failover, health checks/monitoring, discovery, and state management. Using Microservices versus a monolithic approach solves more problems than it causes for the majority of situations. Furthermore, the Service Fabric approach is helpful to remove the remaining hurdles.
Our Project Parameters
Alright, so I was tasked with taking the existing Java web API and rewriting in .NET with Service Fabric.
In this project, there are two microservices: a
projects and an employees, both containing a web API project and service for persisting.
The web API should follow the same request and responses as the current one, and should have the same routes. The UI should be able to use the web API without having to modify said UI project. Perfect, easy.
The data should be persisted to a local cache. All of the services should be able to handle scaling and failovers with no or minimal downtime. Not bad, little harder.
Here is the big one: the application should be capable of working in different environments… including Linux. What?
Enter Service Fabric
It turns out all of that can be accomplished by using Service Fabric. Let’s put our hands on it and start learning.
Note: I will be only showing how to build the Employee microservice, the Projects’ microservice is very similar to the Employee one.
My first step was to create an Service Fabric Application (er… well it was installing Visual Studio 15 and Service Fabric).
This is important: open Visual Studio as Administrator. Service Fabric need to have admin rights to run. Don’t worry, it will tell you if you don’t.

To meet the requirements, I needed to create three projects: two Service Fabric Applications, a Stateless Web API service, and a Stateful Service for the data. I also needed a contract class library project so the two applications knew how to talk to each other.
I started with the Stateless Web API, not that the order matters.
Now there should be a solution that has two projects: the Service Fabric application and the web API. There is no code in the application project but it is a reference to a set of service projects. The application project is also where you’ll find the publish profiles scripts, and application manifest.
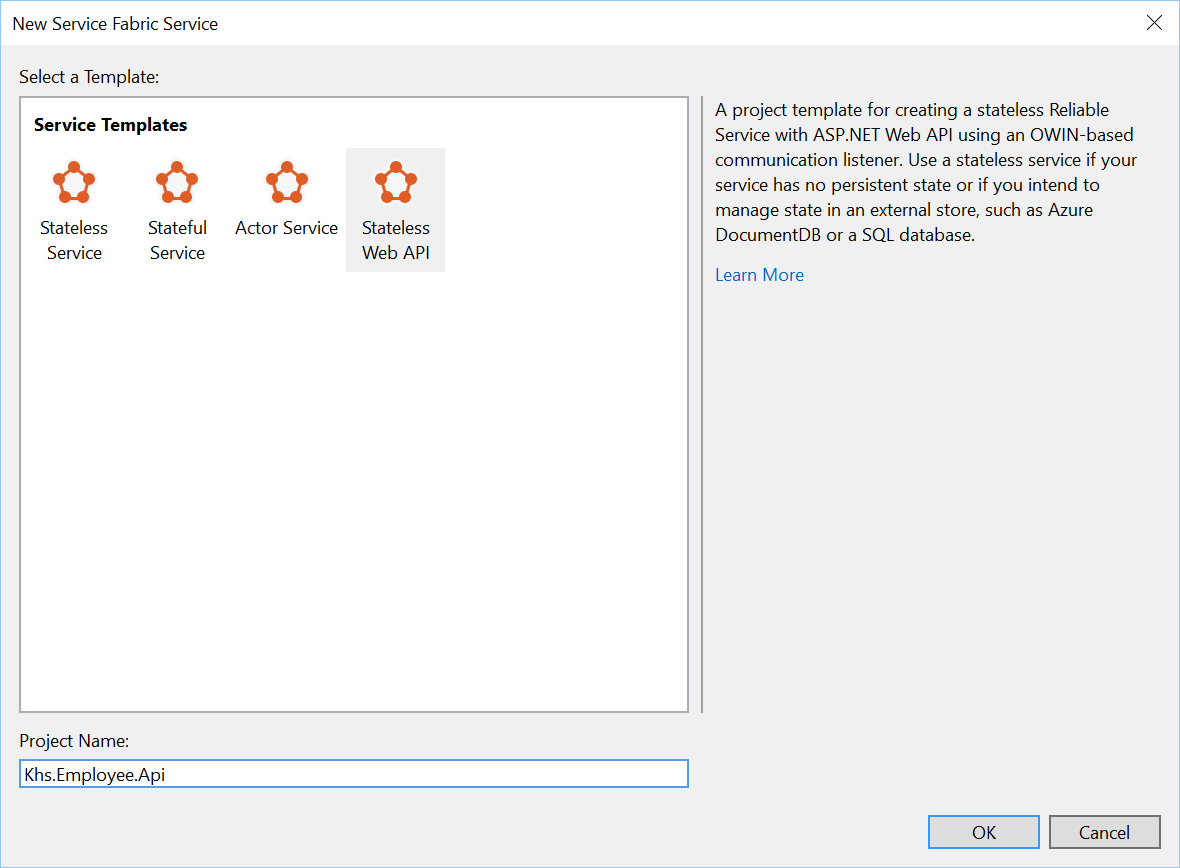
Before I started wiring up the code, I wanted to get all of the project added. So next I added the Stateful Service for persisting the employee data.
First, select the Service Fabric Application that you want to add the new service from. Select Add- -> New Service Fabric Service.
Select the “Stateful Service” option and enter the name.

A stateful reliable service will allow for the use of the reliable collection framework to a persist that the employees locally, meeting one of the requirements. Service Fabric manages the state and, as a developer, I have to do little-to-nothing to manage it. If a node fails, Service Fabric will preserve the state and reinstate it once it switches to a new primary node.
Next up, is the contract project. This is just a regular old class library project add at the solution.

Contract
Starting with contract project I created a POCO for employees.
It’s important to note that in working with Reliable Collections, it’s recommended that object are serializable, immutable, and the class should be sealed. It’s also recommended to avoid using collection properties, as it could affect performance. If you do use collection properties, they should use immutable collections library.
using System;
using System.Runtime.Serialization;
namespace Khs.Employee.Contract
{
    [DataContract]
    public sealed class Employee
    {
        [DataMember]
        public long Id { get; set; }
        [DataMember]
        public String FirstName { get; set; }
        [DataMember]
        public String LastName { get; set; }
        [DataMember]
        public String Email { get; set; }

    }
}
Next I created the Interface for persisting the employee information. The method defined should all be asynchronous and return Task. That interface should implement
Microsoft.ServiceFabric.Services.Remoting.IService. Since the persisting service doesn’t need to rely on a specific communication protocol, we can use the Reliable Service framework remoting mechanism. (For more info, see here.) Keep in mind that you’ll have to “nuget”-in the needed library: Install-Package Microsoft.ServiceFabric.Servicesusing System.Collections.Generic; using System.Threading.Tasks; using Microsoft.ServiceFabric.Services.Remoting; namespace Khs.Employee.Contract { public interface IEmployeeRepository : IService { Task<Employee> Get(long id); Task<IEnumerable<Employee>> Search(); Task<Employee> Save(Employee employee); Task Remove(long id); } }
Service
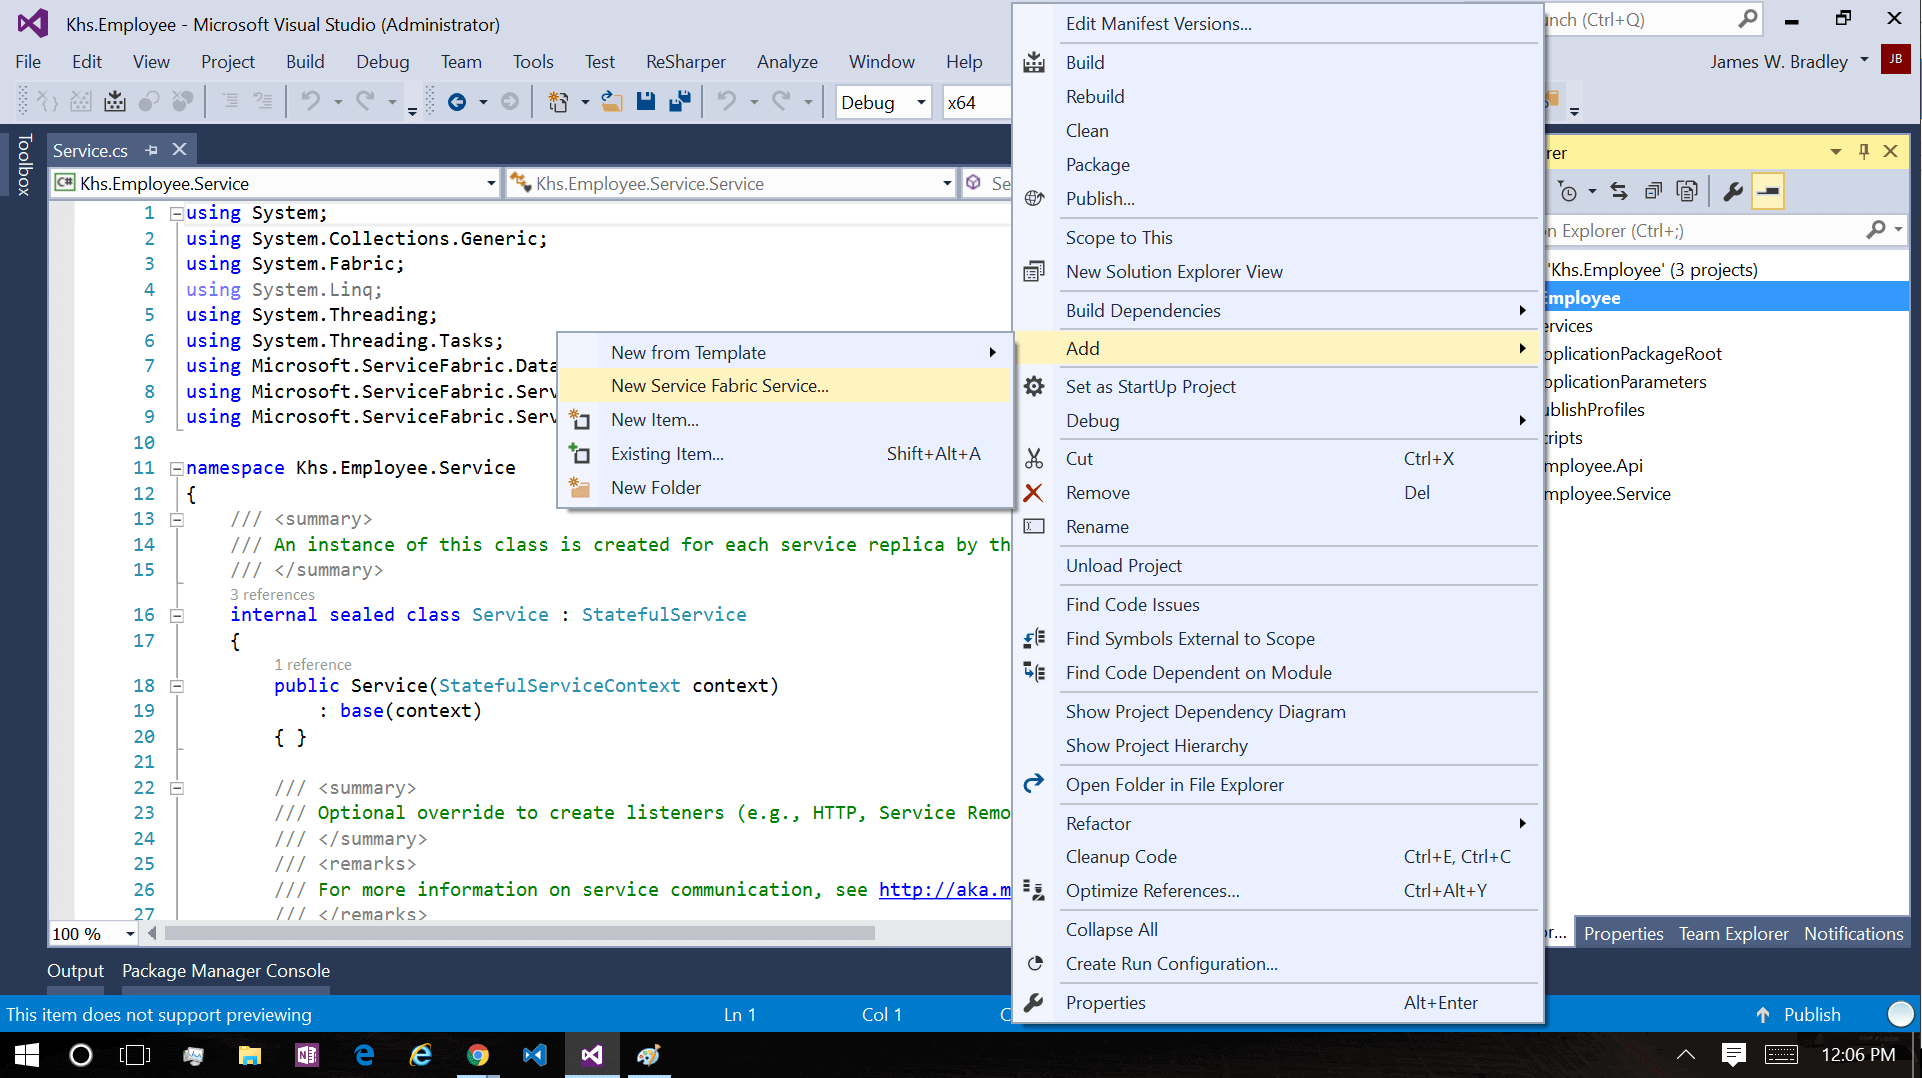
To be honest, my first attempt at adding a new service instead of using default service failed miserably. I was under a time restraint so I cheated a bit by using the default
Service.cs since it was already working. I knew that the issue was probably configuration. I’ve gone back now that I have more time/knowledge and worked it out. It was configuration and it wasn’t hard in hindsight.
Sounds like a normal day, right?
First I added new
EmployeeService.cs, a internal sealed class that extends StatefulService base class. The StatefulService give access to the IReliableStateManager and the ReliableCollection. StatefulService base class requires a constructor for StatefulServiceContext.
Next I added the
IEmployeeRepository interface and implemented its members. Finally to allow add the override for IEnumerable CreateServiceReplicaListeners(), need the service to create the remote listener.using System; using System.Collections.Generic; using System.Fabric; using System.Threading.Tasks; using Khs.Employee.Contract; using Microsoft.ServiceFabric.Services.Communication.Runtime; using Microsoft.ServiceFabric.Services.Remoting.Runtime; using Microsoft.ServiceFabric.Services.Runtime; namespace Khs.Employee.Service { internal sealed class EmployeeService : StatefulService, IEmployeeRepository { public const string CacheName = "employeeRepo"; public EmployeeService(StatefulServiceContext serviceContext) : base(serviceContext) { } public Task<Contract.Employee> Get(long id) { throw new NotImplementedException(); } public Task<IEnumerable<Contract.Employee>> Search() { throw new NotImplementedException(); } public Task Remove(long id) { throw new NotImplementedException(); } public Task<Contract.Employee> Save(Contract.Employee employee) { throw new NotImplementedException(); } protected override IEnumerable<ServiceReplicaListener> CreateServiceReplicaListeners() { return new[] { new ServiceReplicaListener(context => this.CreateServiceRemotingListener(context)) }; } } }
Now we need to register the service so Service Fabric knows to create a cluster, the configuration I was missing. I was doing two of the three things it takes:
1. Register the Service. Check Open
Program.cs and in Main() and add the following code:ServiceRuntime.RegisterServiceAsync("EmployeeServiceType",context =>new EmployeeService(context)) .GetAwaiter().GetResult(); ServiceEventSource.Current.ServiceTypeRegistered(Process.GetCurrentProcess().Id, typeof(EmployeeService).Name);
2. Add the type to the Service Manifest. Check. Open the
ServiceManifest.xml under the Khs.Employee.Service project PackageRoot folder and in the ServiceType node add<StatefulServiceType ServiceTypeName="EmployeeServiceType" HasPersistedState="true" />
3. Add the replication configuration. Opps. In the Service Fabric Application Project, open the
ApplicationManifest.xml in the ApplicationPackageRoot folder and to the DefaultServices add:<Service Name="EmployeeService"> <StatefulService ServiceTypeName="EmployeeServiceType" TargetReplicaSetSize="[Service_TargetReplicaSetSize]" MinReplicaSetSize="[Service_MinReplicaSetSize]"> <UniformInt64Partition PartitionCount="[Service_PartitionCount]" LowKey="-9223372036854775808" HighKey="9223372036854775807" /> </StatefulService> </Service>
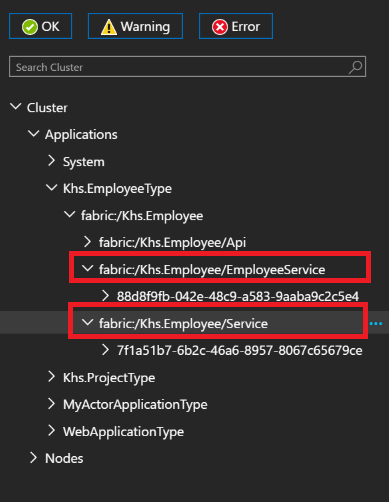
If you run the project and open the Service Fabric Manager (right-click the service fabric icon  in the system tray and select ‘manage local cluster’) you should see both the ServiceType (
fabric:/Khs.Employee/Service) that is the default service when creating a new project and EmployeeServiceType (fabric:/Khs.Employee/EmployeeService) up and running.
Reliable Collections
Now that I have the Employee Service configured and it appears to be up and running, I needed to add the persistence for the employee data. For this I used the built in Reliable Collection because I’m lazy and they do all of the things for me. Reliable Collection will replicate state changes, providing high availability. They will persist the data to disk to handle outages. They are asynchronous and transactional.
There are currently two types of Reliable Collections Reliable Dictionary, key/value pairs and Reliable Queues, a strict first in, first out queue. For this demo I used the Reliable Dictionary with the employee id being the key and the Employee object as the value.
Get By Id
This is pretty unremarkable. Create a transaction, get the dictionary, try to get the value. If an employee is found, return that; else return null.
public async Task<Contract.Employee> Get(long id)
        {
            using (var tx = StateManager.CreateTransaction())
            {
        var employees = await StateManager.GetOrAddAsync<IReliableDictionary<long, Contract.Employee>>(CacheName);
                var employee = await employees.TryGetValueAsync(tx, id);
                return employee.HasValue ? employee.Value : null;
            }
        }
Search
This is a demo so the the method returns all the employees. This one was a little harder, I was expecting the Reliable Dictionary to be IEnumerable. It is not.
There is extension method that will create an enumerable that will allow you to iterate through the collection and in this case add them into a list to return.
public async Task<IEnumerable<Contract.Employee>> Search()
        {
            using (var tx = StateManager.CreateTransaction())
            {
         var projects = await StateManager.GetOrAddAsync<IReliableDictionary<long, Contract.Employee>>(CacheName);

                 var employees = await projects.CreateEnumerableAsync(tx);
                 var result = new List<Contract.Employee>();
                 using (var asyncEnumerator = employees.GetAsyncEnumerator())
                 {
                     while (await asyncEnumerator.MoveNextAsync(CancellationToken.None))
                     {
                          result.Add(asyncEnumerator.Current.Value);
                     }
                }
                return result;

            }
        }
Save
The save method takes a employee POCO, creates a transaction, and gets the collection. It creates a new ID if it is a new employee, calls, and then Adds or Updates the employee to the collection using the ID as the key. It finally commits the transaction.
public async Task<Contract.Employee> Save(Contract.Employee employee)
{
    using (var tx = StateManager.CreateTransaction())
    {
        var employees = await StateManager.GetOrAddAsync<IReliableDictionary<long, Contract.Employee>>(CacheName);
        if (employee.Id <= 0) { employee.Id = await employees.GetCountAsync(tx) + 1; } await employees.AddOrUpdateAsync(tx, employee.Id, employee, (key, value) => employee);
        await tx.CommitAsync();
    }

    return employee;
}
Remove
Again, this is pretty straightforward. Create a transaction, get the collection, remove the key/value pair, and finally commit the transaction.
public async Task Remove(long id)
        {
            using (var tx = StateManager.CreateTransaction())
            {
                var projects = await StateManager.GetOrAddAsync<IReliableDictionary<long, Contract.Employee>>(CacheName);
                await projects.TryRemoveAsync(tx, id);
                await tx.CommitAsync();
            }
        }
That’s it for the employee service.
Web API
To meet the requirements with web API, I need to have the following routes:
GET api/employees: Get all the employeesGET api/employees/{id}: Get an employee by idPOST api/employees: Insert a new employeePUT api/employees/{id}: Update a specific employeeDELETE api/employees/{id}: Removes an employee
It’s pretty straight-forward code. Create an
Employees controller and create the above routes.using System; using System.Threading.Tasks; using System.Web.Http; using Khs.Employee.Contract; using Microsoft.ServiceFabric.Services.Client; using Microsoft.ServiceFabric.Services.Remoting.Client; namespace Khs.Employee.Api.Controllers { public class EmployeesController : ApiController { private readonly IEmployeeRepository _repo; public EmployeesController() { var uri = new Uri("fabric:/Khs.Employee/EmployeeService"); _repo = ServiceProxy.Create<IEmployeeRepository>(uri, new ServicePartitionKey(0)); } [HttpGet] [Route("")] public async Task<IHttpActionResult> Get() { try { var results = await _repo.Search(); return Ok(results); } catch (Exception e) { return InternalServerError(e); } } [HttpGet] [Route("{id}")] public async Task<IHttpActionResult> GetById(long id) { try { var results = await _repo.Get(id); return Ok(results); } catch (Exception e) { return InternalServerError(e); } } [HttpPost] [Route("")] public async Task<IHttpActionResult> Post([FromBody] Contract.Employee employee) { try { var result = await _repo.Save(employee); return Ok(result); } catch (Exception e) { return InternalServerError(e); } } [HttpPut] [Route("{id}")] public async Task<IHttpActionResult> Put(long id, [FromBody] Contract.Employee employee) { try { employee.Id = id; var result = await _repo.Save(employee); return Ok(result); } catch (Exception e) { return InternalServerError(e); } } [HttpDelete] [Route("{id}")] public async Task<IHttpActionResult> Delete(long id) { try { await _repo.Remove(id); return Ok(); } catch (Exception e) { return InternalServerError(e); } } } }
The only notable is thing is how to wire up the communication between the API and the Employee Service. Calling the methods from the Employee Service is done through local proxy by using the
Microsoft.ServiceFabric.Services.Remoting.Client.ServiceProxy class. ServiceProxy has a Create method that will create an object from the interface the service implements.
The URI is the endpoint for that service. If you have trouble with figuring out what the URL should be, you can open the Local Cluster Manager and find the service. It will have the URI as the name.
Now you should be able to create, get, update, and remove employees through the API using your favorite REST Client.
CodeProject
CodeProject
Final Thoughts
I’m a long way off from being Service Fabric expert; I feel like I’ve just barely discovered the usefulness of Service Fabric. But I found it easy to use as the learning curve is minimal. It does more than I expected when I started looking into it. I thought I was getting an answer to Docker. I did, but it’s much more than that – it’s a framework that is perfect for building modern applications.
I do know that I want to go back and refactor all of the code I’ve written to use it. Everything looks like a nail and I have a big golden Service Fabric hammer.