Monday, 1 December 2014

Using DataAnnotations with Entity Framework 4 Entities for a More Dynamic MVC Model


entity_framework
I’ve been working with MVC3 and Razor lately.  It’s been absolutely great.  I’ve not used MVC to build a production app until now, and it’s been killer fast building things out quickly.  Previously, I’ve just used regular old objects like are in the starter projects to play around with my applications as the “M” in my MVC.  With these, you can use the System.ComponentModel.DataAnnotations to decorate your classes with validation, labels, datatypes, field types and more that are used in MVC views to dynamically create your UI.  Now, though, I’m building a pretty big application that I’ll be putting out for a longer term, and will use SQL Server for the back-end with Entity Framework 4.0 entities as my model. The problem with this is that entity models are dynamically generated, and don’t contain annotations of their own.
Here’s an example of the DataAnnotations in a typical model:
public class LogOnModel
{
    [Required]
    [Display(Name = "User name")]
    public string UserName { get; set; }

    [Required]
    [DataType(DataType.Password)]
    [Display(Name = "Password")]
    public string Password { get; set; }

    [Display(Name = "Remember me?")]
    public bool RememberMe { get; set; }
}
Since entities are regenerated often (meaning annotating the entities directly will result in your changes being wiped out pretty quickly), but are the preferred way of working with databases, what’s the best way to go about annotating the entities so they work seamlessly in the MVC framework?
I recently asked this question on StackOverflow, and Austin Lamb of the Microsoft Silverlight team was kind enough to let me know how this is done in the Silverlight world, which ended up working seamlessly with MVC.  See, when you generate entities, they are created as partial classes.  This means that you can extend them by creating another partial class for each of the entity classes.  This gets us around the problem of the regenerating entities wiping out any DataAnnotations, since partial classes we create manually aren’t regenerated by the T4 template that creates the entities.  Now, can we just annotate the fields straight up in the partial class we manually create?  Well, not directly.  The trick here, as Austin points out, is to use a MetadataType class that holds the DataAnnotations.  This MetadataType class, that corresponds to a single entity class, is applied to the partial class you manually created, which then links everything up.  I know it’s hard to visualize by my typing this out in a paragraph, so I’ll give you code he gave me.  Below is the partial class and MetadataType class that you need to create under the assumption you want to add DataAnnotations to the Person class’ FirstName field:
[MetadataType(typeof(PersonMetadata))]
public partial class Person {
  // Note this class has nothing in it.  It's just here to add the class-level attribute.
}

public class PersonMetadata {
  // Name the field the same as EF named the property - "FirstName" for example.
  // Also, the type needs to match.  Basically just redeclare it.
  // Note that this is a field.  I think it can be a property too, but fields definitely should work.

   [Required]
   [Display(Name = "First Name")]
   public string FirstName;
}
Once you have this set up, the DataAnnotations will show through even if you use an Entity Framework model as the model for your MVC application.  Pretty slick, eh?  If you want to read the whole article then go here.  Don’t forget to upvote Adam’s post as it’s helped me a ton, and if this post has helped you, it’s only because of him.  Enjoy!

ASP.NET Identity with the Entity Framework

ASP.NET EF Identity In a previous post  (Core Identity), we saw how the .Core identity assembly provides interfaces for describing the data access needs of a membership and identity system. Core also provides a UserManager class with the domain logic for identity management.
The .EntityFramework identity assembly provides concrete implementations for the core interfaces.
Here are 5 things to know about how it all works together.

In A New MVC 5 Application

If you use File –> New Project to create an MVC 5 application with the “Individual User Accounts” security option, the new project template will spit out all the code needed for users to register, login, and logoff, with all information stored into a SQL Server database.
The new identity bits do not support some of the features included with membership providers in the years past, features like counting invalid login attempts and lockouts, but the extensibility is in place and the current implementation has some clean separations, so perhaps they’ll be in by default in the future.
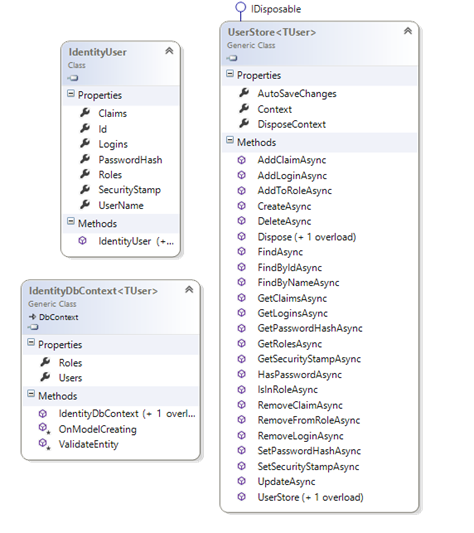
Remember the UserManager is the domain logic, and the UserManager needs (at a minimum) an IUserPasswordStoreto persist users and passwords. Thus, the way the default AccountController constructs a UserManager is by passing in a new UserStore, which implements IUserPasswordStore in addition to the other core identity interfaces for persisting claims, roles, and 3rd party logins.
new UserManager<ApplicationUser>(
    new UserStore<ApplicationUser>(
        new ApplicationDbContext()))
It turns out that UserStore also has a dependency, a dependency on an EF DbContext class, and not just any context but one that derives from IdentityDbContext. IdentityDbContextprovides all of the EF code-first mapping and DbSet properties needed to manage the identity tables in SQL Server. The default “new project” code provides an ApplicationDbContext that derives from IdentityDbContext with the idea that you’ll add your own DbSet properties for the entities, tables, and overall data that your application needs and keep everything in the same database.
In short, an identity specific DbContext plugs into the concrete user store, which then plugs into the user manager.
Once all three are together you have an identity system that supports third party logins as well as local accounts.

In A New Web API or SPA Application

The WebAPI and Single Page Application project templates also support user registration and password logins, but in these templates the AccountController is an API controller that issues authentication tokens instead of authentication cookies. Because the identity management work happens inside both the AccountController and inside Katana middleware, aUserManager factory is responsible for creating the user manager that both the middleware and API controller share.
public static Func<UserManager<IdentityUser>> UserManagerFactory { get; set; }
This static property is in the Startup.Auth.cs file that holds the Katana Startup configuration class. The actual factory function is initialized in this class, also.
UserManagerFactory = () => new UserManager<IdentityUser>(new UserStore<IdentityUser>());
This code uses the default constructor for the UserStore class, which will create a new instance of an IdentityDbContext object since an object isn’t supplied. If you want to use your ownIdentityDbContext derived class, like the MVC 5 project does, you can modify the above initialization code and pass in your own context.
Side note: the SPA application template produces more than 2700 lines of code to get started. Not a large amount, but there are structural design issues (like the static UserManagerFactory) that require a healthy amount of rework for real applications. My personal advice is to use the template to get some ideas, but throw the code away and start from scratch for production applications.

Connection Strings

By default, IdentityDbContext uses a connection string named “DefaultConnection”, and all the new project templates will include a DefaultConnection connection string in the project’s web.config file. The connection string points to a SQL Local DB database in the AppData folder.
To change the SQL Server database being used, you can change the value of the connection string in web.config. You can also pass a different connection string name into the DB context constructor.

The Easy Customizations

A new MVC 5 project (not the SPA or WebAPI templates) provides an IdentityModels.cs file with the following two classes.
public class ApplicationUser : IdentityUser
{
}
 
public class ApplicationDbContext : IdentityDbContext<ApplicationUser>
{
    public ApplicationDbContext()
        : base("DefaultConnection")
    {
 
    }
}
Remember ApplicationDbContext is the context used to initialize a UserStore for a UserManager. The context will already include Users and Roles properties it inherits fromIdentityDbContext, but you can add additional properties to store movies, books, accounts, employees, or whatever an application needs to solve a problem.
The ApplicationUser class includes Id, Username, PasswordHash, and other properties it inherits from IdentityUser. You can add additional properties here to store additional profile information about a user.
For simple applications this all works well, but for more complex applications you again probably want to use the starting project template code only for inspiration and start your own implementation from scratch. The names, structure, and code organization all have a prototype code feel and aren’t production ready.

Managing Contexts

In a real application you’ll have to decide if you want to mingle your data context with IdentityDbContext. One issue to be aware of is that the UserStore class does not play well when using the unit of work design pattern. Specifically, the UserStore invokes SaveChanges in nearly every method call by default, which makes it easy to prematurely commit a unit of work. To change this behavior, change the AutoSaveChanges flag on the UserStore. 
var store = new UserStore<ApplicationUser>(new ApplicationDbContext());
store.AutoSaveChanges = false;

What’s Next

The new Identity system is easy for greenfield projects with no existing users, but quite a bit trickier if you have an existing schema or don’t use the Entity Framework. Fortunately, the separation of domain logic in the UserManager and persistence logic behind IUserStore and friends is a fairly clean separation, so it is relatively easy to implement a custom persistence layer. This is one of the topics we’ll cover in a future post.

Angular Tutorial (Update to Angular 7)

As Angular 7 has just been released a few days ago. This tutorial is updated to show you how to create an Angular 7 project and the new fe...