Entity Framework is a powerful Object-Relational Mapping (ORM) framework for data access in .NET. This framework can be used to build Data Access Layers in any enterprise/non-enterprise application.
Entity Framework Core - Getting Started
Entity Framework Core (or EF Core) is the latest version of Entity Framework and is a complete rewrite. It was released along with .NET Core and is an extensible, lightweight and cross-platform version of Entity Framework.
EF Core does not support all the features offered by Entity Framework 6. However here are some reasons to use EF Core:
- Simple to get started
- Supports NoSQL Databases along with other relational databases
- Fits nicely in an ASP.NET MVC Core setup
- Integrates well with LINQ
- Possible to use in Linux and Mac since it is based on .NET Core
Entity Framework Core vs EF 6.x
EF 6.x is a stable and fully tested ORM technology which is used across many applications. EF Core provides a developer experience similar to EF 6.x. However it is built upon a new set of components. The application targets to .NET Core e.g. ASP.NET Core applications. Universal Windows Platform (UWP) Applications cannot use EF 6.x as this requires the complete .NET Framework. EF Core is more suitable for such applications.
Although both of these releases provides similar features, EF Core does not have following features:
- Spatial Type
- Complex/value types
- EDMX Model format
- Lazy loading
- Stored Procedures
The complete list of features not available in EF Core and a side-by-side comparison with EF 6.x can be found at Feature Comparison.
EF Core Database Providers
EntityFramework Core uses a provider model that allows EF to map with and access many databases. This includes concepts like, performing queries using LINQ, transactions, change tracking to objects etc. EFCore also supports database specific concepts e.g. memory-optimized tables provided by SQL Server. The library Microsoft.EntityFrameworkCore.Relational is used to create and build class providers for relational databases. This library provides APIs for managing table and column mapping.
APIs used in EF Core
- DBContext - The instance of the DbContext represents a database session that is used for performing CRUD operations.
- DbSet
- This is used to define mapping with “T”. All the LINQ queries against DbSet
will be translated into database queries. The important point here to understand is that all LINQ queries executed against DbSet will contain result returned from database, this may not include change made on database over the DbContext. - These queries may be evaluated in-memory rather than converting into database queries. This is depending on the database provider.
- This is used to define mapping with “T”. All the LINQ queries against DbSet
This article will cover the following topics:
- Creating Model in EF Core
- Querying Data in EF Core
- Saving Data in EF Core
Creating Database
The application uses SQL Server database. To create a database, open SQL Server Database and create a new database of name DBEfCore. The following command can be used
In the database, add the following tables:
Department Table
Employee Table
The Departments table is parent of Employees Table.
This article uses Console Application to demonstrate all the above features. The following tools must be installed on the machine.
- Visual Studio 2015 with Update 3
- The most recent version of NuGet Package Manager.
Installing EF Core NuGet Packages
This article uses two approaches to use Entity Framework Core in the application. To use EF Core in the application and since the application will be using Microsoft SQL Server database it need SQL Server provider. To use EF Core the application needs to install the following packages from the Package Manager Console.
Note: The Microsoft.EntityFramework.SqlServer package can also be used for SQL Azure.
Approach 1 - Using a Database-First approach
While developing an application, if the database is already available, then Model classes can be created using the Database. The advantage of this approach is that the application knows that the database is production ready and no changes (or modifications) are required in the database design (Table design). This scenario is more useful when the application is developed from scratch except the database. E.g. Application is redesigned by migrating from Desktop to Web application or ASP.NET to MVC, etc.
This approach explains how to generate Model classes based on Tables in database. The application uses DBEfCore database created as per the instruction given in the Creating Database section.
Step 1: Create a Console application of the name EFCore_Scaffolding. As explained in the Install NuGet Packages section, open the Package manager console using Tools > NuGet Package Manager > Package Manager Console and installed required packages.
Step 2: To generate Models from the database, run the following command from the NuGet Package Manager Console.
The Scaffold-Context command scaffolds DbContext from the database based on the database connection string and the Sql Server NuGet package for EntityFramework Core. This package is a Sql Server provider which is used to connect to Sql Server instance based on the connection string and scaffolded DbContext. The OutputDir switch is used to specify the folder in the project where the Entity classes will be created.
Step 3: In the project, a Model folder is created. This folder contains the classes files, one for each table name in the database and one for the DbContext class. Since Departments table is a parent of Employees table, the mapping generated using the Scaffold command maintains the relationship across them. The following images shows code for Departments and Employees class
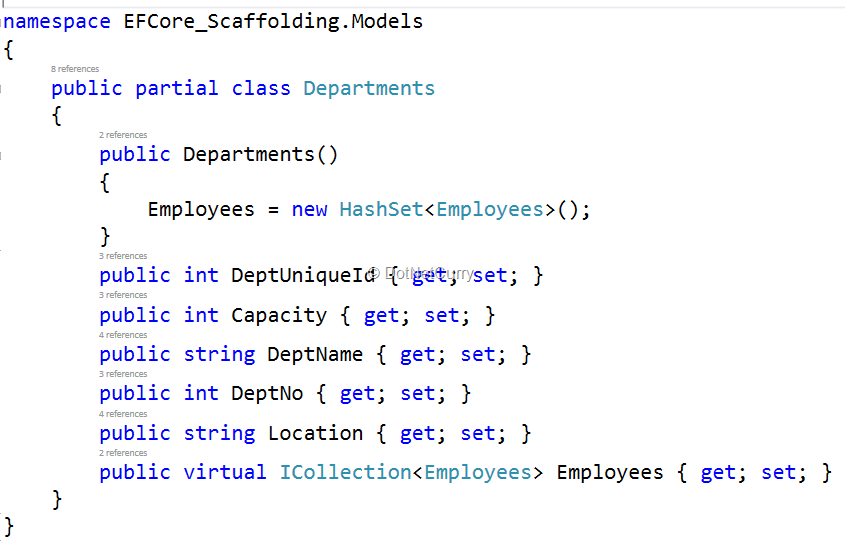
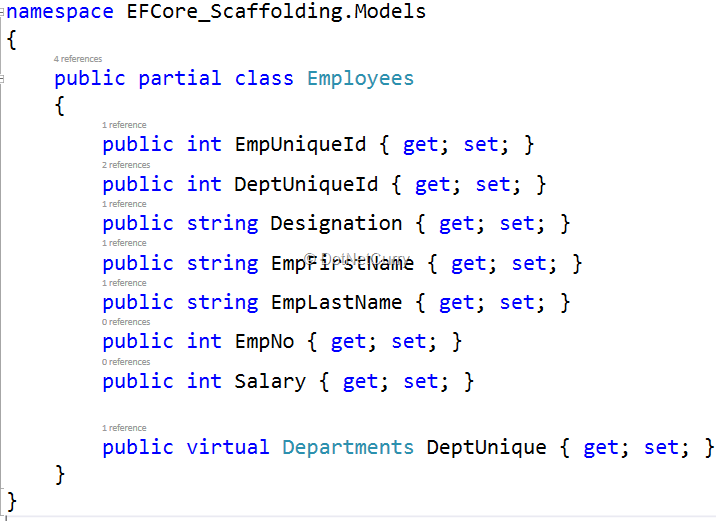
Step 4: To perform Database Read/Write operations, open Program.cs and write the following code. Note that the code is relatively similar to the code for Entity Framework 6.x.
The above code creates an instance of the DbEfCoreContext class generated after the scaffolding is over. An instance of the Departments class is created to create a new Department. The Departments instance is added in the Departments DbSet using its Add() method. The SaveChanges() method is used to commit the save operations on the database.
After running the application, the result will be displayed as shown in the following image:
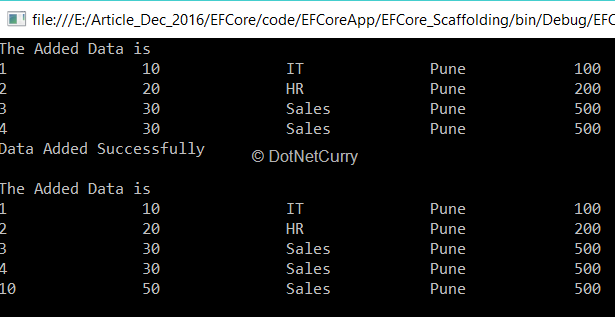
The Scaffold-DbContext provides an easy mechanism to scaffold the DbContext and Entity classes so that they can be used in database CRUD operations.
Note: To try out the steps for Approach 2, delete Departments and Employees table from the database.
Approach 2: Using the approach of creating Model
In an enterprise application, it is important to design the application model. An accurate application model makes the application development easy. The maintainability of the application is primarily dependent on the model design. In EF, the model is based on the design of the Entity Classes. These classes contain necessary properties based on which the application can decide what data is accepted through the application and saved in database.
Step 1: Create a new Console application of the name EFCoreApp targeted to .NET Framework 4.6.1.
Step 2: In the project, add a class file of name Entities.cs. This will contain Models classes (POCO) as shown in the following code.
Have a look at the code of the model design. There are attributes applied on the properties for Required, MaxLength, Key and ForeignKey. The rules of behavior and validations of each property is specified using these attributes.
Step 3: In the app.config file, add a connection string for the database
Step 4: In the Project add a reference for System.Configuration. This will be used to read the connection string from the app.config file.
Step 5: In the project, add a new class file of the name DbContextClass.cs. Add the following code in it.
The above code contains the following specification:
- The class CompanyEntities is derived from DbContext. This class manages the database connection by overriding OnConfiguring() method. This method accepts the DbContextOptionBuilder class. This class is used to configure database connection.
- The DbSet
Step 6: To generate database tables, run migration commands from the package manager console. In Visual Studio select Tools > NuGet Package Manager > Package Manager Console. Run the following commands:
This will update the database by creating tables as shown in the following image:
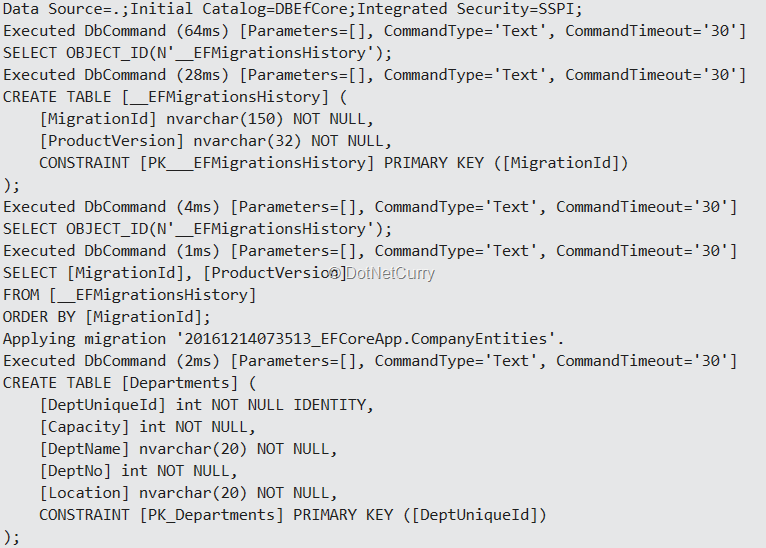

This command will create tables in the database. The project will be added in Migrations folder with the migration classes.
Step 7: In Program.cs, add the following code:
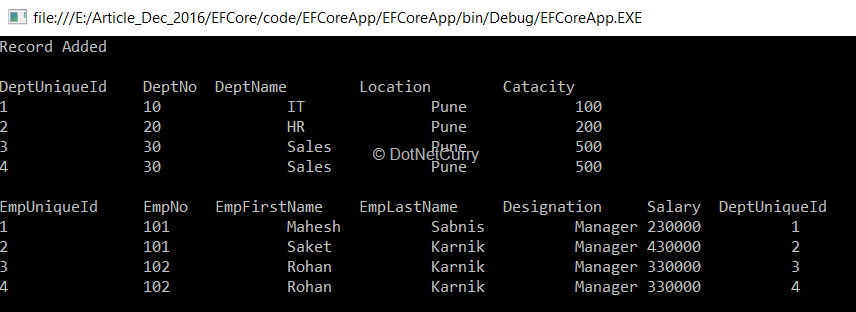
The above code creates an instance of the CompanyEntities class to connect to database and map with the tables. Using Departments and Employees properties and its Add() method, an instance of the Department and Employee instance is added in the DbSet respectively. Using SaveChanges() method, the record is added in the respective table. After executing the application, the result will be displayed as in following image:
Since the Required attribute are applied on the model properties of Department and Employee class, values must be passed for these properties else the transaction will fail. To test it, remove DeptName property value from the dept instance of the Department in the Main method and run the application, the following exception will be displayed.
An error occurred while updating the entries. See the inner exception for details. Cannot insert the value NULL into column…column does not allow nulls. INSERT fails.

The reason behind the exception is that the Department table is mapped with the Department class and since DeptName property is set with the Required attribute, the Department table will be generated with Allow Nulls as false.
Since the DeptName property of the Department class is applied with the MaxLength attribute with value as 20, it can access value up-to 20 characters. If the value of the DeptName in dept instance of the Department class is changed as shown in the following code:
Then after running the application, the result will be as shown in the following image:
An error occurred while updating the entries. See the inner exception for details. String or binary data would be truncated.

Conclusion: Entity Framework Core (EF Core) provides a similar experience of application development as seen in EF 6.x. The Scaffold-DbContext and Migration commands allows creating Models from a ready database and generating database table respectively.
Download the entire source code of this article (Github)
No comments:
Post a Comment