Angular Material is a collection of Material Design components for Angular. By using these components you can apply Material Design very easily. With the release of Angular 6 the usage of Angular Material has become easier as well. In this tutorial we’ll take a look at the recent changes. You’ll learn how to use Angular Material in your Angular 6 project in the most easy way.
The Angular Material website can be found at https://material.angular.io/.

Setting Up The Angular 6 Project
To get starte we first need to setup the Angular 6 project. This is done by using Angular CLI (https://cli.angular.io/). If you have not installed Angular CLI on your system yet you first need to follow the steps from the project’s website to make the command line interface available on your system.
Once Angular CLI has been installed successfully you can initiate the new project by using the ng command in the following way:
$ ng new ngMat01
In this example ngMat01 is the name of the new project. A new project folder (with that name) is created, the Angular project template is downloaded and the needed dependencies are installed.
Using ng add To Add Angular Material
With the release of Angular 6 the new ng add command is available which makes it easy to add new capabilities to the project. This command will use the package manager to download new dependencies and invoke corresponding installation scripts. This is making sure that the project is updated with dependencies, configuration changes and that package-specific initialization code is executed.
In the following we’ll use the ng add command to add Angular Material to the previously created Angular 6 application:
$ ng add @angular/material
By executing this command we’re installing Angular Material and the corresponding theming into the project. Furthermore new starter components are registered into ng generate.
Exploring Angular Material Stater Components
Having added new Angular Material starter components to ng generate makes it very easy to get started with Angular Material. The following starter components are available:
- @angular/material:materialDashboard: Create a card-based dashboard component
- @angular/material:materialTable: Create a component that displays data with a data-table
- @angular/material:materialNav: Create a component with a responsive sidenav for navigation
To make use of those starter components you need to use the ng generate command in the following ways:
$ ng generate @angular/material:materialNav --name myNav
$ ng generate @angular/material:materialDashboard --name myDashboard
$ ng generate @angular/material:materialTable -- name myTable
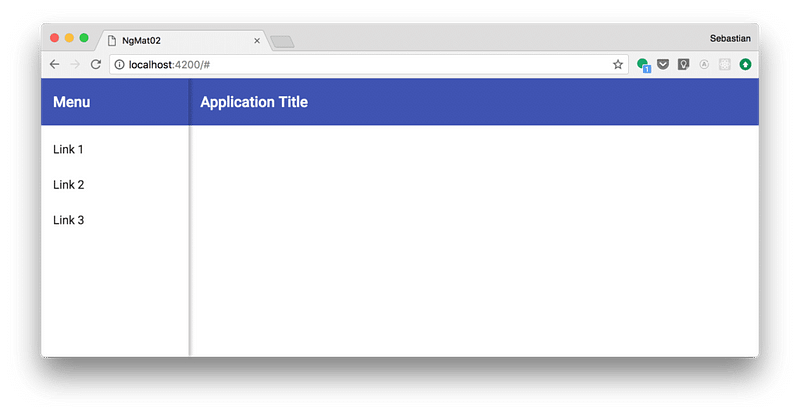
E.g. if you use the first command to generate a new myNav component you should be able to see the following output on the command line:
CREATE src/app/my-nav/my-nav.component.css (110 bytes)
CREATE src/app/my-nav/my-nav.component.html (945 bytes)
CREATE src/app/my-nav/my-nav.component.spec.ts (605 bytes)
CREATE src/app/my-nav/my-nav.component.ts (481 bytes)
UPDATE src/app/app.module.ts (795 bytes)
Four new files have been added to the project. Those files contain the implementation of the Angular Material navigation component. MyNavComponent has been added to the declarations array of the @NgModuledecorator in AppModule, so that the component can be used in our Angular application.
To make it visible to the user delete the default content of file app.component.html and just insert the following element:
<my-nav></my-nav>
This is the element which is used to include the output of MyNavComponent in the output which is presented in the browser.
Having started the development web server with
$ ng server --open
you should be able to see the following result:
Adding The Router
Now that the navigation layout is available we’re able to add Angular Router functionality easily. In app.module.ts add the following import statement to import RouterModule and Routes:
import { RouterModule, Routes } from '@angular/router';
Next add a router configuration array in the same file:
const appRoutes: Routes = [
  { path: 'first-page', component: FirstPageComponent },
  { path: 'second-page', component: SecondPageComponent },
  { path: 'third-page', component: ThirdPageComponent }
];
Of course, FirstPageComponent, SecondPageComponent, and ThirdPageComponent are not available yet. We’re going to add those components in the following steps.
In order to activate the router configuration for our Angular application we need to make sure to add RouterModule to the imports-Array of the @NgModule in the following way:
imports: [
    ...
    RouterModule.forRoot(appRoutes),
    ...
  ],
Next we need to add the router outlet (the place where the content of the route component is inserted) inside the <mat-sidenav-content>-Element in file my-nav.component.html:
<router-outlet></router-outlet>
Furthermore we need to update the links from the sidebar menu and use the routerLink directive to point to the respective routes:
<mat-nav-list>
      <a mat-list-item routerLink="/first-page">First Page</a>
      <a mat-list-item routerLink="/second-page">Second Page</a>
      <a mat-list-item routerLink="/third-page">Third Page</a>
    </mat-nav-list>
Finally, to make the router configuration work, add the three components by using the following commands:
$ ng generate component FirstPage$ ng generate component SecondPage$ ng generate component ThirdPageUsing Other Angular Material Components
We’ve used the navigation starter component in our application so far. You can also make use of any of the other Angular Material components. To get an overview of available components take look at https://material.angular.io/components/categories.
In the next step we’re going to use the MatCard component from the Angular Material library in one of our page components (e.g. FirstPageComponent).
First add the MatCardModule import in file app.module.ts:
import { MatToolbarModule, MatButtonModule, MatSidenavModule, MatIconModule, MatListModule, MatCardModule } from '@angular/material';
Add it to the imports-Array as well:
imports: [
    BrowserModule,
    BrowserAnimationsModule,
    LayoutModule,
    RouterModule.forRoot(appRoutes),
    MatToolbarModule,
    MatButtonModule,
    MatSidenavModule,
    MatIconModule,
    MatListModule,
    MatCardModule
  ],
Now we’re ready to use components of MatCardModule in the template code (e.g. first-page.component.html):
<mat-card class="example-card">
  <mat-card-header>
    <div mat-card-avatar class="example-header-image"></div>
    <mat-card-title>Shiba Inu</mat-card-title>
    <mat-card-subtitle>Dog Breed</mat-card-subtitle>
  </mat-card-header>
  <img mat-card-image src="https://material.angular.io/assets/img/examples/shiba2.jpg" alt="Photo of a Shiba Inu">
  <mat-card-content>
    <p>
      The Shiba Inu is the smallest of the six original and distinct spitz breeds of dog from Japan.
      A small, agile dog that copes very well with mountainous terrain, the Shiba Inu was originally
      bred for hunting.
    </p>
  </mat-card-content>
  <mat-card-actions>
    <button mat-button>LIKE</button>
    <button mat-button>SHARE</button>
  </mat-card-actions>
</mat-card>
Insert the CSS code in first-page.component.css as well:
.example-card {
  max-width: 400px;
}
.example-header-image {
background-image: url('https://material.angular.io/assets/img/examples/shiba1.jpg');
background-size: cover;
}
All other Material Design components from the Angular Material library can be used in the same way.


My warm congratulations for your site! It helped me a lot, especially since all your sharing is interesting. Long life to your site. Above all, never be discouraged; your blog is really on top!
ReplyDeletevoyance mail gratuit en ligne
Positive site, where did u come up with the information on this posting? I'm pleased I discovered it though, ill be checking back soon to find out what additional posts you include. digital pull force gauge
ReplyDeleteNice blog keep posting more
ReplyDeleteAngular course
Angular training
angular certification
angularjs online training
angularjs online course
Angular Online Training
Angularjs Online Training Hyderabad
Angularjs Online Training India
I feel very grateful that I read this. It is very helpful and very informative and I really learned a lot from it. best deal
ReplyDelete