Abstract: ASP.NET Web API 2.0 is the latest version in the WebAPI stack and contains some cool new features. In this article, we will explore some of these new features introduced in ASP.NET Web API 2.0
In its simplest form, a Web API is an API over the web (HTTP). ASP.NET Web API is a framework that allows you to build Web API’s, i.e. HTTP-based services on top of the .NET Framework using a convention based and similar programming model, as that of ASP.NET MVC. These services can then be used in a broad range of clients, browsers and mobile devices.
Two versions of the ASP.NET Web API framework have been released so far, with Web API 2.0 being the latest one. In this article, we will explore some of the new features introduced in ASP.NET Web API 2.0.
If you have never worked with ASP.NET Web API, I recommend you read this article.
When we think about exposing data on the web, we talk about four common operations which we use –
- CREATE
- RETRIEVE
- UPDATE
- DELETE
We call these operations as CRUD operations. HTTP Services provide Four basic HTTP verbs which we can map to our CRUD operations, as described here –
- POST – CREATE
- GET – RETRIEVE
- PUT – UPDATE
- DELETE – DELETE
The idea is by using HTTP Services if you can connect to the web, then any application can consume your data. When the data is pulled or pushed by using HTTP Service, the data is always serialized using JSON (JavaScript Object Notation) or XML.
This article is published from the DotNetCurry .NET Magazine – A Free High Quality Digital Magazine for .NET professionals published once every two months. Subscribe to this eMagazine for Free and get access to hundreds of free tutorials from experts
Well how does the ASP.NET Web API fit here? As already mentioned, ASP.NET Web API allows you to build HTTP Services on top of the .NET Framework. In version 2.0, the Web API framework has been enhanced to support the following features:
- IHttpActionResult return type
- A new Routing Attribute
- Support for Cross-Origin requests using CORS
- Securing ASP.NET Web API using OAuth 2.0
- Support for $expand, $select in OData Service
We will shortly start looking at these new features but first, let’s create a new Web API application. I am using Visual Studio 2013 and SQL Server 2012 for this demonstration
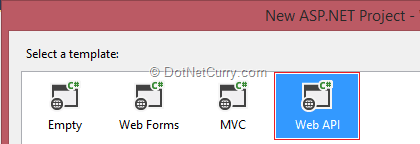
Once your project gets created successfully, we will now create a table in our SQL Server database on which we will perform CRUD operations. The table script is as shown below -
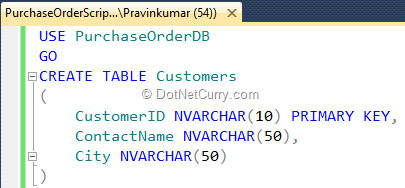
Now insert some dummy data into your table which we can fetch later. Once your table is ready, we will add a new item in our Web API Application by right clicking Web Application in Solution Explorer and add a new item which is “ADO.NET Entity Data Model” with the name “PurchaseOrder” as shown here –

Follow the wizard steps. Choose “Generate from database” > and then choose the connection string for your database. If the connection string is not available, create one and click on the Next button. In the next step, choose the Customers table from the Tables section and click on the Finish button.
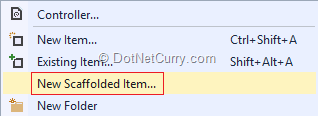
It’s time to implement our logic which will perform CRUD operations using ASP.NET Web API. For this implementation, we will start with the new feature of scaffolding. Right click the controller and choose "New Scaffolded Item" as shown below -
In the next step, choose the controller template. We will choose "Web API 2 Controller Actions, using Entity Framework" and name our controller as CustomerController. Choose a Model class "Customer" and Data Source "PurchaseOrderDBEntities" as shown below -
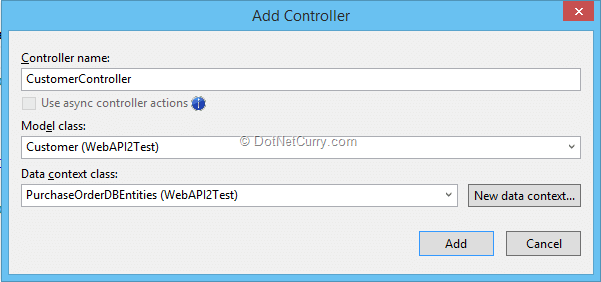
Click on the Add button. Now observe the code generated by the new scaffolding option. It looks similar to the following -
public class CustomerController : ApiController
{
private PurchaseOrderDBEntities db = new PurchaseOrderDBEntities();
{
private PurchaseOrderDBEntities db = new PurchaseOrderDBEntities();
// GET api/Customer
public IQueryable<Customer> GetCustomers()
{
return db.Customers;
}
public IQueryable<Customer> GetCustomers()
{
return db.Customers;
}
// GET api/Customer/5
[ResponseType(typeof(Customer))]
public IHttpActionResult GetCustomer(string id)
{
Customer customer = db.Customers.Find(id);
if (customer == null)
{
return NotFound();
}
[ResponseType(typeof(Customer))]
public IHttpActionResult GetCustomer(string id)
{
Customer customer = db.Customers.Find(id);
if (customer == null)
{
return NotFound();
}
return Ok(customer);
}
}
// PUT api/Customer/5
public IHttpActionResult PutCustomer(string id, Customer customer)
{
if (!ModelState.IsValid)
{
return BadRequest(ModelState);
}
public IHttpActionResult PutCustomer(string id, Customer customer)
{
if (!ModelState.IsValid)
{
return BadRequest(ModelState);
}
if (id != customer.CustomerID)
{
return BadRequest();
}
{
return BadRequest();
}
db.Entry(customer).State = EntityState.Modified;
try
{
db.SaveChanges();
}
catch (DbUpdateConcurrencyException)
{
if (!CustomerExists(id))
{
return NotFound();
}
else
{
throw;
}
}
{
db.SaveChanges();
}
catch (DbUpdateConcurrencyException)
{
if (!CustomerExists(id))
{
return NotFound();
}
else
{
throw;
}
}
return StatusCode(HttpStatusCode.NoContent);
}
}
// POST api/Customer
[ResponseType(typeof(Customer))]
public IHttpActionResult PostCustomer(Customer customer)
{
if (!ModelState.IsValid)
{
return BadRequest(ModelState);
}
[ResponseType(typeof(Customer))]
public IHttpActionResult PostCustomer(Customer customer)
{
if (!ModelState.IsValid)
{
return BadRequest(ModelState);
}
db.Customers.Add(customer);
try
{
db.SaveChanges();
}
catch (DbUpdateException)
{
if (CustomerExists(customer.CustomerID))
{
return Conflict();
}
else
{
throw;
}
}
{
db.SaveChanges();
}
catch (DbUpdateException)
{
if (CustomerExists(customer.CustomerID))
{
return Conflict();
}
else
{
throw;
}
}
return CreatedAtRoute("DefaultApi", new { id = customer.CustomerID }, customer);
}
}
// DELETE api/Customer/5
[ResponseType(typeof(Customer))]
public IHttpActionResult DeleteCustomer(string id)
{
Customer customer = db.Customers.Find(id);
if (customer == null)
{
return NotFound();
}
[ResponseType(typeof(Customer))]
public IHttpActionResult DeleteCustomer(string id)
{
Customer customer = db.Customers.Find(id);
if (customer == null)
{
return NotFound();
}
db.Customers.Remove(customer);
db.SaveChanges();
db.SaveChanges();
return Ok(customer);
}
}
}
}
IHttpActionResult Return type
The first change which you will observe is that the controllers have a return type of IHttpActionResult. In the previous version, we would return an object or set the return type to void for methods like Post, Put and Delete. In these situations, Web API converted the same to HttpResponseMessage. In ASP.NET Web API 2.0, now we have one more option which is implementing IHttpActionResult. It helps you to construct and format your response message by giving instructions which you want the Web API to follow. It also provides a couple of helper methods like -
- NotFound() - When you want to return a 404 error
- Ok() - Generates the result with the specified object
- Conflict() - Creates a 409 Conflict result
A new Routing Attribute
ASP.NET Web API 2.0 now supports routing configuration at Web API method level or at the Controller level using a Route attribute. The question is why would I use the new [Route] attribute? Earlier, in Web API 1.0, we configured routing at a central location. For example, we would configure routing in the Global.asax Application_Start event as shown below -

This technique of routing was the default option while working with Web API 1.0 and works perfectly fine when you have simple routing rules. But when it comes to complex routing and custom routing, this approach becomes hard to configure. Also when it comes to applying constraints on Routes, you usually end up with writing multiple routes.
Instead of writing routes in the Register method or Application_Start method, we can define the route on a controller's method. Change your GetCustomers() method in the controller using [Route] attribute -
[Route("api/customers")]
public IQueryable<Customer> GetCustomers()
{
return db.Customers;
}
public IQueryable<Customer> GetCustomers()
{
return db.Customers;
}
The output of the above route will look like the following -
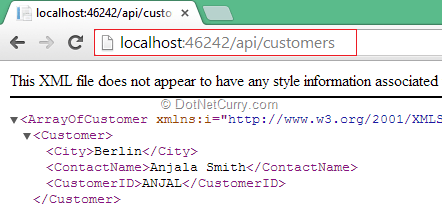
If you are eager to see how this differs from V 1.0, here’s a comparison:
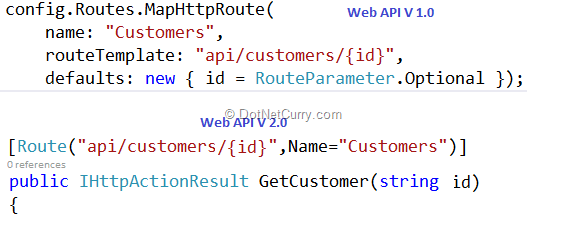
Microsoft has defined the routing configuration on a Web API method with a single line syntax. It also allows us to configure various options while using [Route] attribute. For example, check the following options.
Routing with Constraints - Earlier we use to implement a separate class for constraints which you would have to then configure with the routes. But now using the [Route] attribute, you can define basic constraints like -

The above route will match the customerid parameter in lower case or upper case alphabets characters.
Default Values with Route - We can also specify default values for the routes as shown below -
Route with Optional Values – Similarly, we can also configure route with optional values as shown below -
Route Names - Names can be provided to our routes as shown below -
As you might have observed, the [Route] attribute has brought a bunch of new flexibilities in Web API 2.0 and is very helpful to ease the Web API development in today's era of HTTP Service programming.
RoutePrefix
When you perform routing, your route prefix will always be common. For example, in our case "api/customers". You can use [RoutePrefix] attribute at a Controller level as shown below -

Test the [RoutePrefix] attribute and you will see the same output. In some cases, you may want to override the default route prefix, in which case you can make use of [~] operator to do so. For example -

You can also define optional parameters with route using [?]. But if you are using optional parameters, then you will have to provide the default value to the parameter. There are some other options as well which you can use with [Route] attribute like Route Order and Route Names. Try them out to see what they do.
Cross Origin Resource Sharing [CORS] -
Another new feature introduced in ASP.NET Web API 2.0 is Cross Origin Resource Sharing [CORS]. Let's talk about why we should think about using this new feature. AJAX request to HTTP services can be made only from URLs of the same Origin. For example if your web services are hosted on http://myservices:8080/api/ then the browser will allow applications hosted on http://myservices:8080/ to make AJAX calls to these services. But services/web applications hosted on http://myservices:8081/ or any other port for that matter, cannot access the HTTP resource/api over AJAX. This limitation is the default browser behaviour for security reasons.
However, W3C has a CORS spec that outlines the ‘rules and regulations’ to enable Cross Origin Resource Sharing aka CORS. ASP.NET MVP Brock Allen built CORS support for Thinktecture, which was later pulled into ASP.NET Web API core and is now available in Web API 2.0.
We will see Cross Origin Resource Sharing (CORS) feature with a simple example. Let's add a new project using another Visual Studio instance which will be an Empty ASP.NET Application. This application will try to fetch data from our Web API which we just built a short while ago.
Once your Web Application is ready, add an HTML page and design the page as shown here -
<!DOCTYPE html>
<html lang="en">
<head>
<title>CORS Example</title>
</head>
<body>
<div id="XMLCustomers"></div>
</body>
</html>
<html lang="en">
<head>
<title>CORS Example</title>
</head>
<body>
<div id="XMLCustomers"></div>
</body>
</html>
Add the jQuery library using NuGet package and then add a reference to the jQuery library in your HTML page. Write the following code in our HTML page -
<script src="Scripts/jquery-2.0.3.min.js"></script>
<script>
$(function () {
var webAPIUri = "http://localhost:50008/api/customers";
$.ajax({
url: webAPIUri
}).done(function (data) {
$('#XMLCustomers').text($.parseJSON(data));
}).error(function (jqXHR, textStatus, errorThrown) {
$('#XMLCustomers').text(jqXHR.responseText || textStatus);
});
});
</script>
If your run your application, you will receive an error. You can check this in the Developers tool of a browser of your choice.
XMLHttpRequest cannot load http://localhost:46242/api/customers. No 'Access-Control-Allow-Origin' header is present on the requested resource. Origin 'http://localhost:48995' is therefore not allowed access.
So to accessing this service, we have to enable CORS in our Web API. We will add the CORS Package using NuGet package as shown below -
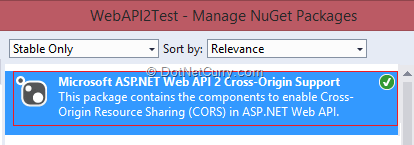
Once you install CORS, we will open the WebApiConfig class which is located in the App_Start folder and enable CORS in the Register method as shown here -

We will now add [EnableCors] attribute in our CustomersController as shown below -

To test the client, we will run the application and now you should be able to access data as shown here -

You can enable CORS at the Action level or in all Controllers in your Web API Application as well. You can also write a custom CORS policy for better control on your Web APIs.
Web API Authentication using OAuth -
The next feature we will discuss is authenticating Web API 2.0 using an External Authentication Service like Facebook, Google, Twitter or Microsoft Account.
What is OpenID and OAuth?
We will start our discussion by first understanding what is OpenID and OAuth. I have taken this explanation from DotNetCurry’s author Sumit’s article on Real World OAuth which I feel is perfect to explain OAuth and OpenID.
At a 100K feet level, both are Authentication protocols that work towards a Single Sign-On model. Basic premise being, instead of having to remember a different username and password for every application we visit on the internet, we have a dedicated Authentication provider with whom we can register our user name and password. Applications (aka Relying Party) redirect us to this provider for authentication and after a successful authentication; the provider passes back a token to the replying party who initiated the request. The target Application then uses the token to verify the identity of the person and provide further access to Application Features.
OAuth was initiated by Twitter when they were working on building their OpenID implementation for Twitter API. Their need was more towards controlling what features to make available based on Authentication Types offered at the Provider and those sought by the relying party.
For example when a Relying party signs up for Twitter Authentication access, they can request for a Read-Only connection (this gives them read permissions to a user’s stream), a Read/Write connection (this gives them read and write permissions on a user’s stream) and a Read/Write with Direct Messages connection (giving them maximum possible access to user’s data). Thus, when a user authenticates with Twitter over OAuth, they are told exactly what kind of access they are providing.
On the other hand, OpenID simply ensures that you are who you claim to be by verifying your username and password. It has no way of controlling feature access.
In even simpler terms and for the sake of explanation, OpenID is about Authentication, OAuth is about Authentication and Authorization (for features at the Provider).
Shown here is an architecture of External Authentication using OAuth 2.0 -
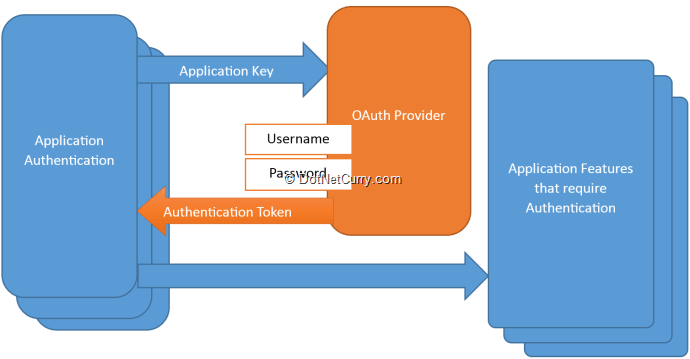
The diagram above demonstrates the Authentication process for an OAuth provider. The overall workflow is as follows:
1. Application (Relying Party) registers with OAuth provider and obtains an Application specific key (secret). This is a one-time process done offline (not shown in above image).
2. Next the Application (Relying Party) has to pass the Application key to the provider every time it intends to authenticate someone.
3. User of the Relying Party needs to be registered with the Provider (again a one-time offline process)
4. Every authentication request directs the user to the Auth Provider’s site. The user enters the Username and Password that they obtained by creating an account with the provider. The Provider verifies the account credentials, then it matches the Application Key and provides a token back to the Relying Party with which only the Authorized actions can be performed.
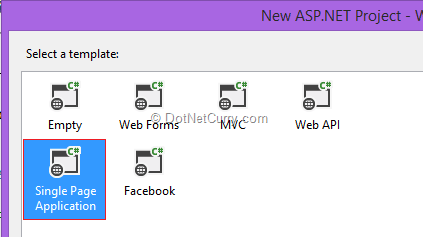
With this OpenID and OAuth basics cleared, let’s configure a Facebook account to authenticate our Web API using OAuth. To start with, we will create an ASP.NET SPA [Single Page Application] application as shown below -
To use Facebook authentication, we will have to create a Facebook developer account. Then you will have to grab the Application ID and secret key. So, let's login to " https://developers.facebook.com/". Then create a Facebook app as shown below -
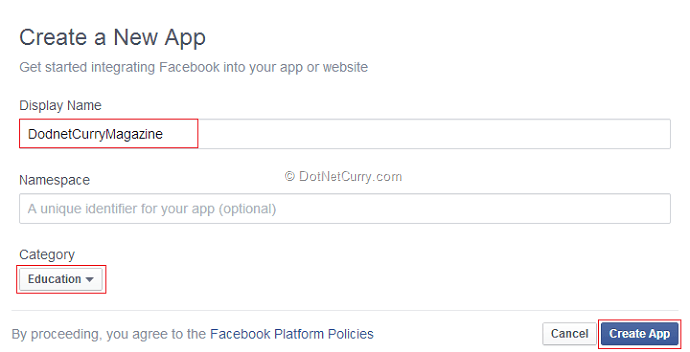
Copy the Application ID and Secret Key in a notepad from the Dashboard as shown below -

Go back to Visual Studio and open Startup.Auth.cs file. Go to ConfigureAuth method and uncomment the "UseFacebookAuthentication" method. Copy the App ID and Secret ID from the notepad. After performing this step, go to Settings and click on the Add Platform button. Choose Web Site and paste the URL of your site and Save the changes.
Now run your application. You should see a Local Account to login as well as a Facebook login at right hand side. Click on the Facebook button. It will now ask you to login with your Facebook account. Once you have successfully logged in, you will see a page similar to the following -
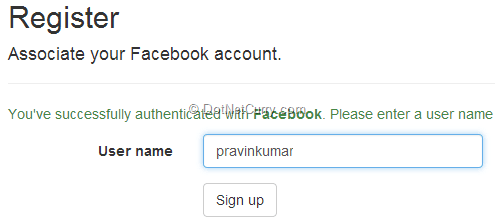
Here you can choose your User Name to login and once authenticated, you will see your Home page.
$Select and $expand Operator support in OData Services -
ASP.NET Web API 2.0 has expanded the support for OData by introducing $select and $expand query operators for querying the data. Let's talk about how these operators will help us in querying.
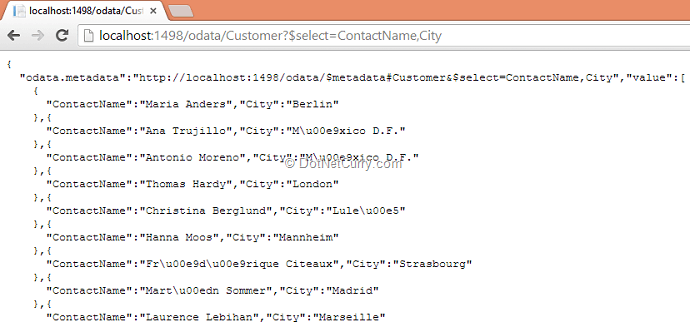
1. $select Operator - This operator is used to select subset of properties. For example if we are querying the Customer Entity, we can use $select operator to fetch only required properties like CustomerID, ContactName and City.
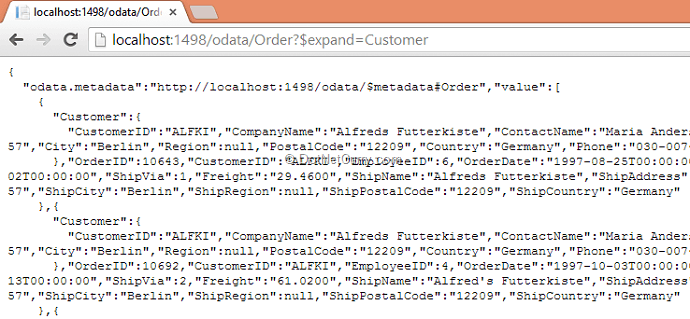
2. $expand Operator - This operator allows us to select the related entities, with the entity being retrieved. For example, while retrieving the Customer entity we can also retrieve the related Orders placed by the Customers. Often, you will use $expand operator with $select operator.
To test the $expand, $select in OData services, we will create a new web application. First we will install the OData package using Package Manager Console. Use the following command to install the OData package –
Install-Package Microsoft.AspNet.WebApi.OData
Once the package is installed successfully, add a "ADO.NET Entity Data Model" and connect it with Northwind database. Also add three tables, Customers, Employees and Orders. The model should look like the following -
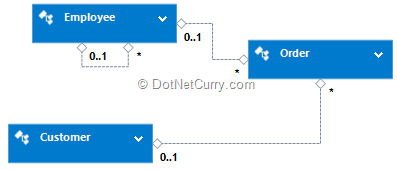
After adding the ADO.NET Data Model, we will add a Scaffold Item by choosing "Web API 2 OData Controller with actions, using Entity Framework" and configure the same as shown here -
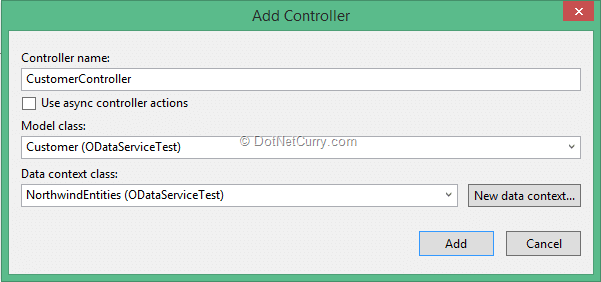
The CustomerController contains the code for the CRUD operations. Similarly create controllers for Employees and Orders as well. Open "WebApiConfig.cs" file from App_Start folder. Import a namespace "using System.Web.Http.OData.Builder" and add the following code in the Register method -

It is time to test our Web API OData Service. Type the url localhost:[portnumber]/odata/Customer in a browser. You will see the following output -
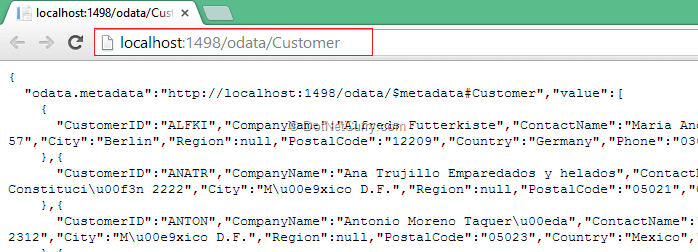
We will now test the new features of Web API 2 OData service. First option is how to use $select. $select allows us to select subset of properties. For example, instead of selecting all the columns of Customers table, let's select some of them as shown here -
$expand allows us to select related entities to be selected as shown below -
And that’s it!
Conclusion
In this article, we have seen a couple of new features introduced in ASP.NET Web API 2.0 which includes new Scaffolding options, IHttpActionResult return type, [Route] attribute, CORS support, securing Web API using External Authentication with OAuth service and using the new operators $select and $expand while querying OData services.
Make sure you use these new features to convert your Web API 1.0 code to 2.0
No comments:
Post a Comment