Abstract: ASP.NET MVC 5 is the latest version of the popular ASP.NET MVC technology that enables you to build dynamic websites using the Model-View-Controller technology, with an emphasis on a clean architecture, test-driven development and extensibility. This detailed article gives you a quick overview of what's new in ASP.NET MVC version 5 and how best to apply these new features in your projects.
The ASP.NET MVC 5 Framework is the latest update to Microsoft’s popular ASP.NET web platform. It provides an extensible, high-quality programming model that allows you to build dynamic, data-driven websites, focusing on a cleaner architecture and test-driven development.
ASP.NET MVC 5 contains a number of improvements over previous versions, including some new features, improved user experiences; native support for JavaScript libraries to build multi-platform CSS and HTML5 enabled sites and better tooling support.
This article focuses on new features of ASP.NET MVC 5.0. If you are new to the ASP.NET MVC, go through this article before moving ahead.
In this article, we will be taking an overview of some of the exciting new fundamental features of MVC 5:
- Scaffolding
- ASP.NET Identity
- One ASP.NET
- Bootstrap
- Attribute Routing
- Filter Overrides
Some of these features like ASP.NET Identity etc are not exactly new features of the core MVC 5 framework, but are worth looking at, as they directly affect/change the way we create MVC 5 applications.
This article is published from the DotNetCurry .NET Magazine – A Free High Quality Digital Magazine for .NET professionals published once every two months. Subscribe to this eMagazine for Free and get access to hundreds of free .NET tutorials from experts
Scaffolding
Visual Studio 2013 includes a new Scaffolding Framework for ASP.NET MVC 5 and the ASP.NET Web API 2. Simply put, Scaffolding is a code generation framework provided for ASP.NET Web Applications. Using this framework, you can quickly generate code that interacts with your data models. This feature reduces the amount of time required to build MVC application with standard data operations. Scaffolding uses code-first approach for data operations.
Note: Visual Studio 2013 does not currently support generating pages for an ASP.NET Web Forms project. The only way out is to add MVC dependencies to your Web Forms project and then use Scaffolding.
Let’s quickly explore Scaffolding in ASP.NET MVC 5.
Step 1: Open VS 2013 and create an ASP.NET MVC application with the name MVC5_Scaffolding. In the model folder, add a new class file with the name Product.cs and add the following class definition in it:
using System.ComponentModel.DataAnnotations;
namespace MVC5_Scaffolding.Models
{
public class Product
{
[Key]
public int Id { get; set; }
public string ProdName { get; set; }
public int ProdPrice { get; set; }
}
}
namespace MVC5_Scaffolding.Models
{
public class Product
{
[Key]
public int Id { get; set; }
public string ProdName { get; set; }
public int ProdPrice { get; set; }
}
}
Note that the class Product defines an Id property with the Key attribute representing a unique identification of the Product entity.
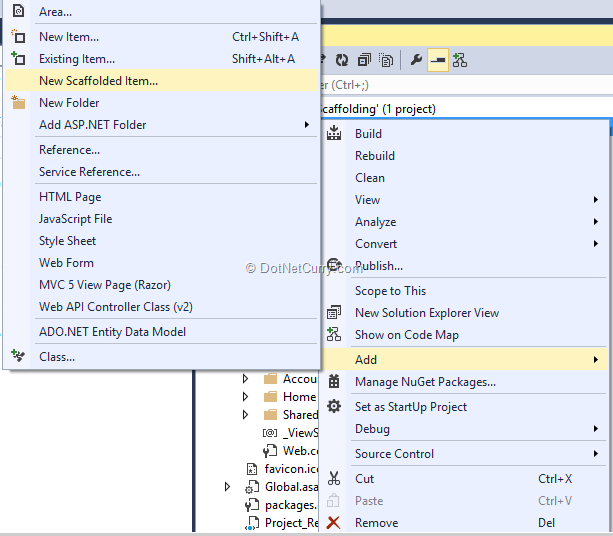
Step 2: In the project, right-click and select Add > New Scaffolded item as shown here:
A window for Add Scaffold will be displayed
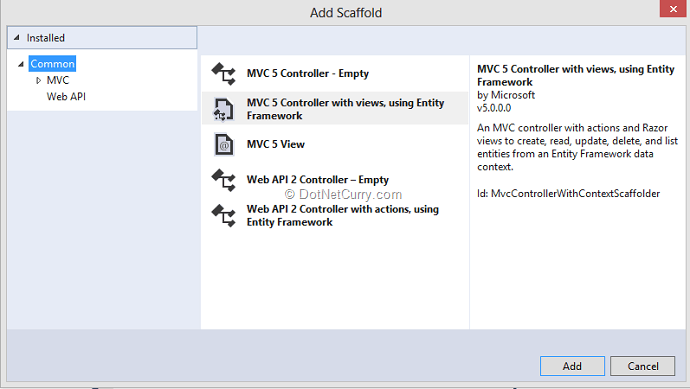
Select the scaffold for MVC 5 Controller with views, using Entity Framework as shown in the screenshot. After clicking the Add button, you should see a window similar to the following:
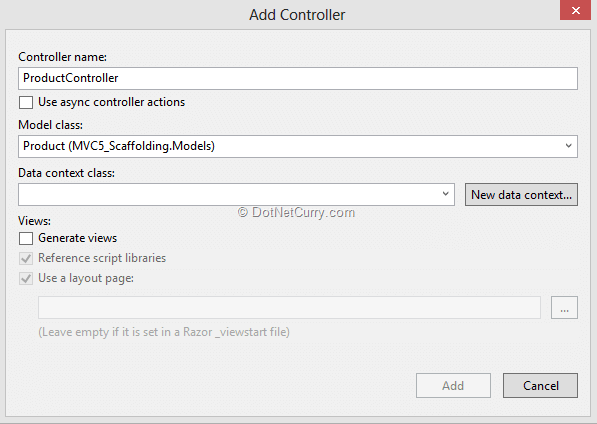
Select the model class from the dropdown. Now to generate the Data Context, click on ‘New Data Context’. A window is displayed where the context class name needs to be entered:

Click on Add and the control will go back to the Add Controller window where you have to check theGenerate Views checkbox as shown here:
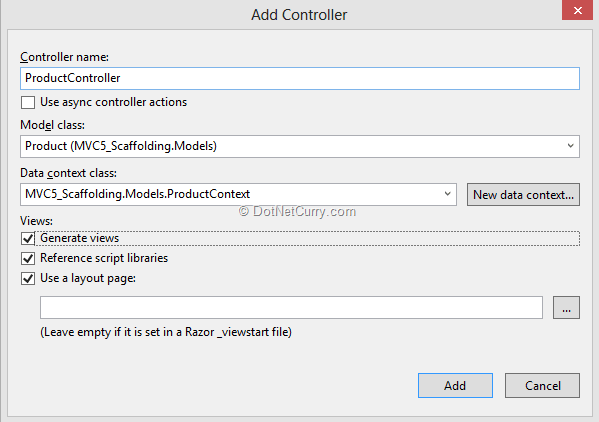
This step will add the ProductController, ProductContext classes and Product folder in Views folder with views for data operations:
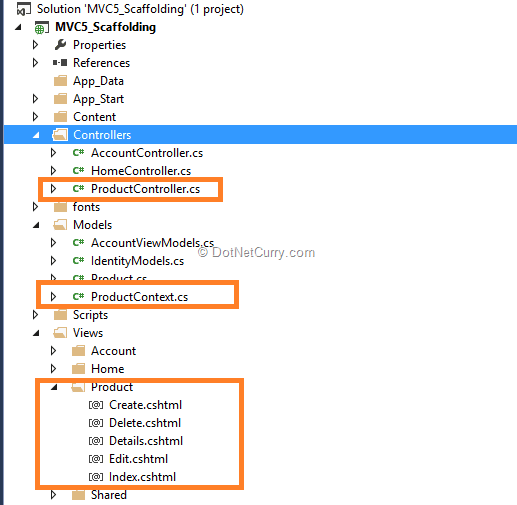
This step will also add a connection string of the name ProductContext in the web.config file. The code for the Product context class will be as shown here:
public class ProductContext : DbContext
{
public ProductContext()
: base("name=ProductContext")
{
}
public System.Data.Entity.DbSet<MVC5_Scaffolding.Models.Product> Products { get; set; }
}
{
public ProductContext()
: base("name=ProductContext")
{
}
public System.Data.Entity.DbSet<MVC5_Scaffolding.Models.Product> Products { get; set; }
}
The context class uses Code-First approach and creates a table of the name Product using DbSet<T> object of the EntityFramework. The Product Controller class interacts with the ProductContext class for performing CRUD operations using the views generated. Hence Scaffolding reduces the time for developing MVC data oriented applications.
ASP.NET Identity
In earlier days of ASP.NET 2.0 programming, a membership provider approach was introduced. This allowed the application to store user’s data in a SQL Server database. This membership model has changed over the years. The notion that a user can log-in by only using a user-name and password registered in the application, can now be ignored. In today’s world, the web has become more social and users connect to each other, and with applications, using social sites like Facebook, Twitter etc. So considering these social integrations, web applications too need to be enhanced to allow users to log-in using their social media credentials.
To get this done, the modern membership framework is now extended to integrate with social credentials and for this purpose, ASP.NET Identity has been introduced. The advantages of the ASP.NET Identity are explained here:
- One ASP.NET Identity System: Can be used across all the ASP.NET Frameworks like WebForms, MVC, Web Pages, Web API, SignalR etc.
- Ease of plugging-in profile data about the user: The user’s profile schema information can be integrated with the web application.
- Persistence Control: ASP.NET Identity system stores all user information in the database.
- Social Login Provider: Social log-in providers such as Microsoft Account, Facebook, Twitter, Google, and others can be easily added to the web application.
- Windows Azure Active Directory (WAAD): The Login-in information from WAAD can also be used for authenticating a web application.
- OWIN Integration: ASP.NET Identity is fully compliant with OWIN Framework. OWIN Authentication can be used for login. If you are new to OWIN, read this article.
All these features in the ASP.NET Identity membership system are available if you are using Visual Studio 2013. Alternatively, you can also obtain it via NuGet packages Microsoft.Aspnet.Identity.Core and Microsoft.Aspnet.Identity.EntityFramework.
One ASP.NET
One ASP.NET is a new unified project system for .NET Web Developers. This system makes it easier to work with multiple frameworks like Web Forms, MVC, Web API etc., in a single project. So essentially using the One ASP.NET project system, you can use ASP.NET Web Forms and MVC together, and can easily add ASP.NET Web API and SignalR too; in the same Web application.
In Visual Studio 2013, the ASP.NET MVC project template integrates with this new system. One of the useful features while creating a MVC project is that the authentication mechanism can be configured.
Step 1: Open VS 2013 and select File > New > Project, select Web from installed template as below:
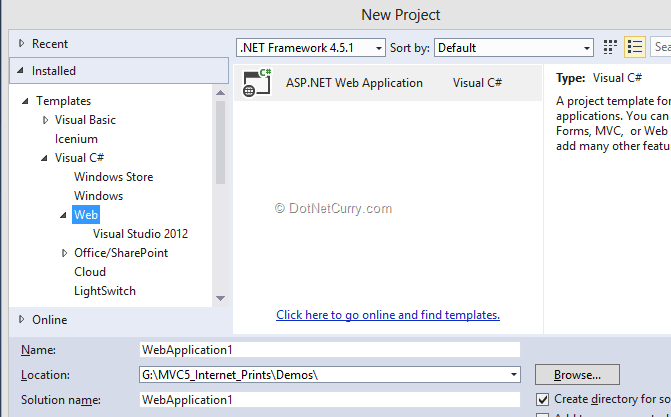
Step 2: Make sure that .NET Framework 4.5.1 is selected; click OK and the following window comes up
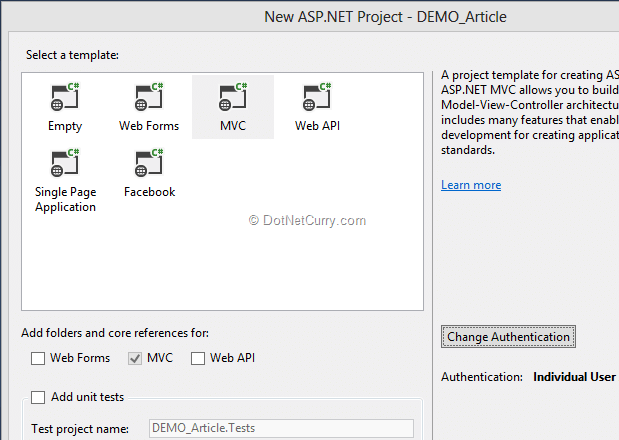
As you can see, a New ASP.NET Project window displays various Web Templates, and based upon the selection of template, the necessary references will get added in the project. Checkboxes indicates the necessary folder structure and core references for the project.
Step 3: Click on Change Authentication and the authentication provider windows will be displayed:
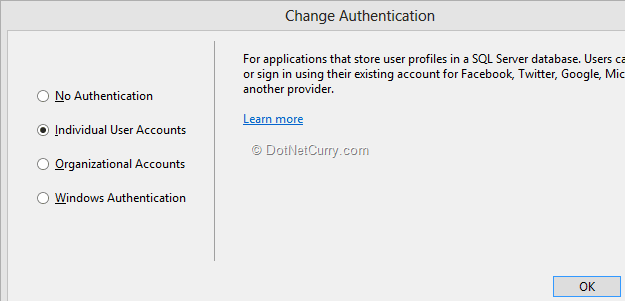
There are four different authentication types that can be set for the application:
1. No Authentication: The application does not require authentication.
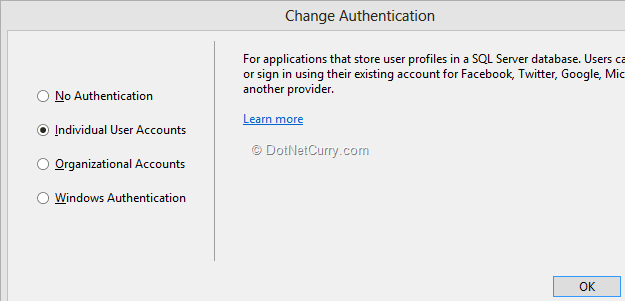
2. Individual User Accounts: SQL Server database is used to store user profile information. This authentication can also be extended to provide the end-user with the option to make use of their social profiles like Facebook, Google, Microsoft, Twitter or any other customized provider.
3. Organizational Accounts: The application can authenticate users using the user profiles stored in Active Directory, Windows Azure Active Directory, or Office 365. This provides Single Sign-on access level to the application. The Organizational Accounts require the following details:
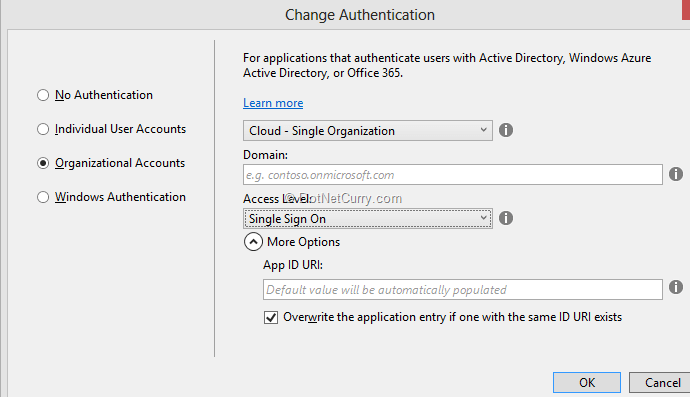
Here the application can be configured for:
- Cloud-Single Organization
- Cloud-Multi Organization – This and the previous one can be used when the user authentication information is stored on the Windows Azure Activity Directory (WAAD)
- On-Premises - Used for the Active Directory on-premises.
- Domain - The WAAD domain for setting application in it.
- Access Level - The application needs to query or update directory information.
- Application ID URI - Created by appending the project name to the domain.
4. Windows Authentication: Used for intranet applications.
Enough theory, let’s see an example!
Using Google Authentication for MVC 5 Application
Let’s design an ASP.NET MVC 5 application which will enable users to log in using an external authentication provider like Google.
Step 1: Open Visual Studio 2013 and create a MVC application. Select Individual User Accounts from the change authentication window as shown here:
Step 2: To enable Google Open ID provider, open the Startup.Auth.cs file from App_Start folder. From the ConfigureAuth method of Startup class, uncomment the GoogleAuthentication method call as shown here:
public void ConfigureAuth(IAppBuilder app)
{
// Enable the application to use a cookie to store information for the signed in user
app.UseCookieAuthentication(new CookieAuthenticationOptions
{
AuthenticationType = DefaultAuthenticationTypes.ApplicationCookie,
LoginPath = new PathString("/Account/Login")
});
// Use a cookie to temporarily store information about a user logging in with a third party login provider
app.UseExternalSignInCookie(DefaultAuthenticationTypes.ExternalCookie);
{
// Enable the application to use a cookie to store information for the signed in user
app.UseCookieAuthentication(new CookieAuthenticationOptions
{
AuthenticationType = DefaultAuthenticationTypes.ApplicationCookie,
LoginPath = new PathString("/Account/Login")
});
// Use a cookie to temporarily store information about a user logging in with a third party login provider
app.UseExternalSignInCookie(DefaultAuthenticationTypes.ExternalCookie);
// Uncomment the following lines to enable logging in with third party login providers
app.UseGoogleAuthentication();}
Step 3: Run the application; from the Home menu, click on Log In. In the Login view, the Use another service to log in option will be displayed:

Google provider is now enabled for the application! Once the Google button is clicked, the Google Login page will be displayed where the credential information (Gmail ID/Password) needs to be entered. The URL on the Google login page contains openid2. This means that Google credentials will be used to login to the site. After entering the credential information, the web application will demand the following permissions:
- View your email address
- View basic information about your account.
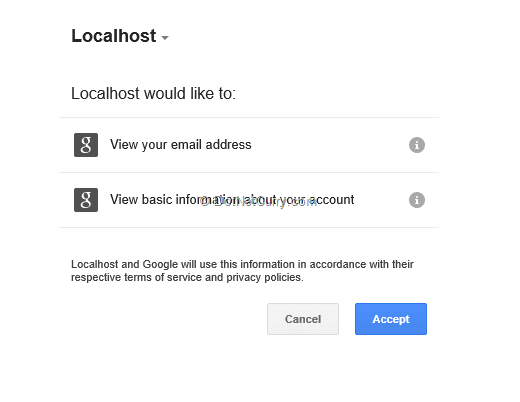
Once the Accept button is clicked, the Register view will be displayed as shown below:

This step registers your Gmail credentials with the web site you just created. ASP.NET MVC 5 uses the code-first approach for creating database for storing user’s login information. Go to the App_Data folder, a database file of name aspnet-(your application name)-yyyymmdd<applicationid>.mdf will be generated. Open this file in the Server Explorer. In this database, the AspNetUserLogins table will be created. View data from this table and you will find the following information:

Likewise, other authentication providers like Facebook, Microsoft, Twitter can also be used!
I would strongly recommend you read the ASP.NET MVC 5 Authentication Filters article by Raj Aththanayake where he explores the new IAuthenticationFilter in ASP.NET MVC 5 and explains the CustomAuthentication attribute and how you can use to change the current principal and redirect un-authenticated user to a login page.
Bootstrap
In Visual Studio 2013, Twitter Bootstrap is added as the default user interface framework for an MVC application. Bootstrap is a free collection of HTML and CSS based design templates created at Twitter for designing forms, navigation, buttons, tables etc. Bootstrap can be downloaded from here. The advantage of Bootstrap is that it is used for rapid development of Responsive user interface using basic HTML and CSS based templates. In the MVC 5 project, bootstrap.js and bootstrap.css is already present:

In the MVC 5 project open _Layout.cshtml and you will find a <div> tag under the <body> element as seen here:
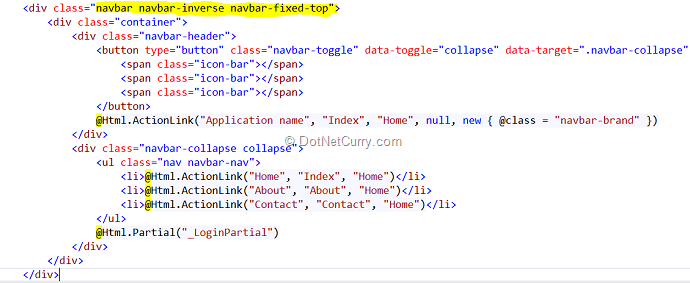
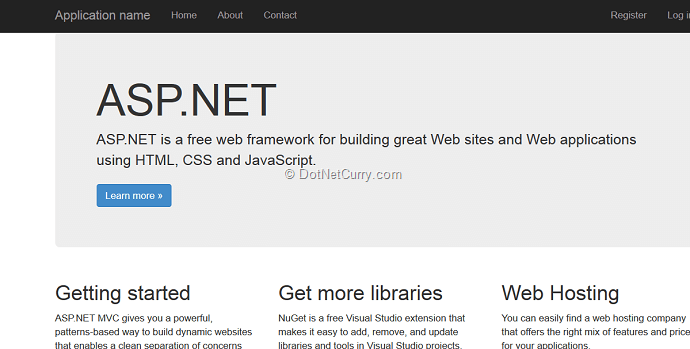
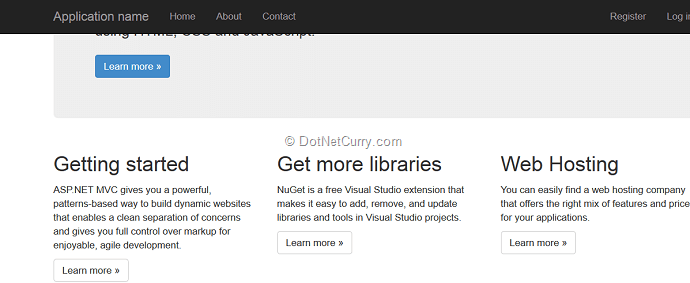
Observe that the <div> tag is decorated with CSS classes like navbar, navbar-inverse, navbar-fixed-top. These classes are declared in the bootstrap.css and it means that the navigation bar showingApplication name, Home, About and Contact is displayed on the top with fixed position, so even when the page is scrolled down; the Navigation bar will be fixed on the top as shown here:
Navigation Bar at the beginning of the page:
After the page scrolls down, the Navigation bar location is still fixed to the top:
Since Bootstrap promotes Responsive Web Design, if the browser resolution is changed, say to emulate a Phone width, then the page accordingly changes its display to the following:
Observe that there are no Navigation Menu Items you saw earlier. If you click on the browse icon (marked with yellow color) in the right corner, then the Navigation will be displayed:
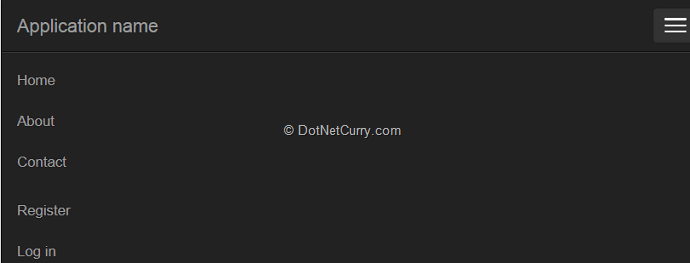
The nice part here is that the layout is changed automatically; this is the magic and advantage of using Bootstrap.
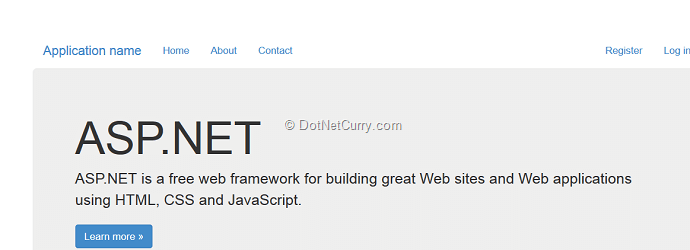
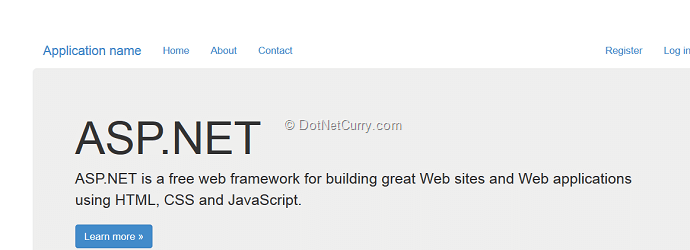
Try by removing the classes applied to the navigation bar for the <div>. You will see that the page appears as shown below:
Similarly Bootstrap can also be used for creating nice looking forms using the styles defined in the bootstrap.css. Using Styles like control-label, form-horizontal, rendering can be managed. Consider aCreate Form for the Customer. The cshtml view markup with style classes generated is as shown here:
<div class="form-horizontal">
<h4>Customer</h4>
<hr />
@Html.ValidationSummary(true)
<h4>Customer</h4>
<hr />
@Html.ValidationSummary(true)
<div class="form-group">
@Html.LabelFor(model => model.CustId, new { @class = "control-label col-md-2" })
<div class="col-md-10">
@Html.EditorFor(model => model.CustId)
@Html.ValidationMessageFor(model => model.CustId)
</div>
</div>
@Html.LabelFor(model => model.CustId, new { @class = "control-label col-md-2" })
<div class="col-md-10">
@Html.EditorFor(model => model.CustId)
@Html.ValidationMessageFor(model => model.CustId)
</div>
</div>
<div class="form-group">
@Html.LabelFor(model => model.CustName, new { @class = "control-label col-md-2" })
<div class="col-md-10">
@Html.EditorFor(model => model.CustName)
@Html.ValidationMessageFor(model => model.CustName)
</div>
</div>
@Html.LabelFor(model => model.CustName, new { @class = "control-label col-md-2" })
<div class="col-md-10">
@Html.EditorFor(model => model.CustName)
@Html.ValidationMessageFor(model => model.CustName)
</div>
</div>
<div class="form-group">
@Html.LabelFor(model => model.Address, new { @class = "control-label col-md-2" })
<div class="col-md-10">
@Html.EditorFor(model => model.Address)
@Html.ValidationMessageFor(model => model.Address)
</div>
</div>
@Html.LabelFor(model => model.Address, new { @class = "control-label col-md-2" })
<div class="col-md-10">
@Html.EditorFor(model => model.Address)
@Html.ValidationMessageFor(model => model.Address)
</div>
</div>
<div class="form-group">
@Html.LabelFor(model => model.City, new { @class = "control-label col-md-2" })
<div class="col-md-10">
@Html.EditorFor(model => model.City)
@Html.ValidationMessageFor(model => model.City)
</div>
</div>
@Html.LabelFor(model => model.City, new { @class = "control-label col-md-2" })
<div class="col-md-10">
@Html.EditorFor(model => model.City)
@Html.ValidationMessageFor(model => model.City)
</div>
</div>
<div class="form-group">
@Html.LabelFor(model => model.Email, new { @class = "control-label col-md-2" })
<div class="col-md-10">
@Html.EditorFor(model => model.Email)
@Html.ValidationMessageFor(model => model.Email)
</div>
</div>
@Html.LabelFor(model => model.Email, new { @class = "control-label col-md-2" })
<div class="col-md-10">
@Html.EditorFor(model => model.Email)
@Html.ValidationMessageFor(model => model.Email)
</div>
</div>
<div class="form-group">
@Html.LabelFor(model => model.ContactNo, new { @class = "control-label col-md-2" })
<div class="col-md-10">
@Html.EditorFor(model => model.ContactNo)
@Html.ValidationMessageFor(model => model.ContactNo)
</div>
</div>
@Html.LabelFor(model => model.ContactNo, new { @class = "control-label col-md-2" })
<div class="col-md-10">
@Html.EditorFor(model => model.ContactNo)
@Html.ValidationMessageFor(model => model.ContactNo)
</div>
</div>
<div class="form-group">
<div class="col-md-offset-2 col-md-10">
<input type="submit" value="Create" class="btn btn-default" />
</div>
</div>
</div>
<div class="col-md-offset-2 col-md-10">
<input type="submit" value="Create" class="btn btn-default" />
</div>
</div>
</div>
In the mark-up, the style class control-label is passed to each label helper with its column location; so if the view is rendered in the browser, it will look like the following:
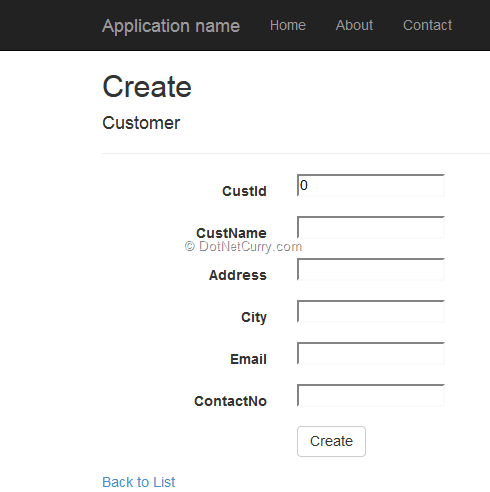
The label and its corresponding textbox is arranged in a single horizontal row. If all styles applied in the mark-up are removed, then the view will be displayed as shown below:
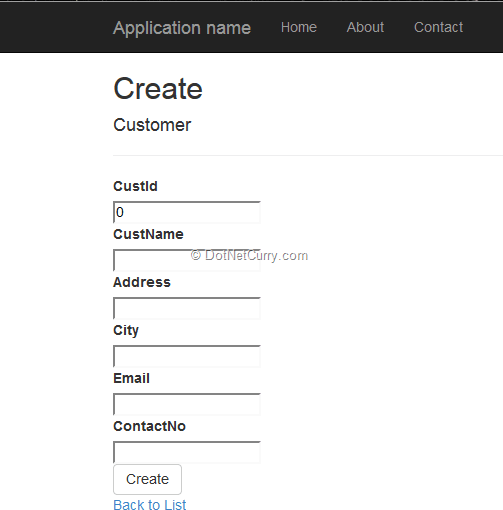
Similarly, the bootstrapper.js file provided in the script folder contains plenty of useful jQuery code which provides interactive components/plugins in a single file. Note that all plugins depend on jQuery (this means jQuery must be included before the plugin files).
One of the nicest feature provided is this file is the support for modal boxes, for which earlier a separate plugin using jQuery UI was needed (jQuery UI dialog). Now components like the Modal boxes can easily be used in our websites using just bootstrap.js and the bootstrap.css. Consider the view below:
<!--The button with the bootstrap class applied on it-->
<div>
<button class="btn btn-danger" id="showmodalbox">Show Model</button>
</div>
<div>
<button class="btn btn-danger" id="showmodalbox">Show Model</button>
</div>
<!--The Modal box defined using class modal-->
<div id="modalbox" class="modal">
<div class="modal-dialog">
<div class="modal-content">
<div class="modal-header">
<h1> The Modal box</h1>
</div>
<div class="modal-body">
<h6>The Modal box body</h6>
</div>
<div class="modal-footer">
<button class="btn btn-default" data-dismiss="modal">Close</button>
<button class="btn btn-primary">Ok</button>
</div>
</div>
</div>
</div>
<!--end here-->
<!--end here-->
@section scripts{
<script>
//The script read the modalbox element and define the
//modal on it using modal method and calls its "show state"
$(function () {
var modelbox = function () {
$("#modalbox").modal("show");
};
$("#showmodalbox").click(modelbox);
});
</script>
}
<script>
//The script read the modalbox element and define the
//modal on it using modal method and calls its "show state"
$(function () {
var modelbox = function () {
$("#modalbox").modal("show");
};
$("#showmodalbox").click(modelbox);
});
</script>
}
In the mark-up and script code, the <div> on the top defines a button which uses the CSS class btn-danger defined in the bootstrap.css. The modal box is defined using <div> with id modalbox. The <div> with class modal-dialog defines a modal using modal-header, modal-content and modal-footer. The modal footer contains a button which contains the data-dismiss attribute. This enables the modal dialog to close when the button is clicked. The script will show the modal dialog when the Show Modalbutton is clicked.
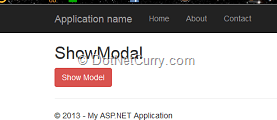
Click on the Show Modal button and a Modal box appears

The Close button here is used to close the modal dialog. Similarly you can write some code in the OK button too.
Hence in MVC 5, with native support of the popular Bootstrap JavaScript library, a developer has a wider range of multi-platform CSS and HTML5 options, than ever before.
Attribute based Routing
The beauty of MVC is in its routing feature. Routing is how ASP.NET MVC matches a URL to an action. In earlier versions of MVC, the routing expressions were provided in the Global.asax class in Application_start event. (Note: In MVC 4, a separate class of name RouteConfig is provided in the App_Start folder.) The route expression set in MVC 4 is similar to the following:
public static void RegisterRoutes(RouteCollection routes)
{
routes.IgnoreRoute("{resource}.axd/{*pathInfo}");
routes.MapRoute(
name: "Default",
url: "{controller}/{action}/{id}",
defaults: new { controller = "Home", action = "Index", id = UrlParameter.Optional }
);
}
{
routes.IgnoreRoute("{resource}.axd/{*pathInfo}");
routes.MapRoute(
name: "Default",
url: "{controller}/{action}/{id}",
defaults: new { controller = "Home", action = "Index", id = UrlParameter.Optional }
);
}
In this code, the defaults are already set to Home controller and its Index action method. This means that when a new URI is requested through the browser addressbar, this expressions has to be re-generated for controller other than Home.
Why to use Attribute Routing?
In MVC 5, to have more control over the URIs of a Web application, we can implement the route definition along with the action methods in the controller class, using attributes. In other words, we use attributes to define routes. To enable attribute based routing, the RegisterRoutes method needs to be changed to the following:
public static void RegisterRoutes(RouteCollection routes)
{
routes.IgnoreRoute("{resource}.axd/{*pathInfo}");
routes.MapMvcAttributeRoutes();
routes.MapRoute(
name: "Default",
url: "{controller}/{action}/{id}",
defaults: new { controller = "Home", action = "Index", id = UrlParameter.Optional }
);
}
{
routes.IgnoreRoute("{resource}.axd/{*pathInfo}");
routes.MapMvcAttributeRoutes();
routes.MapRoute(
name: "Default",
url: "{controller}/{action}/{id}",
defaults: new { controller = "Home", action = "Index", id = UrlParameter.Optional }
);
}
Implementation of Attribute Routing
Step 1: Open Visual Studio 2013 and create a new MVC application, name it as ‘MVC5_Attributebased_Routing’. In the Models folder add a new class file, name it as ‘ModelRepository.cs’ and add the following classes in it:
using System.Collections.Generic;
namespace MVC5_Attributebased_Routing.Models
{
public class Customer
{
public int CustId { get; set; }
public string CustName { get; set; }
public string Address { get; set; }
public string City { get; set; }
public string Email { get; set; }
public string ContactNo { get; set; }
{
public class Customer
{
public int CustId { get; set; }
public string CustName { get; set; }
public string Address { get; set; }
public string City { get; set; }
public string Email { get; set; }
public string ContactNo { get; set; }
}
public class CustomerDatabase : List<Customer>
{
public CustomerDatabase()
{
Add(new Customer() { CustId = 1, CustName = "Amit", Address = "AP Road", City = "Pune", Email = "a.b@ab.com", ContactNo = "1234567" });
Add(new Customer() { CustId = 2, CustName = "Ajit", Address = "BP Road", City = "Yavatmal", Email = "b.b@ab.com", ContactNo = "2234567" });
Add(new Customer() { CustId = 3, CustName = "Abhijit", Address = "CP Road", City = "Nagupr", Email = "c.b@ab.com", ContactNo = "3234567" });
Add(new Customer() { CustId = 4, CustName = "Sumit", Address = "DP Road", City = "Pune", Email = "d.b@ab.com", ContactNo = "4234567" });
Add(new Customer() { CustId = 5, CustName = "Sujit", Address = "EP Road", City = "Yavatmal", Email = "e.b@ab.com", ContactNo = "5234567" });
Add(new Customer() { CustId = 6, CustName = "Rohit", Address = "FP Road", City = "Nagpur", Email = "f.b@ab.com", ContactNo = "6234567" });
Add(new Customer() { CustId = 7, CustName = "Mohit", Address = "GP Road", City = "Pune", Email = "g.b@ab.com", ContactNo = "7234567" });
Add(new Customer() { CustId = 8, CustName = "Ranjit", Address = "HP Road", City = "Yavatmal", Email = "h.b@ab.com", ContactNo = "8234567" });
Add(new Customer() { CustId = 9, CustName = "Kuljit", Address = "IP Road", City = "Nagpur", Email = "i.b@ab.com", ContactNo = "9234567" });
}
}
{
public CustomerDatabase()
{
Add(new Customer() { CustId = 1, CustName = "Amit", Address = "AP Road", City = "Pune", Email = "a.b@ab.com", ContactNo = "1234567" });
Add(new Customer() { CustId = 2, CustName = "Ajit", Address = "BP Road", City = "Yavatmal", Email = "b.b@ab.com", ContactNo = "2234567" });
Add(new Customer() { CustId = 3, CustName = "Abhijit", Address = "CP Road", City = "Nagupr", Email = "c.b@ab.com", ContactNo = "3234567" });
Add(new Customer() { CustId = 4, CustName = "Sumit", Address = "DP Road", City = "Pune", Email = "d.b@ab.com", ContactNo = "4234567" });
Add(new Customer() { CustId = 5, CustName = "Sujit", Address = "EP Road", City = "Yavatmal", Email = "e.b@ab.com", ContactNo = "5234567" });
Add(new Customer() { CustId = 6, CustName = "Rohit", Address = "FP Road", City = "Nagpur", Email = "f.b@ab.com", ContactNo = "6234567" });
Add(new Customer() { CustId = 7, CustName = "Mohit", Address = "GP Road", City = "Pune", Email = "g.b@ab.com", ContactNo = "7234567" });
Add(new Customer() { CustId = 8, CustName = "Ranjit", Address = "HP Road", City = "Yavatmal", Email = "h.b@ab.com", ContactNo = "8234567" });
Add(new Customer() { CustId = 9, CustName = "Kuljit", Address = "IP Road", City = "Nagpur", Email = "i.b@ab.com", ContactNo = "9234567" });
}
}
public class DataAccess
{
public List<Customer> GetCustomers()
{
return new CustomerDatabase();
}
}
{
public List<Customer> GetCustomers()
{
return new CustomerDatabase();
}
}
}
Step 2: Enable attribute based routing in the RouteConfig.cs class file as explained above.
Step 3: In the Controller folder, add a new controller with the name CustomerController. In this controller, add an action method with the name GetCustomerByCity:
public class CustomerController : Controller
{
DataAccess objDs;
{
DataAccess objDs;
public CustomerController()
{
objDs = new DataAccess();
}
{
objDs = new DataAccess();
}
//
// GET: /Customer/
public ActionResult Index()
{
return View();
}
// GET: /Customer/
public ActionResult Index()
{
return View();
}
/// <param name="city"></param>
/// <returns></returns>
[Route("Customers/{city}")]
public ActionResult GetCustomersByCity(string city)
{
var customers = from c in objDs.GetCustomers()
where c.City == city
select c;
public ActionResult GetCustomersByCity(string city)
{
var customers = from c in objDs.GetCustomers()
where c.City == city
select c;
return View(customers);
}
}
}
}
As you can see, an action method GetCustomersByCity is applied with the Route attribute and a routing expression as Customers/{city}
Step 4: Generate View for the above action method and run the application. In the URL, put the following address:
http://MyServer:6764/Customers/Pune
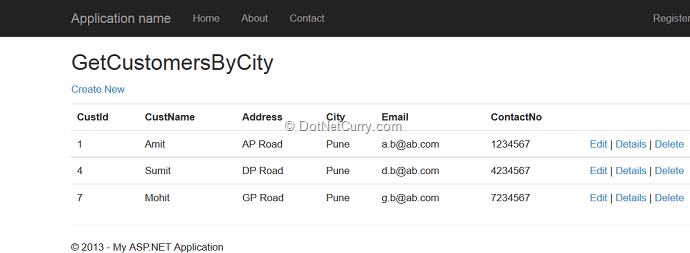
The routing expression Customers/Pune maps with Customers/{city} and the view will be as shown here:
Defining Optional parameter in the URI
The URI parameter can be made optional by adding a question mark (?) to the route parameter. An example of the action method with attribute routing and optional parameter is shown here:
/// <param name="city"></param>
/// <returns></returns>
[Route("Customers/All/{city?}")]
public ActionResult GetCustomers(string city)
{
//Check if the city is null or empty
//If the city value is entered the filter customers
//for that entered city
if(!string.IsNullOrEmpty(city))
{
var customers = from c in objDs.GetCustomers()
where c.City == city
select c;
return View(customers);
}
//else return all customers
return View(objDs.GetCustomers());
}
}
//else return all customers
return View(objDs.GetCustomers());
}
In the code we just saw, the GetCustomers action method is applied with an attributing routing as shown here: Customers/All/{city?}
Here the {city?} parameter with question mark is optional. After running the application, if the URL is entered as http://localhost:25418/Customers/All then all Customers will be displayed.
However if the URL is entered as http://localhost:25418/Customers/All/Nagpur then all customers only in Nagpur city will be displayed.
Defining the Default value for the URI Parameter
The default value for the URI parameter can be set using parameter=value. Here’s an example:
/// <param name="city"></param>
/// <returns></returns>
[Route("Customers/City/{city=Nagpur}")]
public ActionResult GetCitywiseCustomers(string city)
{
var customers = from c in objDs.GetCustomers()
where c.City == city
select c;
/// <returns></returns>
[Route("Customers/City/{city=Nagpur}")]
public ActionResult GetCitywiseCustomers(string city)
{
var customers = from c in objDs.GetCustomers()
where c.City == city
select c;
return View(customers);
}
}
The action method is applied with the attribute routing: Customers/City/{city=Nagpur}
The city parameter is set to the default value of Nagpur. After running the application, if the URL is specified as: http://localhost:25418/Customers/City, then all customers from Nagpur city will be displayed.
However if the URL is entered as: http://localhost:25418/Customers/City/Yavatmal, then all Customers from the Yavatmal city will be displayed.
Applying with RoutePrefix
Generally if routes in the action methods of the controller start with the same prefix, then we can apply RoutePrefix on the controller class as shown here:
[RoutePrefix("Customers")]
public class CustomerController : Controller
{
[Route("{city}")]
public ActionResult GetCustomersByCity(string city)
{
//Your code here
}
[Route("All/{city?}")]
public ActionResult GetCustomers(string city)
{
//Your Code here
}
[Route("City/{city=Nagpur}")]
public ActionResult GetCitywiseCustomers(string city)
{
//Your code Here
}
}
And with that, we saw how the new Attribute Routing feature in ASP.NET MVC 5 provides more control over a URI in our web application.
Filter Overrides
In previous versions of MVC, in order to override a filter for a single action or controller, you had to apply a filter for each and every action and controller, one by one. MVC 5 introduces Filter Overrideswhich is defined in the documentation as "You can now override which filters apply to a given action method or controller, by specifying an override filter. Override filters specify a set of filter types that should not run for a given scope (action or controller). This allows you to add global filters, but then exclude some from specific actions or controllers".
Let’s understand this better with an example. We know that Action filters in ASP.NET MVC define execution behaviour of the controller and/or action. Typically an Action filters such as Authorizerestricts the access of a controller or action method for an unauthenticated user.
Step 1: Open VS 2013 and create an ASP.NET MVC 5 application. To this application, add a class file with the name DataClasses.cs in the Models folder:
using System.Collections.Generic;
namespace MVC5_External_Auth.Models
{
public class Customer
{
public int CustId { get; set; }
public string CustName { get; set; }
}
{
public class Customer
{
public int CustId { get; set; }
public string CustName { get; set; }
}
public class CustomerList : List<Customer>
{
public CustomerList()
{
Add(new Customer() { CustId = 1, CustName = "C1" });
Add(new Customer() { CustId = 2, CustName = "C2" });
}
}
{
public CustomerList()
{
Add(new Customer() { CustId = 1, CustName = "C1" });
Add(new Customer() { CustId = 2, CustName = "C2" });
}
}
public class DataAccess
{
List<Customer> Customers;
{
List<Customer> Customers;
public List<Customer> GetCustomers()
{
return new CustomerList();
}
}
{
return new CustomerList();
}
}
}
Step 2: Run the application. Create two users of name User1 and User 2 in the application using the Register View.
Step 3: Add a new empty controller in the controller folder with the name CustomerController. Add the following code in it:
[Authorize(Users = "user1")]
public class CustomerController : Controller
{
DataAccess objDs;
public class CustomerController : Controller
{
DataAccess objDs;
public CustomerController()
{
objDs = new DataAccess();
}
{
objDs = new DataAccess();
}
public ViewResult Details(int id)
{
var Cust = objDs.GetCustomers().Where(c => c.CustId == id).First();
return View(Cust);
}
{
var Cust = objDs.GetCustomers().Where(c => c.CustId == id).First();
return View(Cust);
}
//
// GET: /Customer/
// GET: /Customer/
public ActionResult Index()
{
var customers = objDs.GetCustomers();
return View(customers);
}
}
{
var customers = objDs.GetCustomers();
return View(customers);
}
}
Note that the CustomerController is applied with Authorize filter and it is authorized for user1. This means that the controller can be accessed only by user1.
Step 4: Run the application, and in the URL type http://localhost:4403/Customer/Index. A login page will be displayed:

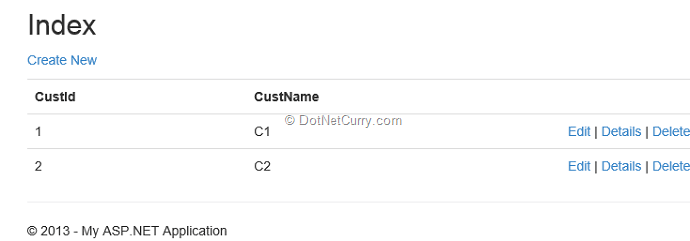
Here enter the user name as user1 and its associated password and the customer details will be displayed as shown:
In the above scenario, consider that you require authorization for all action methods in theCustomerController, except Details. This means that you have to apply the Authorize action filter on the CustomerController, but you want the Details action method to be an exception from using the Authorize filter. So to implement this, the Details method must override the filter applied on the Controller class. In ASP.NET MVC5, this is possible using OverrideAuthorization.
Step 5: In the application, add a new folder with the name CustomActionFilterOverride. Add a new class file of name CustomActionFilterOverride.cs. In the class, add the following code:
namespace MVC5_External_Auth.CustomActionFilterOverride
{
public class CustomOverrideAuthorizationAttribute : FilterAttribute, IOverrideFilter
{
public Type FiltersToOverride
{
get
{
return typeof(IAuthorizationFilter);
}
}
}
}
{
public class CustomOverrideAuthorizationAttribute : FilterAttribute, IOverrideFilter
{
public Type FiltersToOverride
{
get
{
return typeof(IAuthorizationFilter);
}
}
}
}
The class CustomOverrideAuthorizationAttribut is inherited from the FilterAttribute class and implements IOverrideFilter. This interface is used to define the filters applied on the controller. The property FiltersToOverride returns the IAuthorizationFilter type. This means that Authorize filter applied on the parent (controller or Global application class) will be overridden.
Step 6: Now apply this filter on the Details method of the controller class as shown here:
[CustomOverrideAuthorization]
public ViewResult Details(int id)
{
var Cust = objDs.GetCustomers().Where(c => c.CustId == id).First();
return View(Cust);
}
public ViewResult Details(int id)
{
var Cust = objDs.GetCustomers().Where(c => c.CustId == id).First();
return View(Cust);
}
Now run the application, and in address bar type URL ashttp://localhost:4403/Customer/Details/1. The details for the customer with id as 1 will be displayed without redirecting us to the login page.
Please note that there is a bug in the Filter Override feature (https://aspnetwebstack.codeplex.com/workitem/1315) which has been fixed in ASP.NET MVC 5.1.
And with that, we wrap up this journey of some exciting and new features in ASP.NET MVC 5.
Conclusion:
ASP.NET MVC 5 is the latest version of the popular ASP.NET MVC technology that enables you to build dynamic websites using the Model-View-Controller technology, with an emphasis on a clean architecture, test-driven development and extensibility. This article gave you a quick overview of what's new in ASP.NET MVC version 5 and how best to apply these new features in your projects.
No comments:
Post a Comment