This is the fourth part of the Angular Material series on CodingTheSmartWay.com. In this part we’ll be focusing on Data Tables. Of course this part again assumes that you’re familiar with the Angular Material library in general and that you know how to setup an Angular project and install the Angular Material library in that project. If you’re new to Angular Material please first take a look at the first part of this series: Angular Material — Part 1 Introduction or visit the Angular Material Website at https://material.angular.io .
If you want to learn about Angular Material Dialogs, Tooltips and SnackBars you should also check out the second part. For Angular Material Navigation elements (Menus, Sidenavs and Toolbars) check out the third part.
Let’s get started with part four. The following steps assume that you have already a new Angular 4 project set up and included the Angular Material library.
Getting Started With Angular Material Data Tables
Preparing The Project
To demonstrate the usage of data tables let’s first add a new component to the project by using the Angular CLI:
$ ng g component components/usertable
This command is generating the following new files in your project structure:
- src/app/components/usertable/usertable.component.css
- src/app/components/usertable/usertable.component.ts
- src/app/components/usertable/usertable.component.html
- src/app/components/usertable/usertable.component.spec.ts
Later on we’ll user usertable.component.ts and usertable.component.html to implement the table output. But before doing so, let’s first add service to our Angular application by using the following command:
$ ng g service services/user
This command is adding the following new files to the project:
- src/app/services/user.service.ts
- src/app/services/user.service.spec.ts
Next we need to import MatTableModule in app.module.ts. Add the following import statement:
import { MatTableModule } from '@angular/material';
Furthermore add the import statement for the Angular HttpModule to the top of that file:
import { HttpClientModule } from '@angular/common/http';
We’ll use the HttpClient service (which is part of HttpClientModule) in UserService to request user data from a web service.
Also add the modules to the imports array of @NgModule:
imports: [
    BrowserModule,
    BrowserAnimationsModule,
    HttpClientModule,
    MatTableModule
  ],
UserService need to be included in app.module.ts:
import { UserService } from './services/user.service';
To make this service available to all our components it needs to be added to the providers array of the @NgModule decorator as you can see in the following:
providers: [UserService],
Implementing UserService
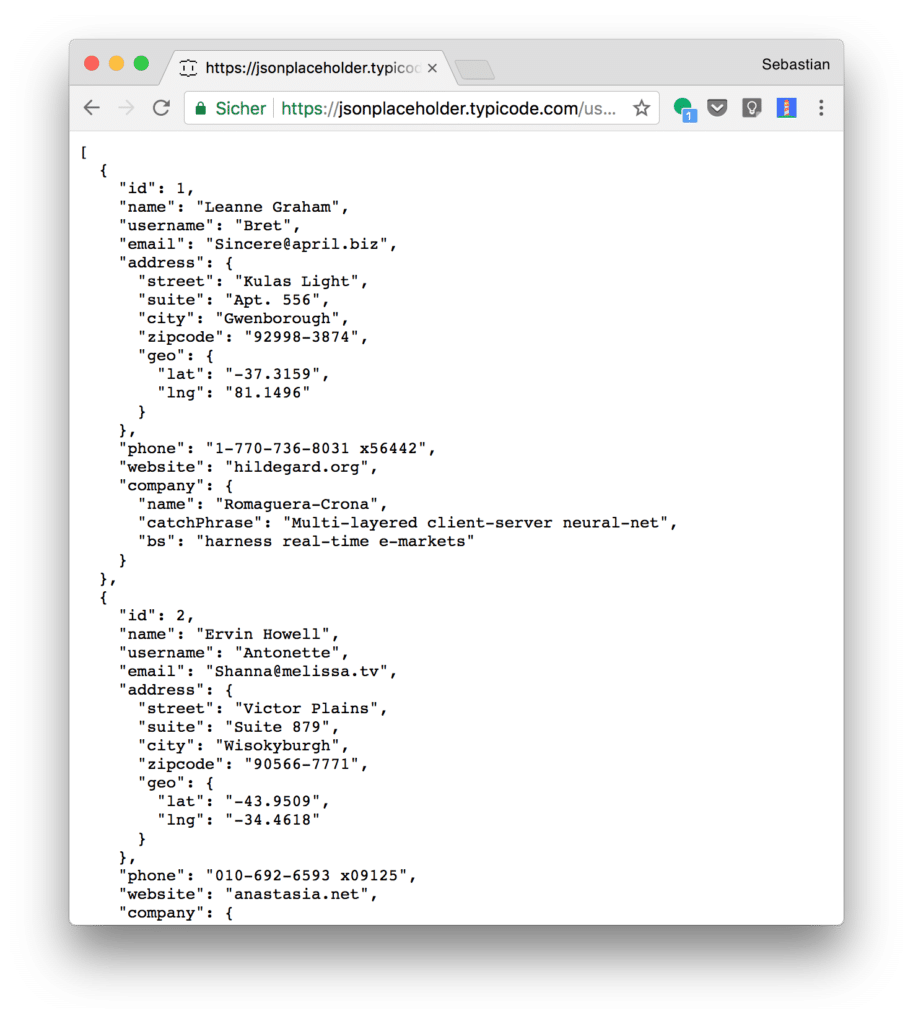
Before displaying data in an Angular Material Data Table we first need to retrieve that data. The data which we’d like to display are user records from web service https://jsonplaceholder.typicode.com/users. Opening this URL in the browser returns the user records in JSON format as you can see in the following screenshot:
To retrieve user data from that web service we’re implementing UserServicefirst. Insert the following code into file user.service.ts:c
import { Injectable }   from '@angular/core';
import { HttpClient }   from '@angular/common/http';
import { Observable }   from 'rxjs/Observable';
import 'rxjs/add/operator/map';
import { User } from '../models/user.model';
@Injectable()
export class UserService { private serviceUrl = 'https://jsonplaceholder.typicode.com/users';
constructor(private http: HttpClient) { }
getUser(): Observable<User[]> {
return this.http.get<User[]>(this.serviceUrl);
}
}
The is a typical Angular service. The Http service is injected into the service class and the getUser service method send a HTTP get request to the external service URL to retrieve the data. This methods returns an Observable of type User[]. User is a custom model class which is imported from src/app/models/user.model.ts. This file hasn’t been created yet, so we need to do that now. Create this new file and then insert the following code to make the User data type available:
export interface User {
    name: string;
    email: string;
    phone: string;
    company: {
        name: string;
    }
}
Implementing UsertableComponent
Next let’s add the implementation for UsertableComponent to our application. Start with inserting the following template code into file usertable.component.html:
<div>
  <mat-table [dataSource]="dataSource">
    <ng-container matColumnDef="name">
      <mat-header-cell *matHeaderCellDef> Name </mat-header-cell>
      <mat-cell *matCellDef="let user"> {{user.name}} </mat-cell>
    </ng-container>
    <ng-container matColumnDef="email">
      <mat-header-cell *matHeaderCellDef> E-Mail </mat-header-cell>
      <mat-cell *matCellDef="let user"> {{user.email}} </mat-cell>
    </ng-container>
    <ng-container matColumnDef="phone">
      <mat-header-cell *matHeaderCellDef> Phone </mat-header-cell>
      <mat-cell *matCellDef="let user"> {{user.phone}} </mat-cell>
    </ng-container>
    <ng-container matColumnDef="company">
      <mat-header-cell *matHeaderCellDef> Company </mat-header-cell>
      <mat-cell *matCellDef="let user"> {{user.company.name}} </mat-cell>
    </ng-container>
    <mat-header-row *matHeaderRowDef="displayedColumns"></mat-header-row>
    <mat-row *matRowDef="let row; columns: displayedColumns;"></mat-row>
  </mat-table>
</div>
Here we’re using the
<mat-table></mat-table> element to include the table from Angular Material library. The dataSource property of that element is bound to dataSource. dataSource is an Object of type DataSource which will be implemented in the next step.
For each table column the
<ng-container> element is used and the matColumnDef directive is applied. A string with the name of that columns is assigned to this directive.
Inside of the
<ng-container> element each column consist of- A
<mat-header-cell>element to which the *matHeaderCellDef directive is applied. This element contains the headline text which is displayed on top of the column. - A
<mat-cell>element which contains the content of the cell. The directive *matCellDef needs to be applied here and the string let user is assigned. By assigning that string we're making sure that we're able to access the current item from the data source via user.
The complete the template implementation we need to include two more elements before the closing tag
</mat-table>:- The
<mat-header-row>elements needs to be added and the *matHeaderRowDef directive needs to be added to this elements. This directive gets assigned a string which is containing the name of an array which contains the column names which should be displayed in the table. The displayedColumns array will be defined in the implementation of class UsertableComponent in the next step. - Second the
<mat-row>element is added and the *matRowDef directive is added.
Having implemented the template code we can now continue with the corresponding component class implementation in file usertable.component.ts:
import { Component, OnInit } from '@angular/core';
import { UserService } from '../../services/user.service';
import { Observable } from 'rxjs/Observable';
import 'rxjs/add/observable/of';
import {DataSource} from '@angular/cdk/collections';
import { User } from '../../models/user.model';
@Component({
selector: 'usertable',
templateUrl: './usertable.component.html',
styleUrls: ['./usertable.component.css']
})
export class UsertableComponent implements OnInit {
dataSource = new UserDataSource(this.userService);
displayedColumns = ['name', 'email', 'phone', 'company'];
constructor(private userService: UserService) { }
ngOnInit() {
}
}export class UserDataSource extends DataSource<any> {
constructor(private userService: UserService) {
super();
}
connect(): Observable<User[]> {
return this.userService.getUser();
}
disconnect() {}
}
First let’s take a look at the implementation of class UsertableComponent. The class makes use of UserService. The service is injected into the class constructor.
Two class properties are created:
- The dataSource members is initialized with a new instance of UserDataSource, a class which is created below. The UserService object is passed to the constructor of UserDataSource.
- The displayedColumns array which is containing the list of column names to be displayed
The class UserDataSource is created and extends DataSource<any>. This class is containing
- A constructor which takes the UserService object as a parameter
- Method connect which is calling the getUser service method and returning an Observable of type User[].
- Method disconnect
With that implementation in place the final result should look like you can see in the following screenshot:


This comment has been removed by the author.
ReplyDelete